RSS Feed

September, 2013

  1. Traditional Dundee Cake

    September 29, 2013 by sarah

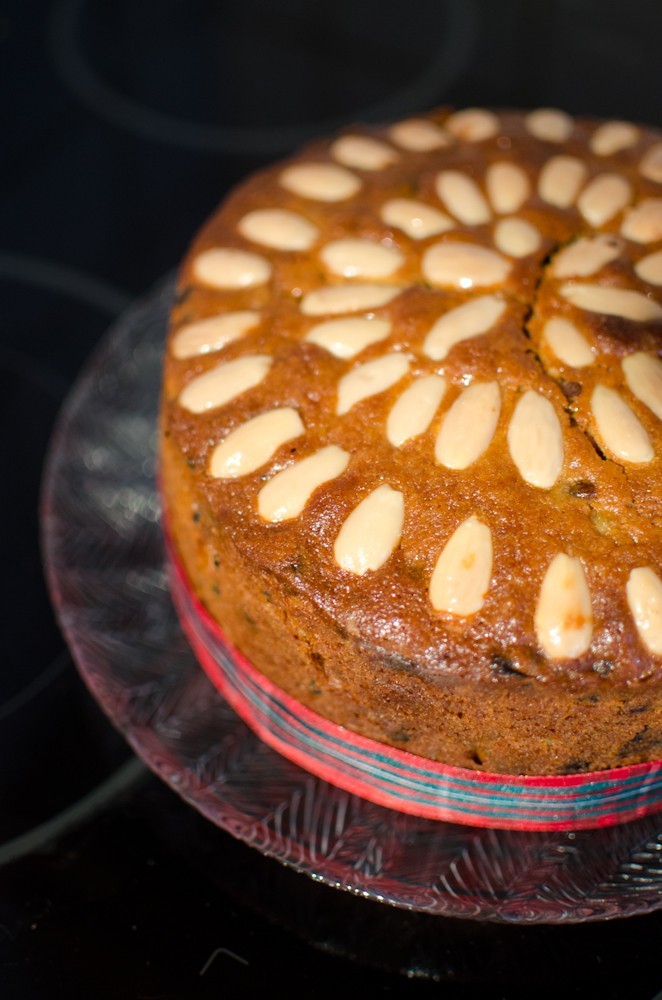
    This is a recipe for a traditional Dundee cake with a texture lighter and crumblier than the Christmas-type fruit cake and a lovely flavour.  It takes a while to bake during which it needs some attention but not constant.

    175g unsalted butter at room temperature/softened
    150g caster sugar or soft brown sugar, or mixture
    4 medium eggs (room temperature)
    250g plain flour
    1 tsp baking powder
    100g marmalade or apricot preserve (optional)
    350g of mixed dried fruit (currants and sultanas are traditional)
    50-100g glace cherries, rinsed, dried and cut in half
    50-100g mixed candied peel, finely chopped
    75g ground almonds
    finely grated rind of an orange
    1 tablespoon of whisky
    100g blanched almonds for the top.

    A day or two before you want to make this cake, weigh out the dried fruit and splash over some sherry, whisky or rum, cover with cling film and leave until ready to make the cake.

    Prepare the tin – this is very important as it will stop the cake from sticking and burning. Line a 20cm (7.5 to 8″) tin with a double layer of greaseproof paper, including the bottom, and grease well. Round the outside of the tin wrap folded over newspaper and tie with string to hold in place. Sit the prepared tin on more folded over newspaper on a baking tray. Preheat the oven to 170 degrees (150 if fan).

    Beat the butter and sugar in a bowl until very fluffy. Whisk in the eggs one at a time with a tablespoon of flour between each addition to prevent curdling (it will also help if the eggs are at room temperature). Now add the marmalade or apricot preserve if using and orange zest; make sure it is soft and bit on the runny side by whisking, possibly with the whisky, before adding to the mixture otherwise you will end up with lumps (see – this is what happened to me!).

    Now fold in the flour (reserving a couple of tablespoons – see next step), ground almonds and baking powder with a large spoon. The mixture at this stage should be stiffer than your average sponge batter, otherwise the fruit will sink.  That reserved flour, sprinkle it over the dried fruit and glace cherries (this stops them from sinking) then fold all the remaining fruity ingredients into the batter.

    Put the blanched almonds into a bowl and cover with boiling water while you spoon the mixture into the prepared cake tin, smooth the top and press a very slight concavity into the middle of the cake (so when it rises the top stays level). Drain the almonds and dry on kitchen paper. Next, arrange the almonds in concentric circles on the top of the cake, starting in the middle. Do not push them in when you do this otherwise they will sink into the cake while cooking.

    Make a foil hat that sits on top of the paper that surrounds the tin and put the tin in the oven, middle or bottom levels. It will need 2 to 2 and half hours, until a skewer comes out almost clean (err on the side of slight under doing as it will continue to cook for a bit as it cools and you don’t want a dry cake). Keep the hat on the cake until the last half an hour of cooking as this will stop burning and cracking.

    When you take the cake out of the oven, brush the top with a sugar syrup made from a tablespoon of water and a tablespoon of caster sugar and put back in the oven for 5 minutes to dry this then repeat the syrup but leave out of the oven. Leave the cake to cool completely in the tin. This cake keeps very well for a week or more in an airtight tin and the flavour improves after a few days. Enjoy!

    show (2 of 16)


  2. Perfect Shortbread

    September 25, 2013 by sarah

    Perfect shortbread – so simple it is hard! Who would of believed it? But I have found some simple tips that seem to make difference to create that perfect shortbread. Recipes from ‘Mary Berry’s Ultimate Cake Book’ (BBC Books, 2003) and ‘How to make perfect shortbread’ on The Guardian Word of mouth blog (http://www.theguardian.com/lifeandstyle/wordofmouth/2010/sep/30/how-to-make-perfect-shortbread). To me shortbread should be crisp but short and crumbling as the sand on Mull so it melts in your mouth and tastes of nothing but butter and the subtle sweetness of sugar. No fancy flavourings in this one!

    Use the best quality butter your can get i.e. the top shelf butter in the supermarket. You will REALLY taste the butter in this recipe so it must be good and not fridgey either. Handle it very gently using implements not a food processor or your hands. Refridgerate before cooking as with any pastry and do not over cook. It must be crisp but pale – the butter and sugar will make it colour easily so watch it like a hawk and I would recommend checking every 5 minutes maximum towards the end of cooking.

    150g unsalted butter, cut onto small pieces and soft

    75g caster sugar

    150g plain flour, ‘OO’ if you can get it

    75 rice flour

    good pinch of salt

    Use a wooden spoon to cream the butter and sugar together. Then use a fork to mix in the flours and salt. Pour the crumbs into a well greased loose bottom fluted pan of about 8″/20cm diameter. Gently pat down until all the flutes are equally filled.

    Refridgerate for 15 minutes or so. Bring out and prick all over with a fork and score into 8 wedges – in a pretty pattern if for a show.

    Cook at 170 degrees or 150 if fan oven, for 30-35 minutes, watching carefully towards the end so it stays pale. Bring out and remark the scoring before sprinkling with more caster sugar. Cool in the pan before removing for serving. The shortbread will last for several days in an airtight container – if you can resist eating it all in one go!

    An alternative way of shaping is to gently kneed the crumbs until they stick together and form a smooth dough which you can then press into the tin or roll out to make a large round or individual biscuits (bake on parchment). But I found this shortbread was not as crumbly melting as the former method, though the top was smoother which might be important in showing.

    show (12 of 16)


  3. Luscious Lilac Cake

    September 18, 2013 by sarah

    This is the cake that I entered in the ‘decorated sponge cake – max 8″ tin’ category. I am surprised it only came second – perhaps the judge didn’t know the skills that I was using to make this cake. Or perhaps it was too modern! I thought I was onto a sure winner but it shows how wrong you can be!

    show (8 of 16)I thought I’d share with you the thought processes that I put into creating something such as this. The first part is ‘the brief” which in this case is also very brief and doesn’t give much away as to what they are looking for so I needed some more information. I bought the ‘WI On With The Show’ book which is their handbook for showing. Now, although this local show is not an official WI show, after last years remarks from other competitors I felt that it would probably be best to stick to WI rules and to stick with traditional things (which I didn’t do in the end which was probably my downfall). In the book, there wasn’t a section on ‘decorated sponge’ only for ‘decorated sandwich cake’, though this specified only the top of the cake was to be decorated and both the decoration and cake are judged, no covering of sides with nuts, chocolate etc as this is a gateau, colour design and neatness are important and decorations should not be heavy.

    OK, so I now had some idea of what they might be looking for but when decorating I tend to just smear on some frosting or buttercream and dot with fresh fruit or strew with coconut or chocolate which obviously was not going to cut the mustard here. But must not forget flavour.  So I looked online and in my cake books so some inspiration and started to sketch a couple of ideas. The first idea was sugar fondant covered cake with either a painted surface (like this http://amelieshouse.blogspot.co.uk/2011/07/painting-on-cake-class.html) or traditional sugar paste flowers. Problem. I HATE sugar paste. So I looked at what other coverings could be used for cake and I found some ideas using buttercream covering. Perfect – I’ve made it made before and it is yummy too. I found in Pinterest some cake ideas (http://www.pinterest.com/kimmclain/cake-decorating-ideas/) and a vision appeared in my head one night when I was lying awake; lavender coloured buttercream covered cake of three tiers to get the right proportions, with a swirl of contrasting flowers and possibly butterflies.

    So next I was thinking how I could take the buttercream covering to a new level. I read about crumb coating and how to achieve a smooth finish and watched some YouTube videos on how to achieve this. I bought a straight sided scraper but held off buying a rotating cake stand. But I didn’t have time to practice before the day. The American websites were certain that you needed some vegetable shortening in the buttercream to get it firm but my first batch with shortening in was lumpy and tasted yucky! I had planned for the cake to be lemon sponge with a lemon curd filling and lemon essence in the buttercream but I forgot to add the lemon zest to the cakes so had to quickly revise the plan to old fashioned vanilla sponge with raspberry jam and butter cream filling and vanilla flavoured buttercream. Oops!

    The colour hasn’t come out quite right on the picture – it was a lovely old lady lilac-lavender colour, as I added Sugarflair ‘Grape Violet’ to the buttercream. I decided to go with contrasting plain white sugar paste flowers and a piped white royal icing beading around the base. So this cake showed skills in planning, design and execution of three major cake skills of smooth buttercream icing, sugar paste flowers and royal icing piping. What more did they want? Sadly they didn’t even cut into it to see the three layers.

    show (9 of 16) show (10 of 16)


  4. The jam line up

    September 15, 2013 by sarah

    These are the jams I entered in the show

    – bramble jelly – first place

    – strawberry jam – unplaced, comment it was too soft set

    – lemon curd – first place

    – sour cherry jam – first, made with delicious sour cherries from a tree in the back garden that I was considering chopping down

    – red gooseberry and elderflower – first, made with red gooseberries from the garden

    – whiskey marmalade – unplaced and I don’t know why

    – fig and apricot chutney – unplaced because presented in a kilner jar.

    show (16 of 16)


  5. Great British Bake Off …

    September 11, 2013 by sarah

    I have just had my own Great British Bake Off with the local WI at the Wigginton Horticultural Show … and look what I won! I am so chuffed with myself and though it was stressful at times, I thoroughly enjoyed learning new skills and trying out new recipes. I will share these recipes with you over the next few weeks, as I get time to post them. I certainly couldn’t of done it without having the Friday off work; as soon as I finished work on Thursday lunchtime, I didn’t stop until show set up time on Saturday morning. I still feel knackered.

    Out of 20 classes entered, I got 11 first places and 4 second places, which was enough to win me the Lady Hadden Challenge Cup for the person with the most points! I also scooped a cup for the best display of garden flowers in an unusual container (see the pink wellie boot) and a plate for the best wine in the show! I am on cloud nine now! My only slight disappointment is my eight plait loaf wasn’t even placed (the comment was it was ‘too Paul Hollywood’) and my beautiful decorated sponge came second (I am guessing it was too modern for the WI).

    _1SK3490

    show (6 of 16) show (7 of 16) show (16 of 16)


  6. I just had to share this with you…

    September 4, 2013 by sarah

    Please go to this website and have a look at the pictures… are these not the most beautiful food pictures you have ever seen? If the standard of mine ever gets close to this I will be very happy!

    http://www.jenniferfarleyphotography.com/

    Jen I think your photos are AMAZING!

    web-chocolate-espresso-cake_6990

    web-skillet-cornbread_6149