RSS Feed

Posts Tagged ‘eggs’

  1. Marshmallows

    May 31, 2016 by sarah

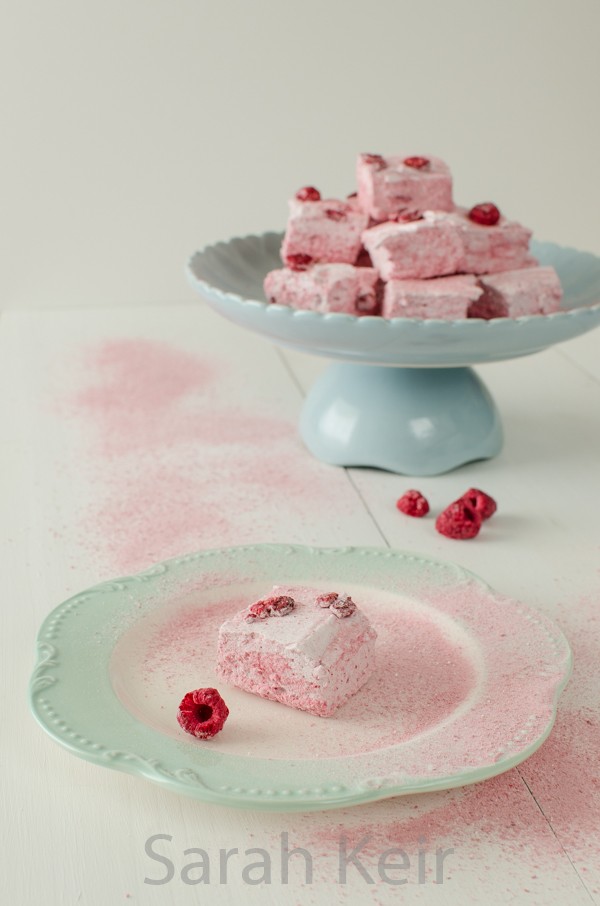
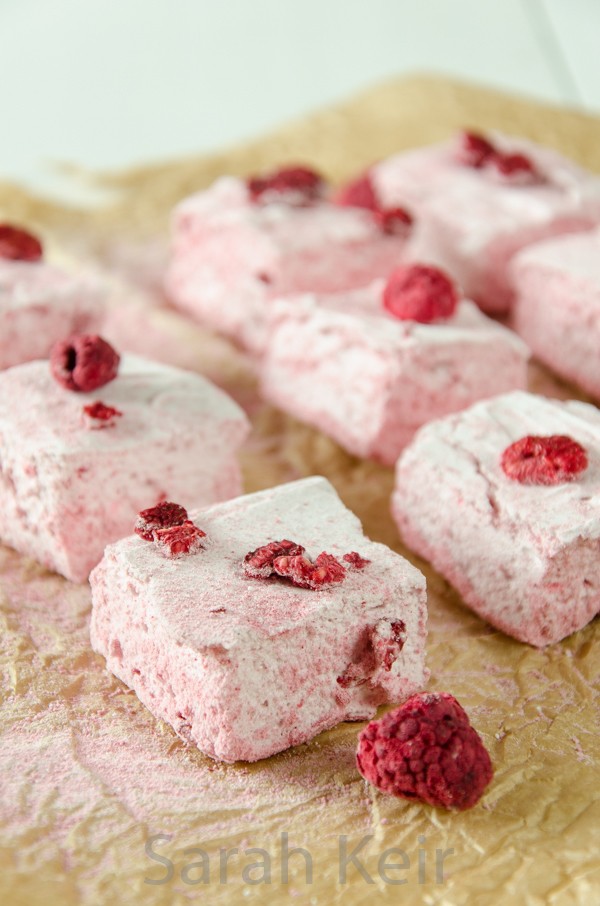
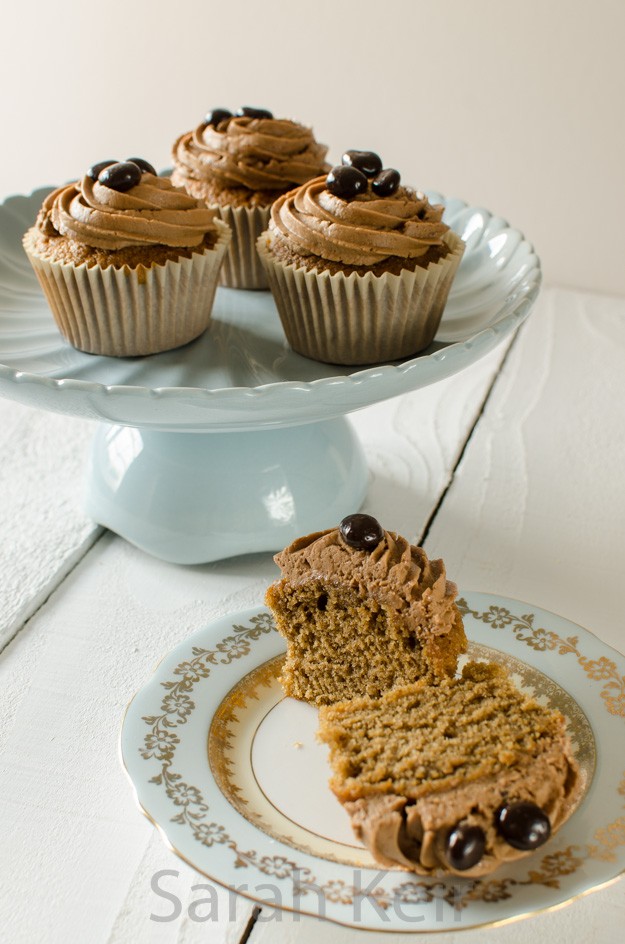
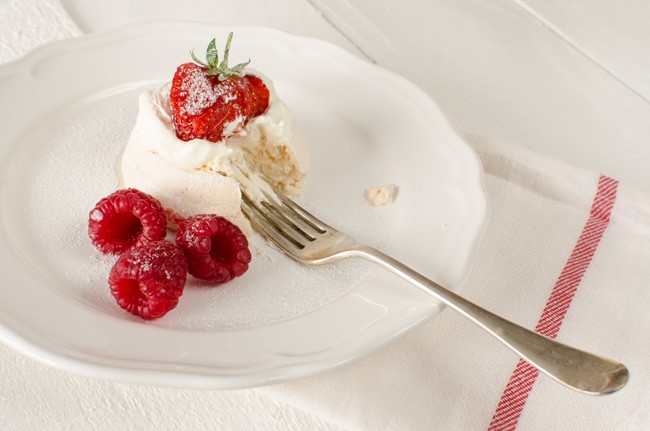
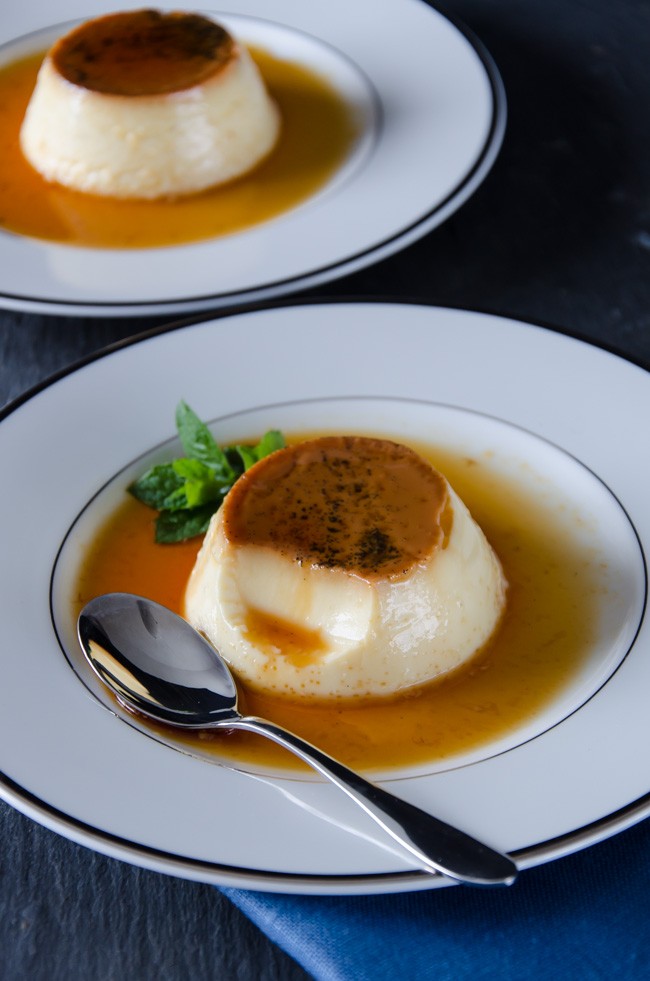
    I have to admit now, before we go any further, I do not like marshmallows. Except the seriously caramilised (burnt) type on the end of a stick and something to do with a camp fire – those I can take in small doses. But a raw bouncy, squidgy marshmallow just does not do it for me. They tend to be insipid in taste, overwhelmingly sugary and have the texture of a gymnastics mat. I even bought some expensive hand-made ones from La Pâtisserie de Rêves the last time I was in London – they were disgusting AND expensive! Not very promising for a weekend treat, I hear you cry! Well after having made them, my way, I may be converted… just a little. And they look very pretty!

    marshmallow-2


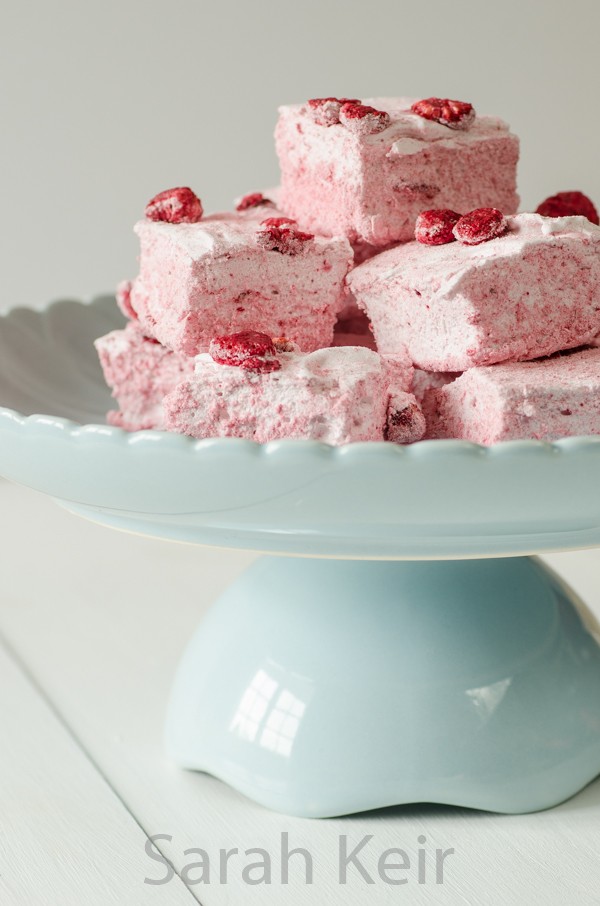
    Feel free to use whatever freeze dried fruit you can find. Most supermarkets sell some now but I get mine online from Healthy Supplies as they have a fabulous selection at good prices. I have been disappointed with the flavour of freeze-dried fruit in chocolate ganaches – it tastes kind of ‘green’ and not at all like the fruit it is supposed to. So these marshmallows are a good use of the freeze-dried fruit as the flavour is actually intensified in them.

    marshmallow-4

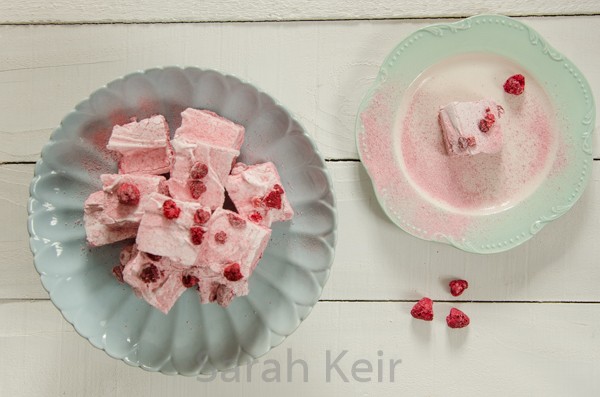
    Raspberry Marshmallows

    Makes lots (about 30 portions), takes about 30 minutes.

    Handful of freeze-dried raspberries
    3 tablespoons of freeze-dried raspberry powder
    2 tablespoons icing sugar
    2 tablespoons cornflour
    8 gelatine leaves
    450g granulated sugar
    1 tablespoon glucose syrup
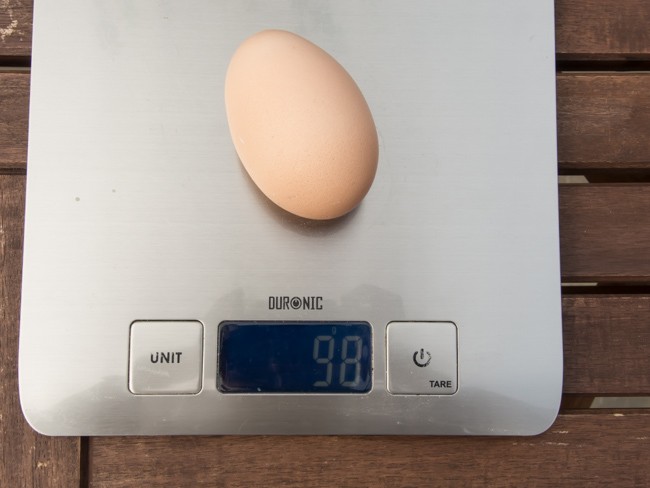
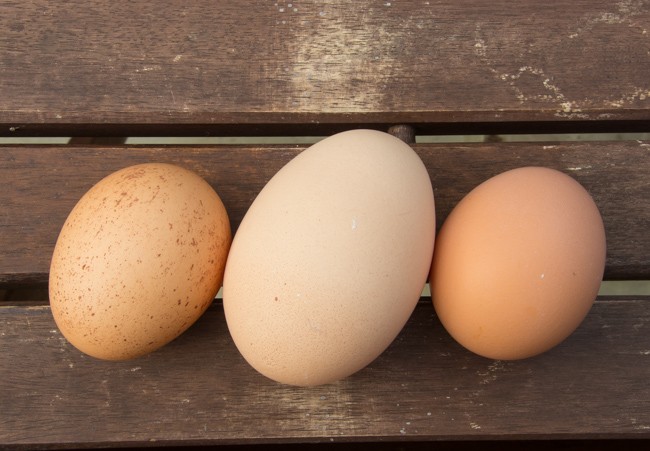
    3 large egg whites (about 120g)

    – Line the base a sides of a large roasting tin (about 20x30cm, but it doesn’t matter too much) with non-stick baking parchment.
    – In a small bowl, mix one tablespoon of the raspberry powder with the icing sugar and corn flour. Sieve half of this mixture into the base of the lined tin so it is evenly covered.
    – In another small bowl, sit the gelatine leaves in COLD water.
    – In a heavy based pan on a medium heat, heat the granulated sugar, glucose syrup and 150ml water, stirring until it is all dissolved. Bring this sugar syrup to the boil, do not stir any more and continue to boil until it reaches 116°C.
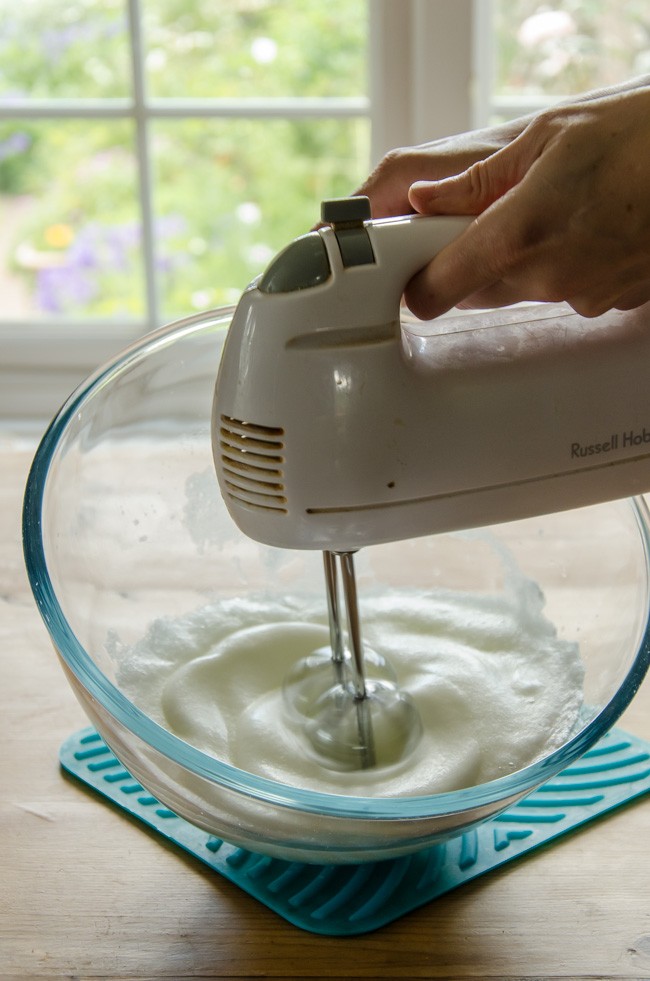
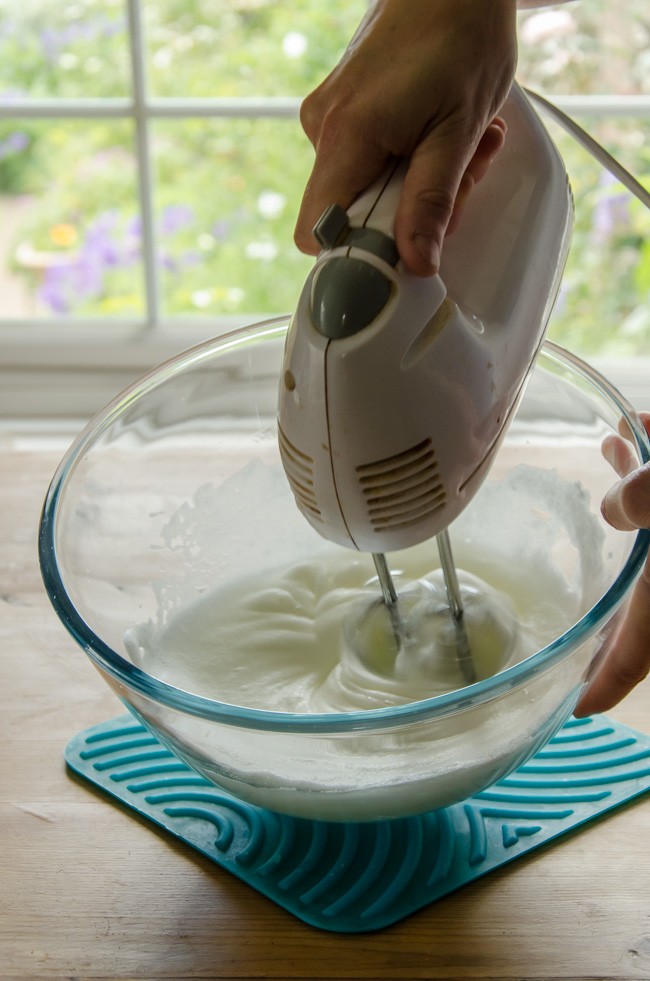
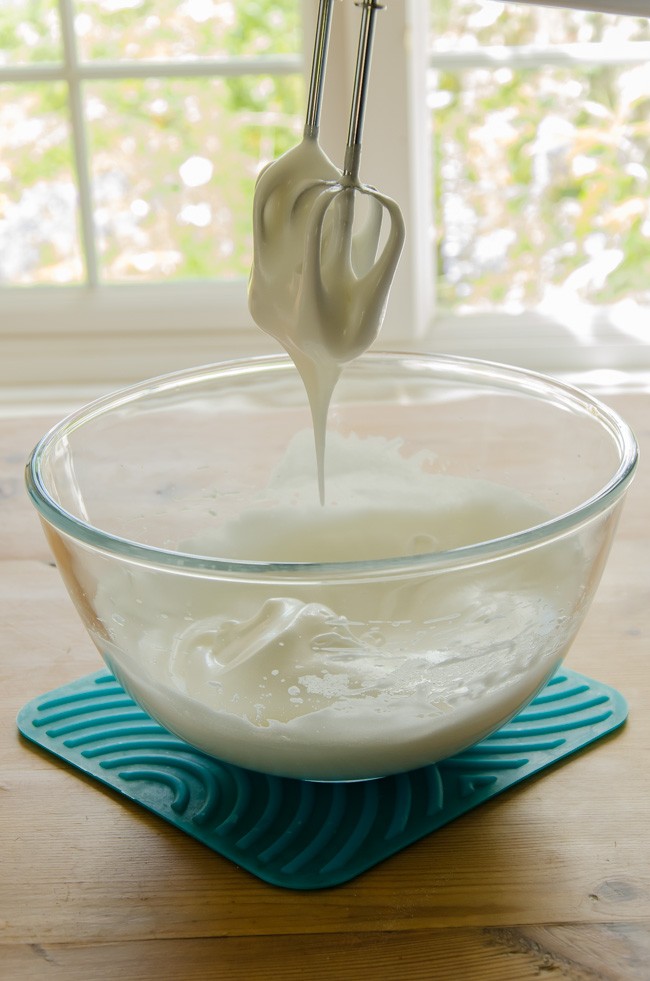
    – While the sugar is doing it thing, in a stand mixer, whisk the egg whites until they form soft peaks.
    – Once the sugar syrup reaches the correct temperature, take it off the heat and leave it to sit for a couple of minutes.
    – Remove the gelatine leaves from the water, squeeze out as much water as possible and pat dry with kitchen paper. Add the gelatine to the sugar and stir until melted.
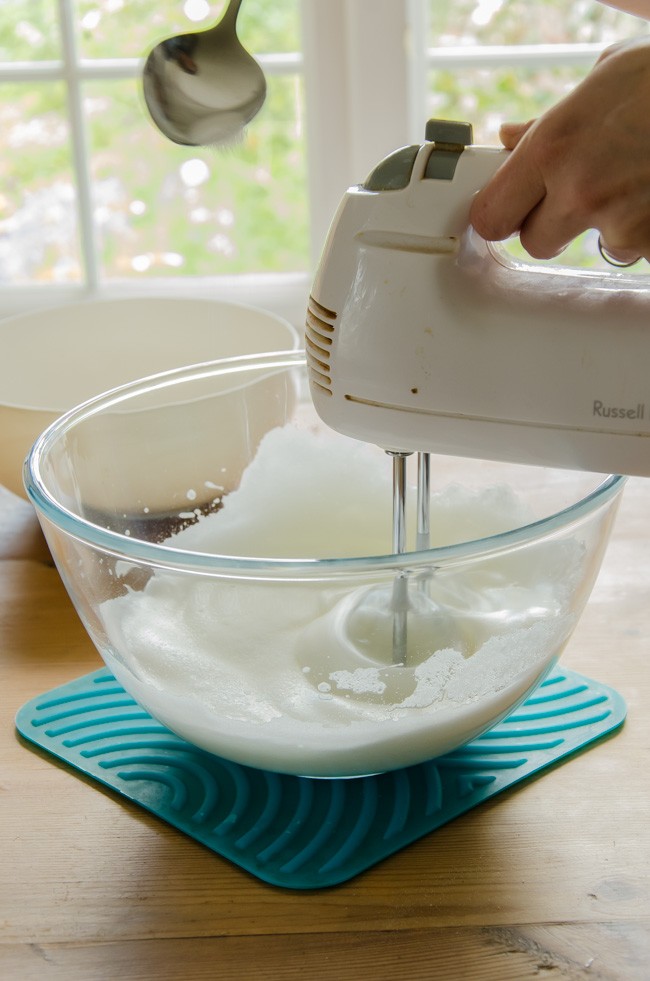
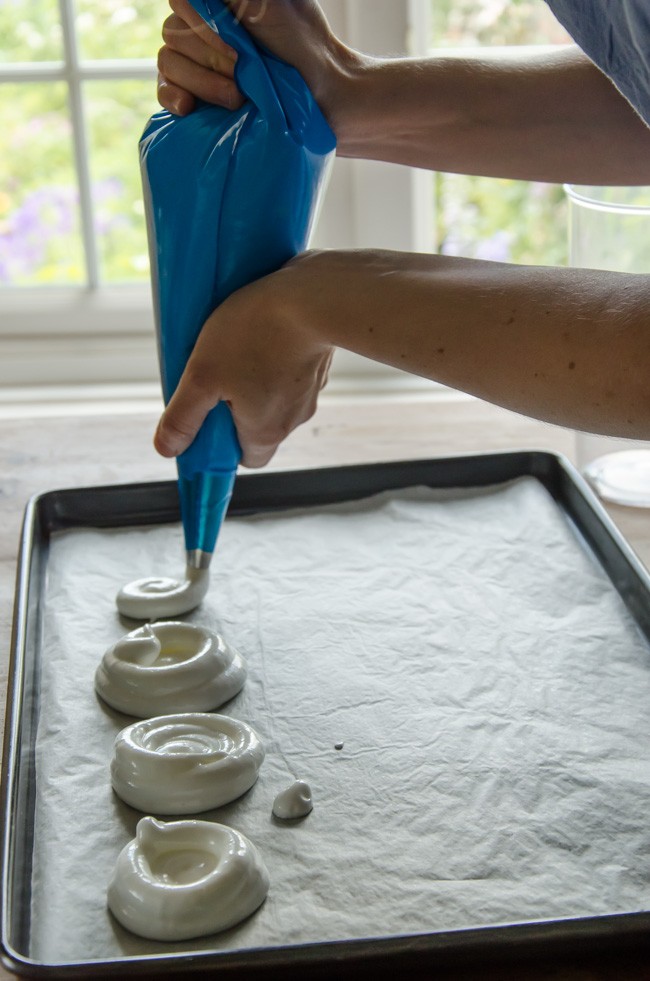
    – With the mixer on slow, trickle the sugar syrup over the beaten egg whites (try to miss the whisk otherwise it gets messy). Once it is all added, turn the mixer up to high and beat until the marshmallow is thick, light and cool to touch.
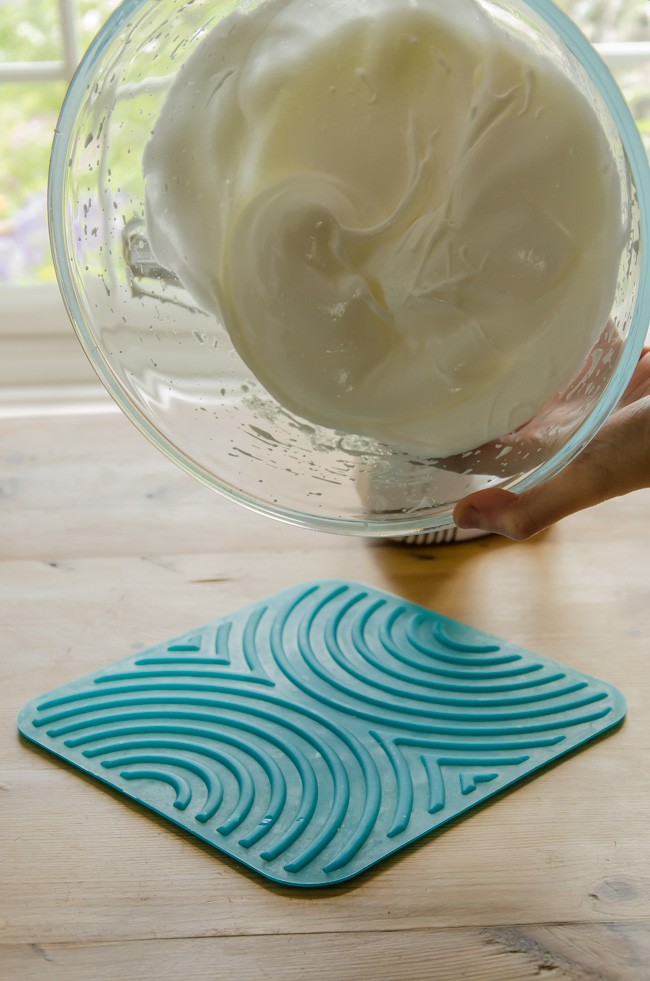
    – Add the rest of the raspberry power and whole raspberries.
    – Pour this into the prepared tin, tapping it flat, and leave to set overnight.
    – Cover a chopping board with non-stick parchment and sieve over the remaining powdered raspberry/icing sugar/cornflour mix. Turn the tray of marshmallow out on to this and cut into desired sizes, rolling in the dust as you go along.

    marshmallow-5 marshmallow-3 marshmallow


  2. Lemon & Blueberry Layer Cake

    December 12, 2015 by sarah

    I made this cake way back in the seemly long distant summer, for the tea party I held in our garden. Gosh, it seems so long ago that the sun was here especially as now the days are very short and what daylight there is is veiled in grey cloud and rain. I am dreaming of the lovely Ethiopian sunshine! Even my blue light therapy cannot dispel the winter blues!

    lemon-001


    But I chose to write up this recipe now as it has a sunny warm feeling about it. I wanted a light fruity cake to complement the heavier, richer cherry chocolate cake and lemon flavour always goes down well. And this cake ticked all those boxes; the light but flavourful sponge interspersed with bright bursts of blueberries, the bright sour flavour of the homemade lemon curd and the soft marshmallow of the Italian meringue topping enveloping the whole lot with a touch of caramel sugar where the blow torch caught as a foil against the floral tones of the elderflower. The list of ingredients and steps may seem an insurmountable hurdle but broken down into components, it really is not that a big a deal. You can make the lemon curd (you can find my fool-proof recipe here) a week or so in advance or buy a good quality one (I’m not judging). The cake layers (recipe adapted from here) can be made the day before and stored well wrapped in cling film. Only the assembly and meringue topping needs to be done shortly before eating. I was surprised by the keeping qualities of this cake. The meringue did weep terribly after about 12 hours but the syrup it produced kept the cake moist for several days!

    lemon-003


    If you have any lemon curd and meringue left over, you can easily make a form of lemon meringue pie – I made mini ones to have at the tea party. Marks and Spencer sell good quality ready made pastry shells which are so easy to use for this recipe.

    lemon-002

    Lemon & Blueberry Layer Cake

    Cake Layers
    230g soft unsalted butter
    250g caster sugar
    100g soft light brown sugar
    6 medium eggs
    1 tablespoon vanilla extract
    360g plain flour, sifted
    1 tablespoon baking powder
    1/2 teaspoon salt
    240ml buttermilk (or full cream milk with lemon juice added)
    zest and juice of 3 lemons
    275 of still-frozen blueberries, tossed in 2 tablespoon plain flour just before adding
    
    Filling
    Jar of lemon curd
    Some plain or lemon buttercream (100g butter, 200g icing sugar, a little milk if necessary)
    
    Italian Meringue
    300g caster sugar
    200g egg whites
    1/2 teaspoon cream of tartar
    1 teaspoon elderflower essence (I used Uncle Roy's, available here)
    
    Fresh blueberries for decoration.


    Preheat the oven to 180°C/160°C fan. Grease and line the base of three 9″ cake pans. It is easier to make this cake in a stand mixer, but it is perfectly possible to use a hand mixer or even entirely by hand.

    Beat the butter with paddle attachment until creamy. Add the sugars and beat until well creamed, scraping down the sides of the bowl as needed.

    Beat together the eggs and vanilla. Add to the butter/sugar mix a spoonful at a time with the beaters on medium, adding tablespoons of the flour if it looks like it is separating.

    Sift the dry ingredients (remaining flour, salt and baking powder) over the wet mixture, beat very slowly and then start adding the buttermilk, lemon zest and lemon juice. Do not over mix otherwise it will be tough – it is better to so the last bit by hand. Toss the blueberries into the flour and fold in. Spoon the batter evenly into the three prepared tins.

    Bake the three layers on the same shelf on the oven if possible and they will take 20-25 minutes, until a toothpick comes out clean. Remove from the oven, cool in the tins and do not proceed until they are completely cold.

    Stick the bottom layer of the cake to the serving dish with a blob of buttercream. Pipe a ridge of butter cream around the outer edge of the top of the cake layer – this is going to act as a dam to stop the lemon curd running out from the layers! Spoon the lemon curd into the centre, as much as you dare and then place the next cake layer on top and repeat the buttercream dam and lemon curd and then sit the final cake layer on the top.

    Make the Italian meringue by placing the sugar in a saucepan with 175ml water and bring to a rolling boil; place in a candy thermometer. Meanwhile, place the egg whites and cream of tartar in a stand mixer with the whisk attachment and beat to soft peaks. When the sugar syrup has reached 115°C, slowly trickle in down the side of the bowl of egg whites while they are going at high speed. Continue to whisk the meringue on high speed for about 10 minutes during which time it will thicken and cool but it is easier to use when still warm. Whisk in the elderflower essence if using and spoon into a piping bag. Use some of the meringue to cover the top first, smoothing with a spatula, then piping vertical lines (it is easier to go from bottom to top and it leaves nice spikes on top too) so that the whole of the cake is covered. If you have a blow torch then run it over the meringue to colour it. Dump some fresh blueberries on top, and an individual one on the top of each piped blob!
    lemon-004


  3. Cupcakes

    April 26, 2015 by sarah

    I have shied away from putting up a recipe for cupcakes so far as they seem to have had their time in the spot-light and are now considered ‘has beens’. I think this is rather harsh as a good cupcake is a lesson in portion control; no guessing how many the cake is supposed to feed and trying to gauge slice sizes. The key though is a GOOD cupcake. Far too often have I been tempted by the bling exterior of a coffee shop or market stall cupcake, just to be sorely disappointed by the dry, tasteless, overly sweet interior with far too much sweet, tasteless icing.

    cupcakes-001

    Coffee cupcakes with coffee flavoured Swiss meringue buttercream and decorated with chocolate covered coffee beans.


    But cupcakes do not need to be like this. For cupcakes to be a joy they must be freshly baked (no more than 24 hours old or they are too dry), as they come out of the oven liberally brush the top with appropriately flavoured sugar syrup, consider filling the centre with jam or fruit curd and consider the icing to be in proportion with the cake below (Swiss meringue buttercream is luxuriant but not too sweet). My favourite cupcakes that I make are a lemon sponge, doused with lemon syrup as they come out of the oven and then filled with lemon curd and topped with lemon cream cheese topping (half cream cheese, half butter, sweetened with a little icing sugar). Decorations should be simple but appropriate and are not the entire reason for a cupcakes existence. Go on, give cupcakes a second chance.

    comic relief-001

    Selection of different cupcakes I made for charity fund raising – lemon, strawberry, chocolate, coffee and almond amaretto.

    Cupcakes


    Makes 12 of larger/muffin sized cakes

    175g soft butter or margarine
    175g caster sugar
    3 medium eggs at room temperature
    175g self-raising flour plus 1/2 teaspoon baking powder
    or 175g plain flour with 2 teaspoons of baking powder
    2 tablespoons of milk
    flavourings – 1 teaspoon vanilla extract, or
    – zest of 2 lemons, or
    – replace 25g of flour with cocoa powder, or
    – replace the milk with 4 teaspoons of instant coffee dissolved in 2 tablespoons boiling water

    Preheat the oven to 180ºC/160ºC fan. Put cupcake cases into hollows of a cupcake tin.

    Put the butter/margarine into a large bowl with the sugar and cream together until light and fluffy.

    Add all the other ingredients in one go and beat on slow speed until mixed thoroughly and a smooth, thick batter is formed. I prefer to do the last bit by hand with a silicone spatula so that all the ingredients from the sides and bottom are thoroughly mixed in and the batter is not over mixed.

    Divide the batter between the cupcake cases – should come three-quarters full.

    Bake for 18-20 minutes, turning half way through cooking. Take out the oven and allow to cool for at least 15-20 minutes in the tin before turning out; this stops the paper cases pulling away from the cake.

    Prick the tops all over with a skewer and use a pastry brush to soak in sugar syrup.

    Sugar syrup – 5 tablespoons of water plus 75g sugar – place in a small pan and heat gently until the sugar is dissolved then allow to cool. Add flavourings – a split vanilla pod or for lemon replace the water with lemon juice. Will last up to a month in a sealed container in the fridge.

    cupcakes-002


  4. Lemon Curd Recipe (Yolks only) and Lemon Tart

    March 25, 2015 by sarah

    After making the Swiss Meringue Buttercream for the chocolate cherry layer cake, I had 4 egg yolks left over. The weather is too cold at the moment for ice cream (a good way of using egg yolks) so I searched for alternative uses for the yolks and came across some lemon curd recipes that just used the yolks. This recipe works well but I have say that since I have made lemon curd both ways, I prefer my lemon curd made with whole eggs as it is lighter in texture and richness. The upside is this recipe is it does not need sieving afterwards to remove the little lumps of firm egg white that inevitable form due to the whites cooking faster than the yolks.

    lemon curd-001


    With several pots of lemon curd in the fridge, I thought I would try making a lemon tart. I pre-cooked a couple of pastry cases (shortcrust or paté sucré) and then filled them with the fresh lemon curd. I tried caramelising the tops by sifting over some icing sugar and then browning under the grill – unfortunately all what happened was I burnt the pastry. But despite this the tarts were still delicious. Next time I will try topping them with some meringue for a lemon meringue tart.

    lemon curd-005


    I also must extol the virtues of a Microplane grater. Having struggled with all kinds of zesters and graters over the years, I gave in and asked for one for Christmas. And it truly does grate lemon zest faster and finer than anything else I have used. Try it for yourself.


    Yolk Only Lemon Curd


    4 egg yolks

    175g caster sugar

    100g butter

    zest and jiunce of 2 large lemons

    1/2 teaspoon lemon extract/oil

    In a heat proof bowl over barely simmering water, place all the ingredients. Stir until the butter is melted and then frequently stir until the mixture thickens. This takes 15 to 20 minutes. When thick enough to leave a clear path through the back of the spoon when a finger is drawn through, it is done. Pour into sterilised jars and leave too cool entirely. Refrigerate until needed but also freezes well. Eat within a couple of weeks.

    lemon curd-003 lemon curd-006


  5. Moist Lemon Bundt Cake

    January 25, 2015 by sarah

    lemon bundt-001


    My bundt tin was calling me from the cupboard and desired to be used. Ideally, I also had a glut of eggs last week and so this cake came about. The moist lemoniness was a great little January pick-me-up especially in the run up to the exams in a few weeks time. I also used cup measures for the first time as I had a folding cup measuring gadget as present from my Mum last year. Makes it easier with all these American recipes, though I have included usual metric measurements for the rest of the world.

    lemon bundt-004

    Moist Lemon Bundt Cake

    2 lemons, grated and juiced, zest sitting in the juice until ready to use
    340g (2 and 1/2 cups) plain flour 
    1 teaspoon baking powder
    1/2 teaspoon baking soda
    1 teaspoon fine salt
    200ml (3/4 cup) buttermilk
    5 medium eggs
    1 teaspoon vanilla extract
    200g soft margarine or butter
    200g (1 and 1/2 cups)caster sugar
    
    For the glaze - 3 tablespoons fresh lemon juice
                  - 100g (1/2 cup) caster sugar
    
    For vanilla icing - 120g (1 cup) icing sugar
                      - 1 teaspoon vanilla extract
                      - 2 tablespoons double cream or milk
    

    Preheat the oven to 160 ºC fan. Spray the bundt tin (10 cup size) with cake release and the dust the inside with flour, knocking out the excess.

    In a stand mixer with the flat beater, beat the margarine and sugar until light and fluffy.

    In a jug, beat the eggs with the buttermilk and vanilla extract. In a large bowl sift the flour, baking powder, baking soda and salt. Dump the egg mix, dry mix and lemon zest with juice into the stand mixer and start off slow speed to mix and then speed up to incorportate all, stopping and scraping down the sides a couple of times. Add some milk if it looks excessively stiff.

    Scrape into the prepared bundt tin so it is evenly distributed. Bake until the top is golden brown and a squewer comes out clean – about 45 minutes.

    While the cake is baking, combine the glaze ingredients, warming in the microwave to get the sugar dissolved if necessary. When the cake is done, allow to cool in the tin for 10 minutes so the sides shrink away and then turn out the right way up onto a cooling wrack. Sit the cooling wrack over a tray (carrying tray or cookie tray) and pour the glaze over the cake slowly so it sinks in. Scrape up excess glaze from the tray and pour over the cake; repeating until bored or the glaze sets.

    When the cake is entirely cool, mix the icing ingredients together (warm very briefly to achieve correct pouring consistency) then artfully drizzle over the cake. Serve!
    lemon bundt-003 lemon bundt-002


  6. Swiss Roll – Great British Bake Off Challenge

    October 25, 2014 by sarah

    After watching ‘The Great British Bake Off’ and lamenting the end of the current series, I decided to challenge myself to make something something from the series that I hadn’t attempted before. My husband always chuckles at me when we watch GGBO because I tend to make comments like ‘that’s wrong’, ‘that’s going to fail’, ‘I wouldn’t do it like that’ etc. However I don’t think anyone in the real world would make their own filo pastry – that is what machines with big rollers are for! On our honeymoon on Crete we did watch an eighty-odd year old man make and stretch filo pastry by hand over a huge wooden table in his bakery and it was a joy to behold. Anyone else though, just go to the supermarket!

    But back to the task in hand, in other words the Swiss roll. I have to admit that even I, a keen baker, has never made a Swiss roll before. Why, when Marks and Spencer make a perfectly good one in all yummy flavours. Well, I can tell you now (after the cake is made and entirely eaten) that homemade always tastes best; soft, moist and no nasty chemicals to make it stay that way for multiple weeks on a supermarket shelf! Have a go yourself.

    swiss roll-001

    This recipe is from ‘Merry Berry’s Ultimate Cake Book’ from BBC books. It worked great and I achieved that nice tight spiral – Mary Berry would be proud! Only thing wrong is that it stuck to the parchment paper as it cooled, despite generous liberations of caster sugar, so the skin partially peeled off. I fear I would of been marked down because of that.

    Swiss Roll

    Makes one Swiss roll – feeds 6-8
    5 medium eggs (weight 250g minimum) at room temperature
    100g caster sugar
    finely grated rind of 1 lemon
    100g self-raising flour
     
    4 tablespoons lemon curd
    100ml soft whipped double cream
     
    Preheat the oven to 220 ºC/fan 200 ºC.
    Line a 33 x 23 cm Swiss roll tin (I used a roasting tin of the same measurements) with baking parchment.
    Whisk the eggs, sugar and lemon rind in a large bowl until the ribbon stage (took me about 10 minutes with my hand mixer).
    Sift over the flour and then carefully fold in . Pour the mixture into the prepared tin and tip the tin so that the cake mix is evenly spread and reaches the corners.
    Bake in the preheated oven for about 10 minutes until the sponge is light golden in colour and beginning to shrink away from the edges of the tin, but be careful not to overcook otherwise it will dry out ande be impossible to roll.
    Place a piece of baking parchment a little bigger than the size of the tin on the work top over a tea towel. Sprinkle the paper with caster sugar.
    Invert the cake on to the paper while still warm, remove the paper it was baked in,  trim off the edges (a cooks perk – you get to taste it first) and score a mark 2 cm from the shorter edge, but do not cut all the way through. Roll up the cake firmly from the cut end and leave to cool rolled up.
    Only fill when completely cool. Unroll, spread with the lemon curd then the cream and roll up tightly again. Sit on the serving dish with the seam side downwards.
     
    swiss roll-004

  7. Rhubarb semifreddo

    July 3, 2014 by sarah

    Here is another recipe that uses up eggs. Can you tell that we have an egg glut at the moment? I also didn’t realise that chickens love rhubarb leaves. I wonder if it makes the eggs taste of rhubarb? Anyone noticed? Rhubarb leaves are supposedly toxic due the high levels of oxalates they contain, but either birds excrete oxalates in a different way to mammals or the chickens are slowly poisoning themselves. I have had to resort to netting the plants to prevent the chickens getting to them; for their sake and the poor rhubarb plants!

    This recipe is delectable, especially enjoyed on a lovely sunny evening like today. It tastes like rhubarb and custard in the most unctuous, dreamy state imaginable. Once served, it is cold but not icy like ice cream can be; all the better for taking large bites of. I like to serve this dessert with roasted rhubarb. Roasting the rhubarb means it keeps it shape and dries it slightly so it is not soupy like stewed rhubarb can be. Cut the rhubarb into 2cm lengths, lay single depth on a roasting tray or dish, sprinkle with caster sugar and roast in a medium oven for about 20-30 minutes. Enjoy!

    semifreddo-6911

    500g rhubarb
    120g caster sugar
    2 egg yolks
    2 tablespoons elderflower cordial
    250ml double or whipping cream
     
    Chop half the rhubarb finely and add to a pan with 100g of caster sugar plus the elderflower cordial. Bring to simmer and with lid off cook until very soft. Puree with potato masher or hand blender or pushing through a sieve. The other half of the rhubarb cut into 2cm lengths and arrange in singe layer on a baking dish, sprinkle with couple tablespoons sugar, cook in oven until soft (about 180 C for 3o-40 minutes). Leave to cool and then store in a ceramic or glass dish in the fridge until ready to serve the semifreddo.
    Make the sabayon base: in bowl over a pan of gently bubbling water, whisk the egg yolks and 20g caster sugar until light and fluffy and pale. They should triple in volume. Take off heat and allow to cool.
    In another bowl whisk the cream to soft peaks then fold in the pureed rhubarb and sabayon.
    Line a 2 lb loaf tin with two layers of cling film. Pour in the creamy mixture. If you have left over meringues or almond biscuits, crumble over the top. Fold over the cling to seal the surface of the semifreddo and place the tin into a carrier bag. Put in the freezer for at least 4 hours, ideally over night. When you want to serve, put the tin in the fridge for half an hour, turn out onto a plate and serve with the roasted rhubarb.
    semifreddo-6913

  8. Meringue nests – Uses for eggs!

    June 15, 2014 by sarah

    Meringue. A word that can instill fear into the heart of even the most experienced cook. Sometimes it works and sometimes it doesn’t and usually you can never work out why. But understanding more about eggs and the chemical reaction that makes meringue can help demystify it and hopefully prevent so many failed egg dishes. Though I can knock out a batch of meringues without much thought, I still get some disasters though they always taste better than they look! A meringue is never a failure, you might just have to opt to serve Eton mess rather than neat nests. There is nothing better than sweet meringue, smooth and silky cream and tart berries.

    meringues (7 of 9)

    Eton mess

    meringues (8 of 9)

    Strawberry meringue nest

    Egg whites consist over 90% water and various proteins make up the rest. When you whisk egg whites, you are breaking down the protein structure so that the protein strands lengthen and air bubbles become entrapped within this lattice structure. When whisking egg whites it is very important to have scrupulously clean bowl and whisk. I prefer a metal or bowl as it is supposed to help the egg whites trap more air or if using a glass bowl, I clean it first with kitchen paper with a little vinegar and left to dry. It is also very important not to get a single speck of egg yolk in with the whites so it is a good idea to break the eggs individually into a small bowl before adding the whites to your larger bowl to avoid messing up the whole lot. A drop of lemon juice or a pinch of cream of tartar is often added to the egg whites at the start of beating as it is supposed to help stabilise the bubbles. This is unverified; I think I need to do more experimentation to see if it makes a noticeable difference. Very fresh eggs whisk the best as the white is firm and not runny. This is part of the reason why I got chickens of my own. Interestingly, fresh eggs make awful hard boiled eggs as they are impossible to peel! Remember that eggs you buy in the supermarket will probably be at least a week old by the time you buy them and the ‘best before date’ will be up to 5 weeks after they were laid!

    When you start whisking eggs, start on a slow speed for a minute or so before increasing the speed. The soft peak stage, as used for souffles and mousses, occurs when you lift the whisk out of the egg whites and the peak slowly folds over into the mixture. The bottom of the bowl may feel slightly liquidy and slip around the bowl. The stiff peak stage happen fairly soon after so keep watching and testing. Egg whites beaten to this stage are used for meringues and you can tell when you have reached this stage as the peaks when you lift out the whisk are firm and do not sag. Also the whole bowl should be whisked to the same stage so at firm peak stage you should be able to turn the bowl over your head and not get a santa hat of egg whites! To prevent meringues from weeping when cooking, you must make sure the sugar is thoroughly dissolved in the egg whites and that you use very fine sugar.

    I don’t know if equipment matters too much when whisking meringues; after all, it used to be done with a hand whisk. Think of those muscles! I use a handheld machine but would love a stand machine, especially if it came with whisk attachments rather than the all purpose ones I currently have. I am not sure it would make a huge difference to my meringues, but there is only one way to tell! I do put a silicone mat under the bowl as I whisk to prevent the bowl from spinning off the counter.

    There are three types of meringues and I will give the recipe for simple ones below. Swiss meringues are probably what we are all familiar with. The egg whites are beaten to soft peak stage, half the sugar is added and whisking continues until stiff peaks are achieved and the mixture is glossy; then the rest of the sugar is folded in. This mixture is suitable for simple piping like the nest I made for the afternoon tea or pavlova layers or toppings for pies, but it must be used quickly other it turns back to liquid. Italian meringue is made by adding hot sugar syrup to whisked egg whites and whisking until cool. This meringue is more stable and is the best choice for piping delicate items. Cooked meringue, also known as meringue cuite, is made by whisking the egg whites with the sugar in a bowl over boiling water and this is the most stable type of meringue.

    One final note on making meringues and that is you MUST use baking parchment, also known as silicone paper, to line the trays. Greaseproof paper has a wax coating that resists water so is used for wrapping and layering food and with sticky food like dough, but the coating melts in the oven so the food then sticks to it unless you pre-grease it like for a sponge cake. Baking parchment has been treated so that the non-stick properties do not disappear in the heat of the oven; essential for high sugar foods such as meringues, macaroons and even sponge cakes that you do not pre-grease the paper lining the tin such as genoese sponge.

    meringues (9 of 9)


    Simple Meringue Recipe

     
    4 large egg whites, cold from fridge – about 120-150g of egg white if mixed egg sizes
    pinch of cream of tartar
    225g caster sugar
     
    Preheat the oven to 110 ºC/ fan 100ºC and line a couple of baking trays with baking parchment/silicone paper.
    Tip the egg whites into a large bowl and whisk on slow speed until foamy and then add the cream of tartar. Continue to whisk on medium speed until soft peaks are reached and just turning to stiff ones.
    Turn the speed up and add the sugar a dessert spoonful at a time, beating for 3-4 seconds between each addition.
    Once half of the sugar has been added and the egg whites are glossy, add the rest of the sugar in one go and beat for a few seconds more until well mixed and not granular when touch between you fingers. But try to resist over beating. If you over beat, put in the fridge until cold again and try again. Theoretically you should fold in the last half of the sugar but I find it doesn’t mix in well so you get sugar bleeding in the finished meringue or to fold it in well enough the mixture becomes deflated and becomes sloppy.
    Pipe or soon the mixture on the lined baking trays – you can only manage rough shapes with this type of meringue.
    Bake for about 1 and half hours. I cook for an hour then prop the oven door open and let them cool in the oven and this leaves the meringues with a soft, chewy centre. If you like them dry all the way through then cook for the full 1 and half hours at least.
    When cool, they can be stored in an airtight container for up to 2 weeks, or frozen indefinitely.
     
    meringues (1 of 9)

    Step 1 – whisk egg whites to soft peak stage.

    meringues (2 of 9)

    Step two – make sure you move the beaters around the bowl.

    meringues (3 of 9)

    Step three – add the sugar a spoonful at a time.

    meringues (4 of 9)

    Step four – keep beating until stiff and glossy.

    meringues (5 of 9)

    See – stiff peaks, shouldn’t slide out the bowl.

    meringues (6 of 9)

    Step five – pipe as required on to baking parchment.


  9. What to do with all those eggs? Recipe for Creme Caramel

    June 10, 2014 by sarah

    There once was three chickens
    Called Mrs Red, White and Blue,
    They laid so many eggs
    I didn’t know what to do,
    So I made some meringues,
    Ice cream and creme caramels,
    That used up lots of eggs
    And then all was well.
     
    _1SK6838

    Mrs Red, White and Blue enjoying the sun in the garden.

    _1SK6857

    Mrs Red enjoying rhubarb leaves.

    My girls are currently on full steam with the egg laying. Which means I get at least two eggs every day and three eggs most days so a potential of about 20 eggs a week. Even with selling a box or two at work, it still leaves a lot of eggs for eating! Many are eaten at breakfasts, lunches or light dinners as boiled, poached, scrambled or baked eggs with various accompaniments but this usually leaves a box or two of eggs and me wondering what to do with them. So here is my go to list for inspiration when there are eggs to use and cooking to be done. If I spy a recipe I want to use that uses yolks, I make sure I also have an egg white recipe in mind, and visa versa, though egg whites do freeze well if necessary.

    Savoury
    –          omelette
    –          Frittata/tortilla
    –          Quiche/tarts
    –          Soufflés
    –          Mayonnaise, hollandaise sauce
     
    Sweet – whole eggs
    –          Sponge cake especially Genoese sponge/swiss roll/roulade
    –          Clafoutis
    –          Choux pastry e.g. profiteroles
    –          Pancakes/crepes
    –          Cheesecake
    –          Lemon tart
    –          Bread and butter pudding
    –          Custard Tart
     
    Sweet – whites
    –          Meringue, pavlovas
    –          Angel food cake
    –          Macaroons, of various types
    –          Mousses and soufflés
     
    Sweet – yolks
    –          Lemon curd
    –          Gateau Breton
    –          Custard/creme anglais – therefore accompaniment to stewed fruit or a steamed pudding and of course, the base for making
    –          Ice cream
    –          Crème patisserie – filling for fruit tarts or a base for trifles


    _1SK6809

    Lovely bowl of fresh eggs.

    And now for the recipe – a delectable smooth and creamy favourite – creme caramel. When homemade, it is a million miles away from the insipid stuff in pots in the supermarket or even the ubiquitous pudding option in any food establishment pertaining to be remotely French. It works because the creamy coolness of the just set custard is counter balanced by a caramel that is a bit acid or tart so you must get enough colour on the caramel to get that.

    _1SK6775 _1SK6779

    Creme Caramel

     
    500g milk (whole milk ideally or fat reduced milk with splash of cream, though I have used semi-skimmed and it turns out fine)
    1 vanilla pod
    4 medium eggs
    50g sugar
     
    Caramel – 50g sugar
     
    Put the milk into a non-stick heavy based pan, split the vanilla pod and add the seeds and empty pod to the milk and bring to the boil. Remove from the heat and leave to infuse until ready to use. Heat oven to 150 C/fan 120 C.
    Make the caramel by heating the sugar with 1 tablespoon of water in a heavy bottomed pan over a medium heat. If the sugar is crystallising around the edge of the pan, wipe around the edge with a silicon pastry brush dipped in water. Continue to bubble until a deep golden colour is reached and then pour the caramel directing into the bottom of 4-5 ramekins. Watch out as hot sugar is very hot and will burn. Allow to cool then grease the insides of the ramekins with a little butter.
    In a bowl whisk the eggs and remaining sugar until combined but do not continue to whisk (adding air bubbles at this stage will put air bubbles in your creme). Strain over the infused milk and whisk in. Strain this egg and milk mixture into a jug and use to fill the moulds evenly.
    Sit the moulds in a roasting tin and pour boiling water around the outside until comes half way up ( a bain marie – lovely name, means Mary’s bath) and cook in the preheated oven for 30-40 minutes until just set (should still wobble a little). Take out of the water and allow to cool entirely and then refridgerate before unmoulding. To unmould, run you finger around the top of the custard to prise it away from the ramekin, sit the base of the ramekin in hot water for 30 seconds then up end over a plate. Serve immediately as the caramel will lose its colour.
     
    _1SK6795

  10. Monster Egg

    May 17, 2014 by sarah

    When I opened the nest box today, I could not believe the egg that was there – a monster. I know this must be Mrs White’s egg as the other two are pullets so are laying medium sized eggs at present. This one though weighed a whopping 98g! Here they are enjoying the freedom of the garden before they started digging up my veggie beds.

    egg (1 of 3) egg (2 of 3) egg (3 of 3)