-
December 29, 2013 by sarah
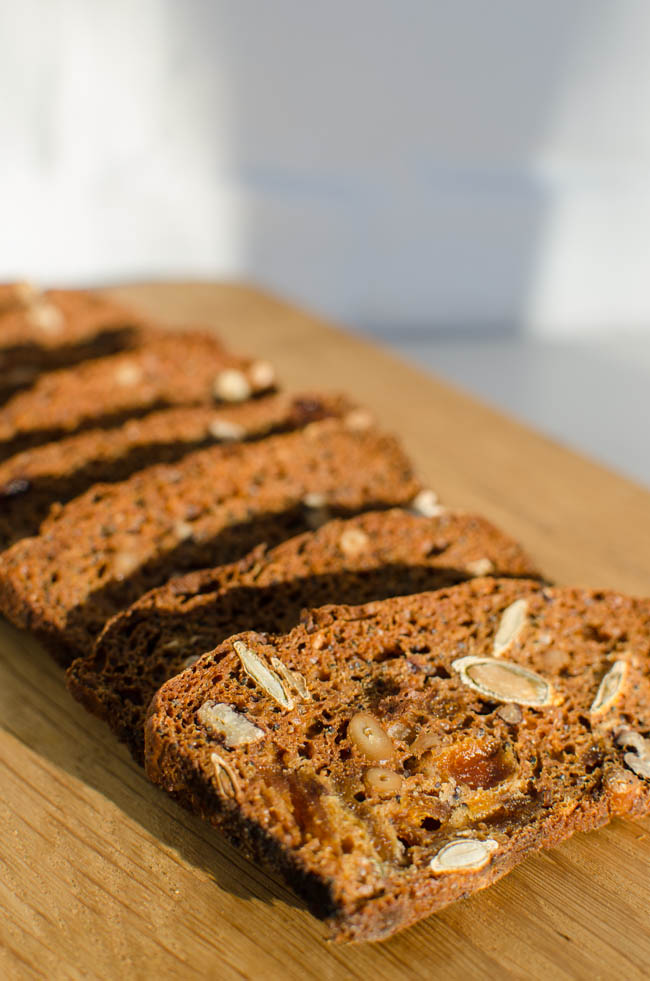
I made these to go with the cheese board over Christmas. If you know me, you how much I love cheese. But now I have found a recipe for crackers that are good enough to eat in their own right rather than just being a token apparatus to get cheese to the mouth!
The original recipe is here on ‘theKitchn’ and seems to be very adaptable and forgiving. I don’t normally cook by cup measurements as it doesn’t seem accurate enough for baking (and I don’t own a cup measure) but I used a small plastic cup as the measure and got stuck in. The recipe is based on soda bread. I shoved in some dried apricots and a mix of nuts and seeds as I didn’t have enough of any particular one and the only brown flour I had in the house was strong bread flour. AND they still came out fantastic. I still have one of the loaves in the freezer for another round of crackers when I feel like it! Brill!
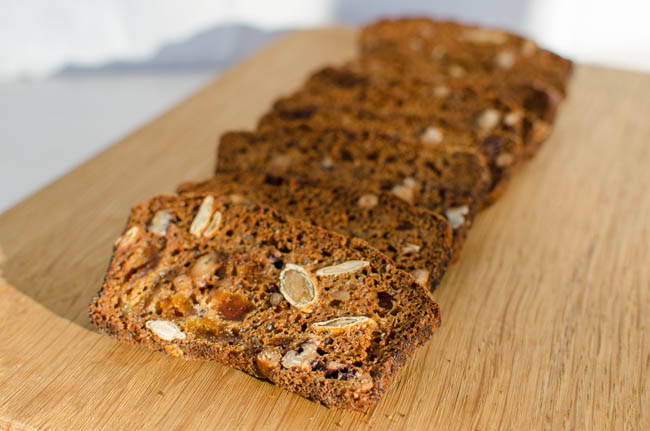
1 cup dried fruit e.g. cranberries, apricots, dates, raisins
3/4 nuts e.g. pecans, walnuts, hazelnuts
1/2 cup mixed seeds e.g. pumpkin, sunflower
1 cup plain flour
1 cup whole wheat, rye, spelt or other whole-grain flour
1/3 cup soft brown sugar
1 tablespoon herbs e.g. rosemary or thyme
2 teaspoon bicarbonate of soda
1 teaspoon of salt
2 cups milk with 1/2 teaspoon of lemon juice added, leave for 10 minutes
Preheat oven to 180 °C or 160 °C if fan. Grease two loaf tins.
Place the dried fruit in a small bowl and pour over very hot water from the kettle. Allow time to plump up while you get the other ingredients together.
Toast the nuts in the oven until golden brown and fragrant and then roughly chop. Set aside.
In a large mixing bowl, whisk the flours, herbs, bicarbonate of soda, salt and sugar. Pour over the buttermilk and stir together with a spatula until no dry mixture remains but do not continue mixing beyond this.
Drain the dried fruit and if using a large fruit such as apricots or dates, roughly chop. Add the fruit with the nuts and seeds to the batter, stir gently to mix. Do not be worried if your batter look very liquid at this stage.
Divide the batter evenly between the two loaf tins, place on a baking sheet and put in the oven for about 30 minutes, until a skewer comes out clean.
Remove the cakes from the pans and allow to cool completely on a cooling rack. Then wrap in cling or greaseproof paper, put in a freezer bag and pop in the freezer until you are ready to do the next stage, but they need to be frozen for at least 4 hours before they are firm enough to cut thinly.
When you are ready to turn the cakes into crackers then preheat the oven to 150° C. Remove one of the loaves from the freezer and unwrap. With a very sharp knife, slice as thin as possible. Lay the slices out on baking trays so they are one layer thick.
Bake the slices for 15 minutes, turn the slices over and continue cooking for another 10 minutes or so. They should now have turned a darker colour, be starting to curl at the edges but not blacken. Do not worry if they are still a little soft in the centre as they will firm up when you cool them on a cooling rack. Store in a airtight tin until ready to be eaten.
Category Home, Recipe Index | Tags: bake cake,baking,bread,cheese,cracker,fruit,other,soda bread | No Comments
-
December 28, 2013 by sarah
I bought these quinces a few weeks ago at the Waddesdon Christmas food fair. They had been sitting in the fruit bowl, staring at me, taunting me, ‘go on then, you bought me, now cook me’! Everything I read said they were devils to cook; impossible to peel and needing long slow cooking otherwise they would stay rock hard and inedible but that the pleasures would more than overcome any trials in cooking them, in fragrance and flavour.
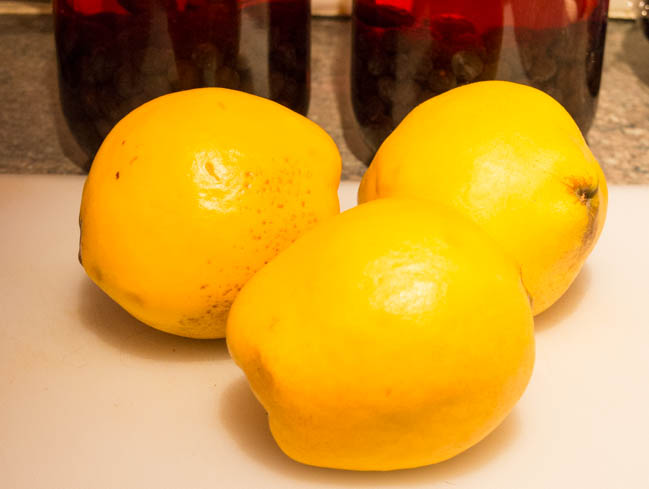
I have to say I am disappointed. I had procrastinated about cooking them for several weeks, waiting for this fantastic aroma that is supposed to emanate from them. It didn’t happen so I moved on to cooking with them. They weren’t that hard to peel and chop, or at least my birthday present knives, once sharpened, cut then easy enough. Then I poached them in spiced sugar syrup awaiting the transformation into rose red jewels. Instead of the half an hour of poaching they were supposed to need, they were ready in 15 minutes without a hint of pink. So came the tasting and again disappointment, like a pear crossed with an apple. I had such high hopes for them. In the end two out of the three were eaten on my morning muesli.
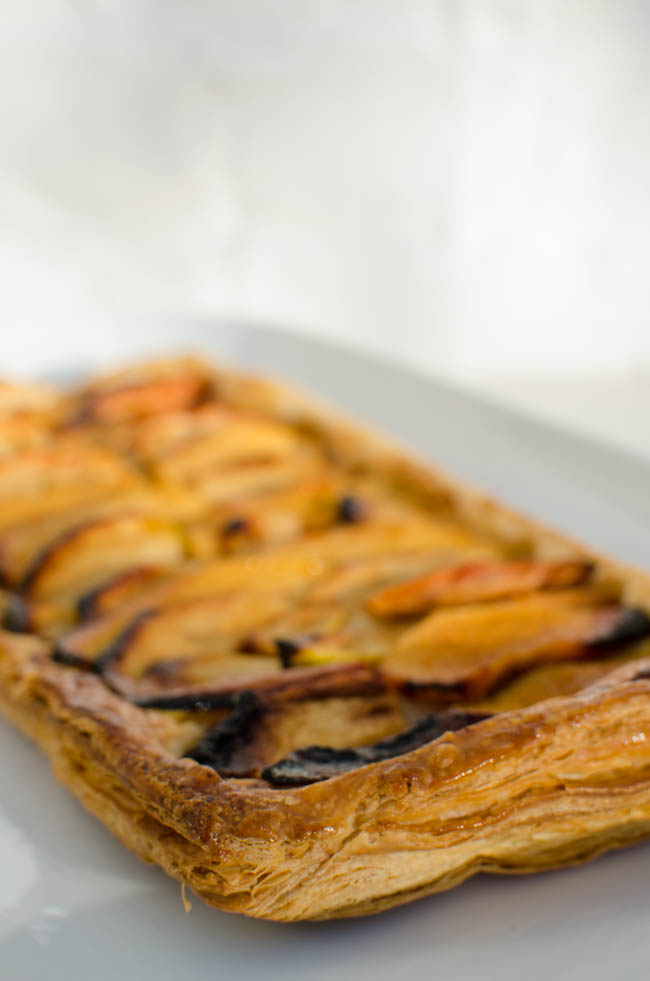
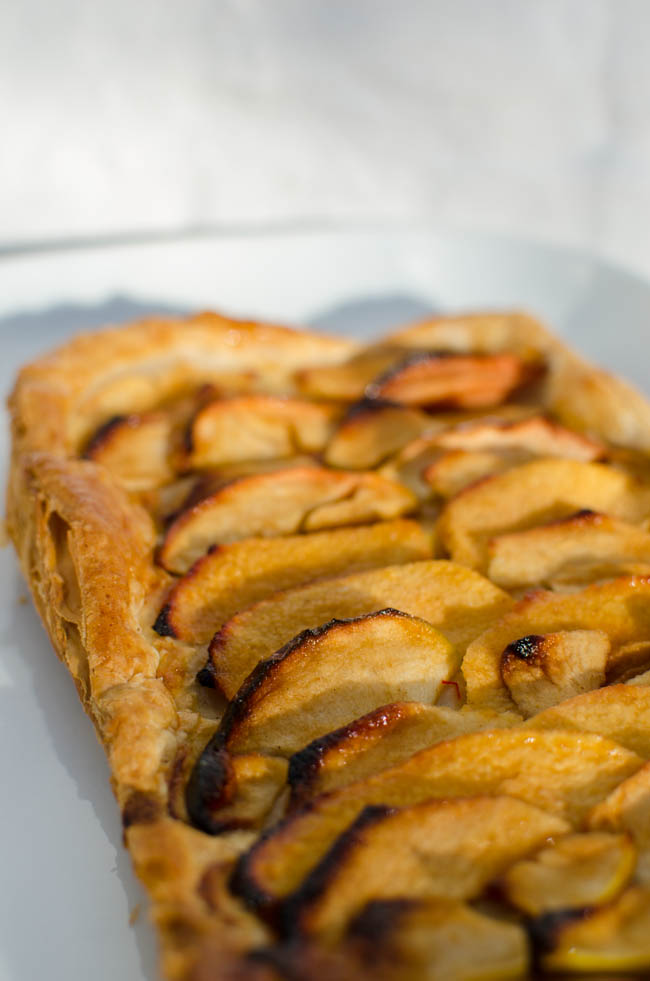
So we come to the recipe. After leaving organisation to the last minute, I realised on Christmas day that I would need to produce some sort of dessert for the friends coming the next day. I raided the freezer and found a packet of puff pastry and in the fruit bowl a lonely quince and some apples. So we have
French Apple and Quince Cheats Tart
packet of puff pastry, defrosted if frozen
2 eating apples e.g. granny smiths, cored but not peeled
1 lonely quince, peeled and cored
2 tablespoons of soft brown sugar mixed with 2 tablespoons of lemon juice
icing sugar
fruit jelly e.g. apricot or quince
Roll out the puff pastry to a square about 30 cm on each side and cut in half so two bits about 15cm by 30cm. If it is ready rolled pastry try and find a way of getting the square or rectangle into two lengths that are not too narrow. Place on baking sheets and put in the fridge until ready to cook.
Finely slice the apples and quince into a large bowl containing the sugar mixed with lemon juice. Set aside until ready to bake.
When you want to bake them, preheat oven to 220 C or 200 C if fan.
Take the pastry rectangles out of the fridge and neatly arrange rows of the fruit slices, alternating quince and apple, so that they overlap by about half a slice but leave a clear border of pastry of about a centimetre around the edge.
Drizzle over any juices left in the bowl and dust over a thin layer of icing sugar.
Place in the preheated oven for about 20 minutes.
When they come out, cool on a cooling rack while heating a couple of tablespoons of fruit jelly with a splash of water (in a pan or in the microwave), stir until the jelly has dissolved and then brush over the pastrys with a pastry brush. Serve!
If you are looking for more inspiration for what to do with quinces then see Nigel Slater, he raves about them.
Category Home, Recipe Index | Tags: apple,bake,baking,desserts,pastry,quince,tart | No Comments
-
December 24, 2013 by sarah
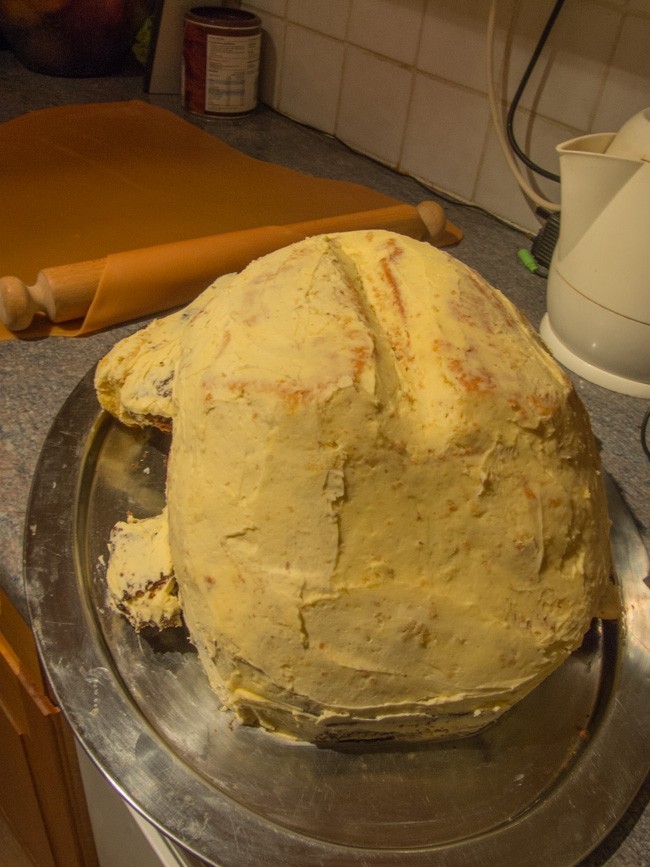
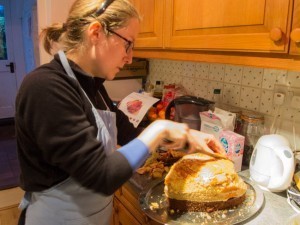
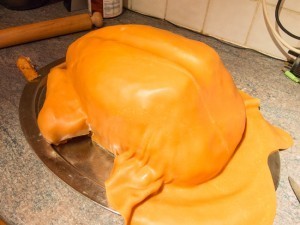
I can finally reveal the ‘other’ Christmas cake I have been working on now it has been unveiled and eaten; a roast turkey cake with the trimmings!
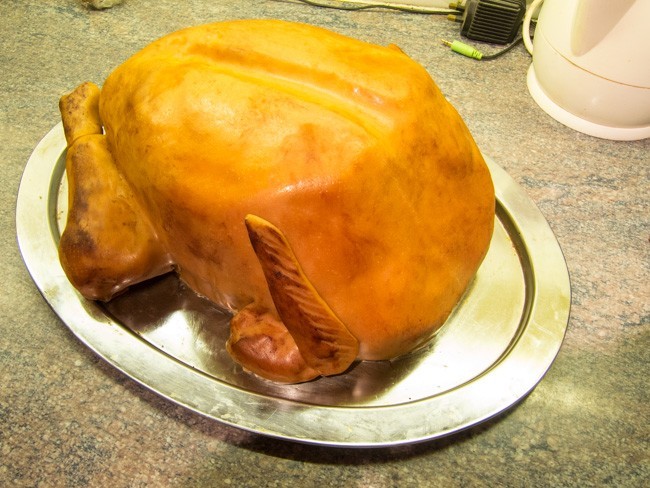
I also made roast potatoes (lemon drizzle fairy cakes), sprouts (lemon white chocolate truffles), carrots (orange flavoured shortbread) and peas (green fondant and marzipan) and served it with gravy (chocolate sauce). Bring it on Heston!
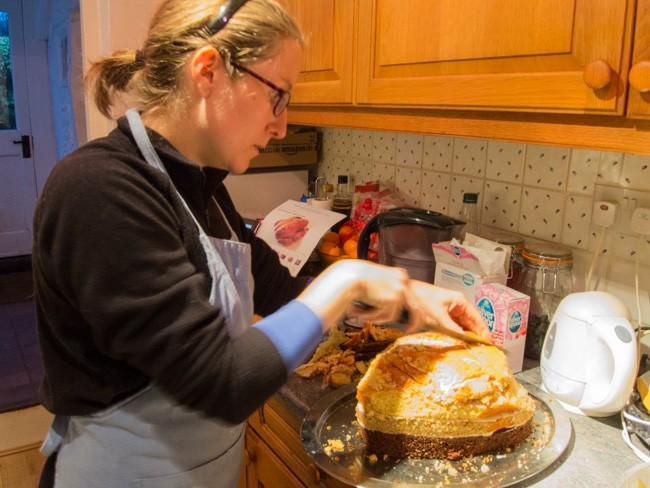
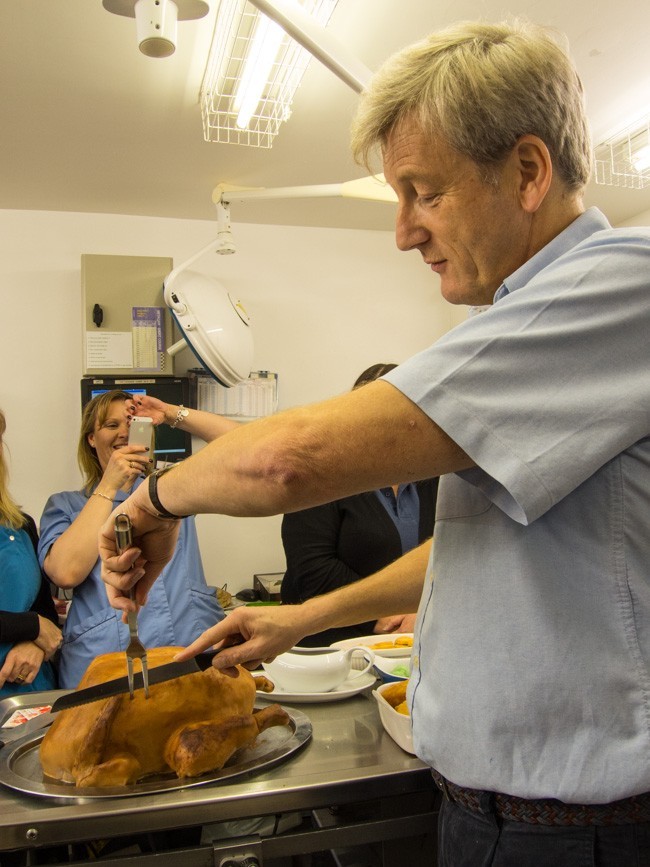
I really enjoyed the challenge of planning, designing and executing this beast of a cake! But I also need to give credit to my husband for his inspired suggestion. It went down well at the practice Christmas party this lunch time; there is nothing left which means job well done! Here is The Boss carving it!
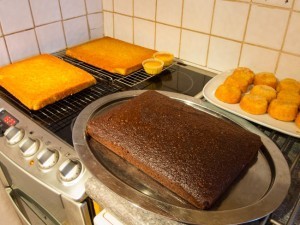
So here are some of the steps in making it. I started with 3 layers of cake (gingerbread, orange and spice and vanilla) and glued them in a stack with butter icing to signify the dark and light meat you get with a real turkey. Plus the cake for the bottom had to be really sturdy to stand up to the weight on top! I then set about sculpting it into the desired shape, comparing to pictures of real roast turkeys online – you can see the intense look of concentration on my face! Then came a butter cream layer to get the icing to stick and a sit in the fridge to firm up. The icing is in fact softened dairy fudges! Putting them in the microwave for 10 second bursts then kneading and rolling out quickly before it cooled, it was stressful! Then came the covering of the cake beast, using hands to sculpt the fudge layer neatly around the carved cake. Finally, the finishing touches; fudge leg bones, texturing the skin with a dimpled piece of plastic and colouring with coco powder mixed with vegetable oil to give a real shine. Done!


Category Home, Recipe Index | Tags: cake,Christmas,fun,home made,novelty,turkey | No Comments
-
December 19, 2013 by sarah
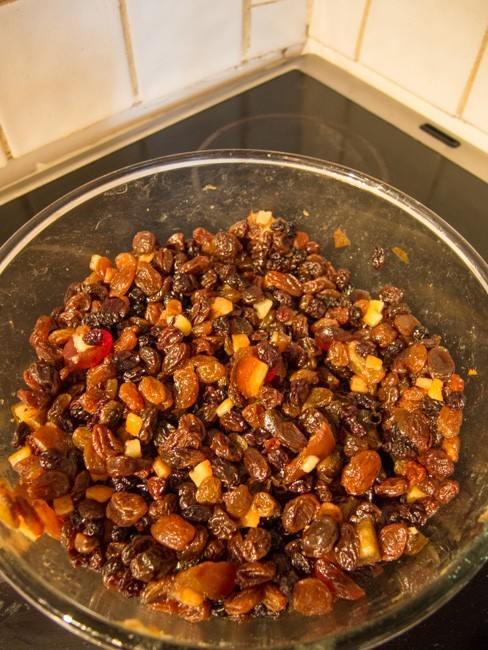
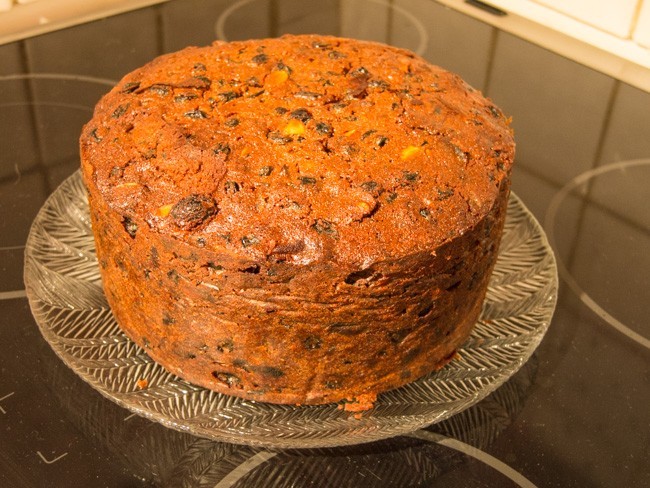
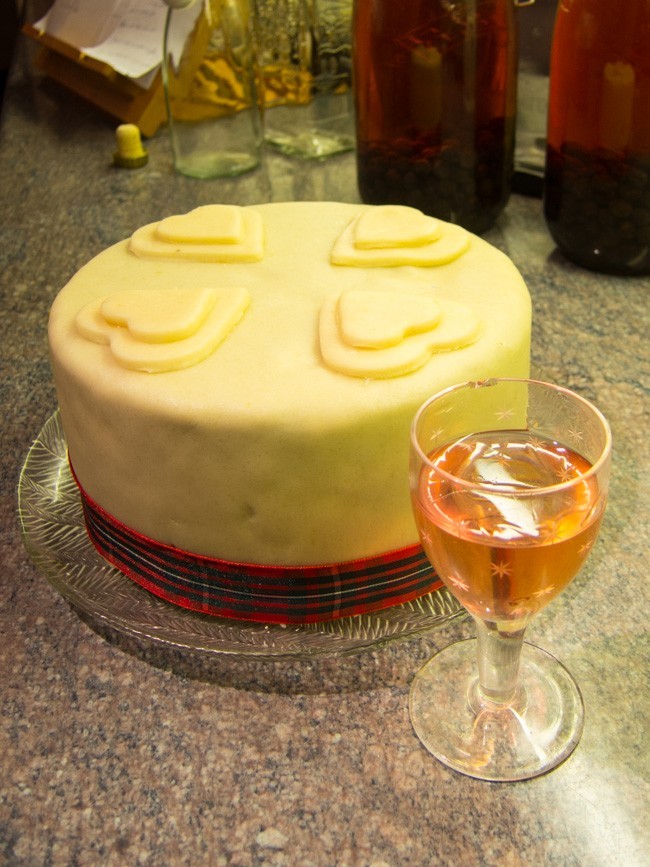
I only started making our Christmas cake annually a couple of years ago. It seemed like too much hassle and the supermarket one was fine if you doused it up with enough booze. But then I bit the bullet and it has definately become an annual ceremony. The actually making doesn’t take too long; the fruit is best boozed up a few days before, a bit of stirring and then hours in the oven when it just needs occasional checking but not onerously. And then the boozing up, my favourite ritual. Once a week, or more if I remember, the cake is unwrapped, prodded, sniffed and then liberally painted with booze. I write ‘booze’ because I don’t think it really matters what you use so use up those dregs at the back of the cocktail cabinet (what, you don’t have one darling) but I stipulate it must have flavour (so no vodka), not be cream based and be greater than 20% alcohol (so no syrupy things). Don’t ask me if you can make it without the alcohol; this recipe has mandatory alcohol. This cake is best made several weeks before it is due to be eaten; Delia suggests a minimum of 8 weeks, so perhaps it should really be an October Half Term activity but I usually don’t remember until mid to late November and it still tastes great.
Christmas Cake
(Delia Smith with some of my alterations)
1kg mixed dried fruits (raisins, sultanas, currants, mixed peel, glace cherries, dried cranberries, chopped dried apricots, dates, figs) I added a quarter of this weight in dates from our trip to Morocco
50-100ml booze (sherry, brandy, rum, whisky…)
250g unsalted butter
250g light brown soft sugar
200g plain flour
50-100g nuts (whole or flaked almonds, chopped walnuts, pecans etc)
4 large eggs or 5 medium eggs from my girls
1/2 tsp salt
2 tsp mixed spice
1 tbsp black treacle
grated rind of one lemon and one orange
Several days before you plan do do the baking, put the fruit mixture into a glass bowl and add the booze. Cover with cling and shake daily until ready to use.
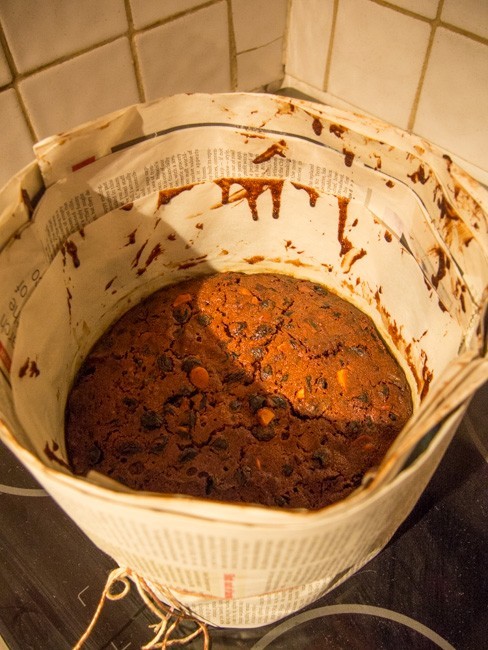
Preheat the oven to 160 °C/140 °C fan with a shelf in the bottom third of the oven. Butter and double line a 20 cm round tin, with enough baking parchment to come several centimetres above the top of the tin. Wrap the outside of the tin with several sheets of newspaper secured with string. Sit the tin on top of more folded newspaper on a baking tray. Make a hat for the tin with double thickness of parchment cut to a circle that just fits inside and cut out a small circle in this in the centre (fold the squares of parchment up into quarters, the quarters again then round off the outer corners to give a circle and cut the point out of the circle – comprendé?).
Cream the butter and sugar until very light. Whisk the eggs separately then add one at a time to this, mixing well between and adding some of the flour if it looks like it will curdle. Sift the flour, spices and salt over the top and then fold in. Fold in the fruit (and any booze left behind), the nuts, the treacle and rinds.
Tip this mixture into the prepared tin and level off the surface. Place into the preheated oven and leave alone for 4 hours – walk the dog, do some study etc. The cake may take up to 4 and half hours but you still want a few crumbs sticking to the metal skewer when you test it; if you over cook it, it will be dry no matter how much booze you add. Leave to cool totally in the tin before unwrapping and then make some holes with a skewer all over the cake and brush or spoon over more booze. Wrap the cake in greaseproof paper and in a tin and repeat the feeding process ad infinitum.
Decorate as you wish (no fondant for me please!).
Category Home, Recipe Index | Tags: bake,baking,cake,Christmas,fruit,icing | No Comments
-
December 19, 2013 by sarah
I don’t know what it is about home made wine that attracts me. Maybe it is my thrifty Scottish side that likes the chance to make something out of (almost) free stuff that would normally cost good money to buy. Maybe it is the baking/making side. My husband claims he likes making it too, though inevitably I am the one who does all the work of making it. Drinking it, well that is a mixed bag. The elderberry wine that keeps winning firsts at the show is too sharp and tannin filled for me, but if it keeps winning firsts then I’ll keep producing it. But I do like a chilled glass of the dandelion wine and the bramble wine is passable. A few years ago we made cider and that was such a success that it didn’t last long at all! So this year we have 4 demi-johns of cider, 2 of apple wine (2 different recipes), one of bramble, one of damson and soon to be put in a demi-john will be grape wine. Yes, you read right – grape wine. But these are free grapes from the garden at work. I wonder what Chateau Wheelhouse 2013 will be like? We will have to wait a year at least to find out. That is the thing about homemade wine; if it doesn’t taste good when you first try it, ignore it for another year or two then try it again as it will taste completely different.
Bottoms up!


Category Home, Making | Tags: | No Comments
-
December 19, 2013 by sarah
I thought I would share with you some Christmasy pictures from around the house.
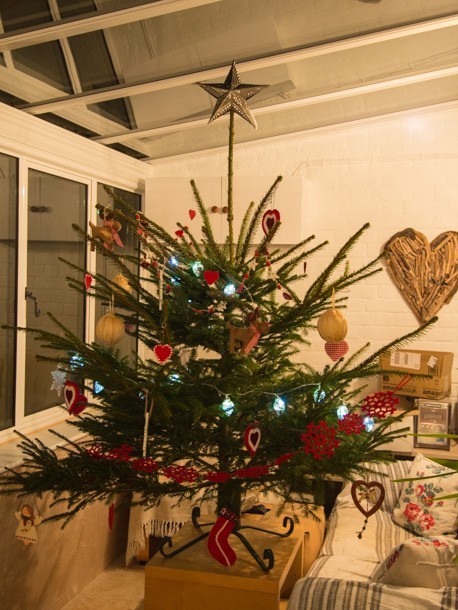
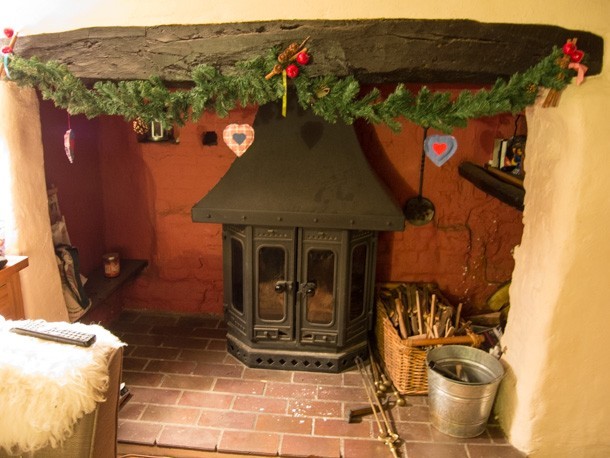

The speedily decorated tree; found the usual lights didn’t work so used the little lantern LED ones that usually use to go elsewhere (nice shape but blue light, will need to look for better ones next year). The decorations are a mixture of homemade (the felt hearts and raffia covered balls), childhood (the felt stocking made in primary school), found (the reindeer) and fond memories (wooden decorations from Salzberg). Fake spruce garland over the very real inglenook fireplace (more handmade hearts and cinnamon stick decorations). The 5 minute door wreath; take strands of ivy, wrap around metal wreath making hoop, tying on with twine where necessary but mainly just weaving, finish with holly berries tucked in and a gold ribbon (and rain). All completed in the time it took to drink the mulled wine and eat the very delicious Waitrose mince pie!
Category Home, Live life | Tags: | No Comments
-
December 8, 2013 by sarah
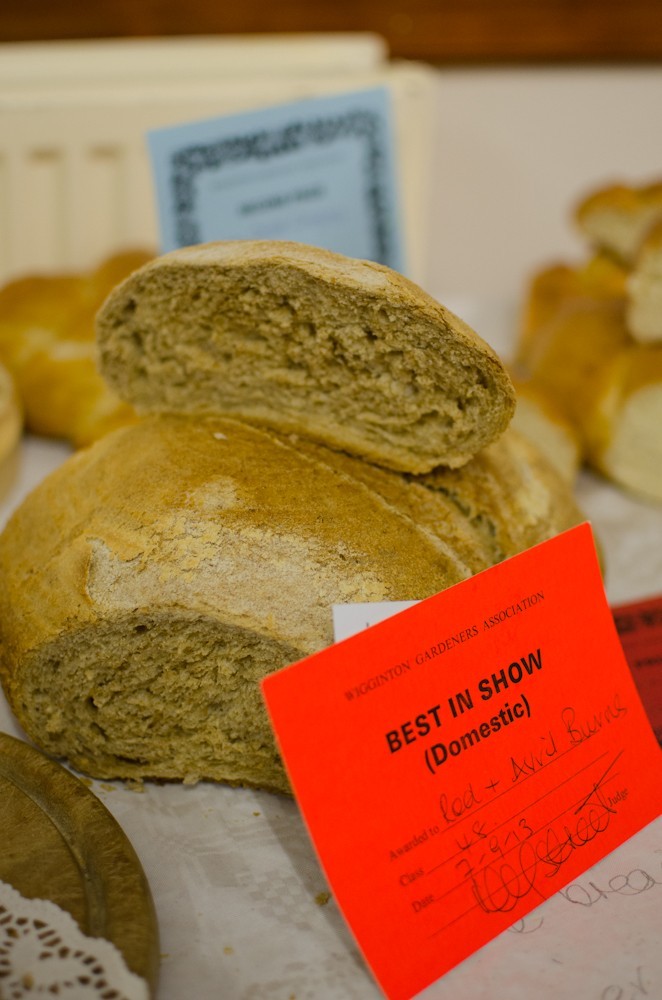
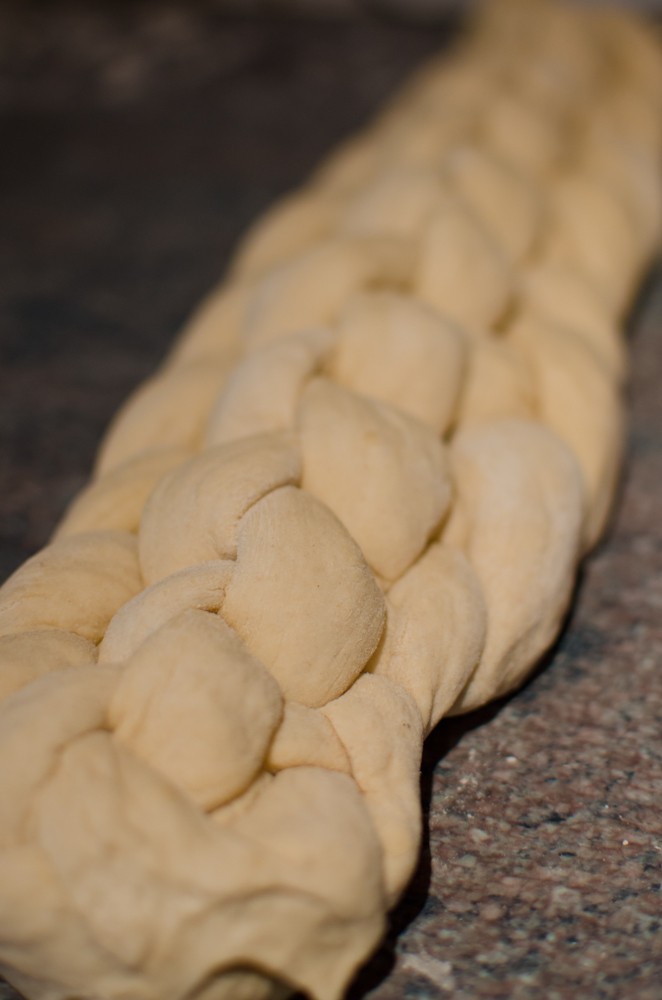
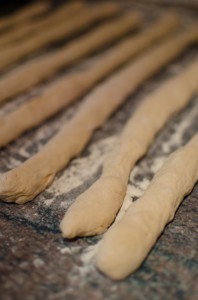
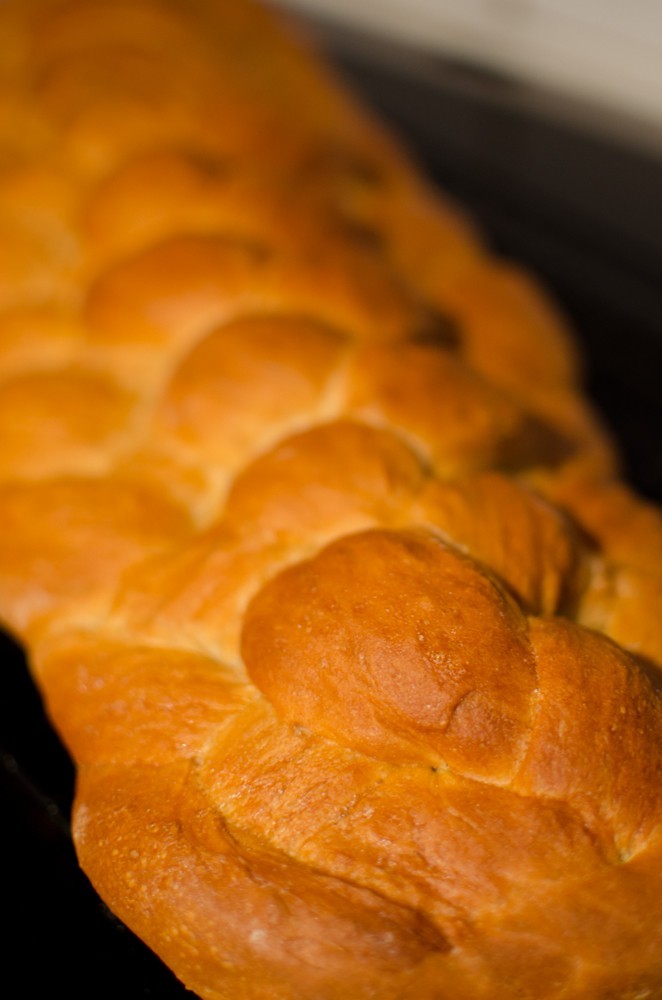
This is the plaited loaf I made for the Wigginton show this year. My basic bread recipes come out fine but I thought for a show I should push the boat out and enter a more elaborate loaf in the ‘one loaf baked in a fancy shape’ category. In the end a bog standard cob won; it looked tasty but wasn’t ‘fancy’ by any means and I even think the bottom looked stodgey.
 I am very pleased with my first plaited loaf. Following the instructions and some clips on You Tube it was actually not that difficult. I tried to roll out the individual strands on an oiled work surface, how Paul Hollywood recommends, but the strands were slipping and sliding everywhere and not actually getting any thinner! It didn’t help that my work top really was not deep enough to do this properly so I had to work at an angle! My house is not the warmest, even on a late summers day, so I sit the bowl of dough on a heat pad that is meant for reptile aquariums. This provides the dough with a touch of background warmth which means I can get the rising and proving done without waiting all day and cooking them at midnight (and I have done that before).
Recipe from ‘How To Bake’ by Paul Hollywood
600g strong white bread flour
12g instant yeast
12g salt
2 tablespoons of oil
400ml tepid water
Place the dry ingredients into a bowl, with salt on the opposite side to the yeast. Add the oil and three-quarters of the water and mix together by hand, adding the rest of the water if needed. Turn the dough out onto a work surface and knead by hand until silky and stretchy (at least 10 minutes of hard work!). Oil a medium sized bowl and place in the dough, cover with an oiled shower cap and leave somewhere vaguely warm until doubled in size.
Turn the dough out onto a lightly floured surface and knock back the dough by folding inwards repeatedly until the dough is smooth. Divide into 8 equal pieces and roll out each piece into a strand about 40cm long.
Lay the strands out on the work top like octopus arms coming out from a central point at the top and squidge the top joined part to the work top to stick it down. You now need to follow the following braiding sequence , with the strands numbered 1 to 8 from left to right and renumbered each time you complete a sequence. This step is only done once at the start; place 8 under 7 and over 1. Now repeat the following steps until all the strands are plaited:
– place 8 over 5
– place 2 under 3 and over 8
– place 1 over 4
– place 7 under 6 and over 1
 Squidge the ends together to seal and tuck top and bottom squidges under the loaf so it looks neat. Place the plaited loaf on a floured baking tray, place in a large plastic bag and leave somewhere warm to prove for an hour or so until the doubled in size and the dough springs back quickly if prodded.
Heat the oven to 230°C and put a roasting tray in the bottom of the oven. Brush the loaf with a beaten egg mixed with a pinch of salt but take care not to flood it otherwise the egg wash will glue together the strands so they can’t do the final rise in the oven. Put the loaf in the oven and immediately pour a half litre of water in the roasting tray. Bake for 20-30 minutes until cooked through (sounds hollow when tapped on bottom then another 5 minutes for luck).
Happy breading!
Squidge the ends together to seal and tuck top and bottom squidges under the loaf so it looks neat. Place the plaited loaf on a floured baking tray, place in a large plastic bag and leave somewhere warm to prove for an hour or so until the doubled in size and the dough springs back quickly if prodded.
Heat the oven to 230°C and put a roasting tray in the bottom of the oven. Brush the loaf with a beaten egg mixed with a pinch of salt but take care not to flood it otherwise the egg wash will glue together the strands so they can’t do the final rise in the oven. Put the loaf in the oven and immediately pour a half litre of water in the roasting tray. Bake for 20-30 minutes until cooked through (sounds hollow when tapped on bottom then another 5 minutes for luck).
Happy breading!
Category Home, Recipe Index | Tags: bread,loaf,others,plaited loaf,yeast | No Comments
-
December 7, 2013 by sarah
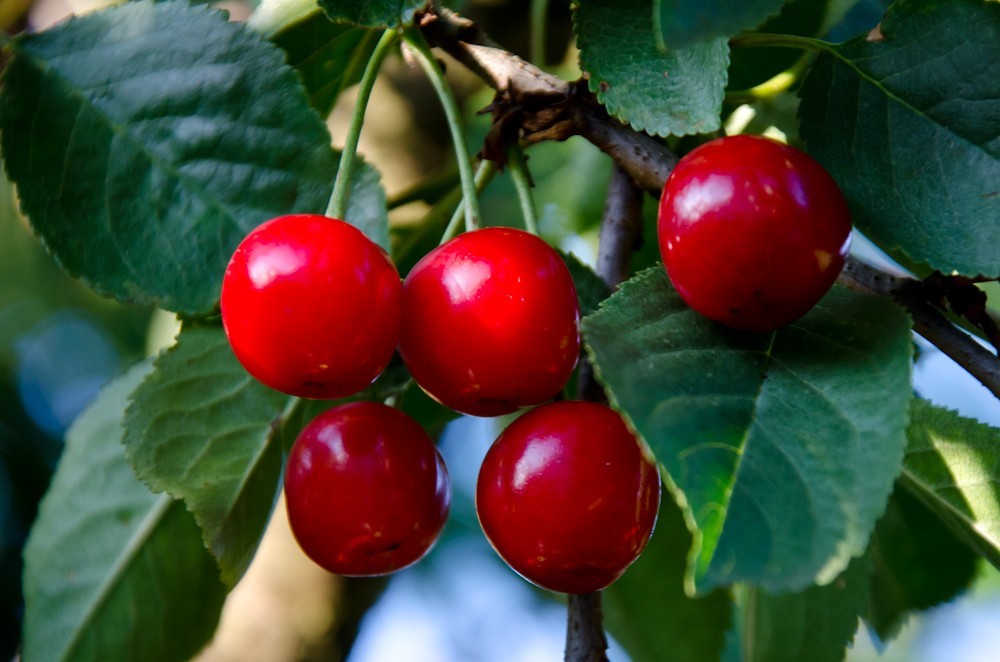
You might guess from this title that cherries are my favourite fruit; as they are, jammed, cooked in a clafouti, made into ice-cream, even cherry flavour sweats. This year a very sick tree in the back garden managed to produce a kilogram of the most delicious sour cherries I’ve ever had. I made them into jam (which won a first in the local show) which is amazing on toast or swirled into plain yogurt or spread over a chocolate cake. Sadly the tree had to be removed because it was completely rotten in the core and branches had broken off in the past. RIP cherry tree.
Category Home | Tags: cherries,garden,home grown | No Comments