RSS Feed

April, 2015

  1. Spice 10 – Nutmeg – Custard Tart

    April 28, 2015 by sarah

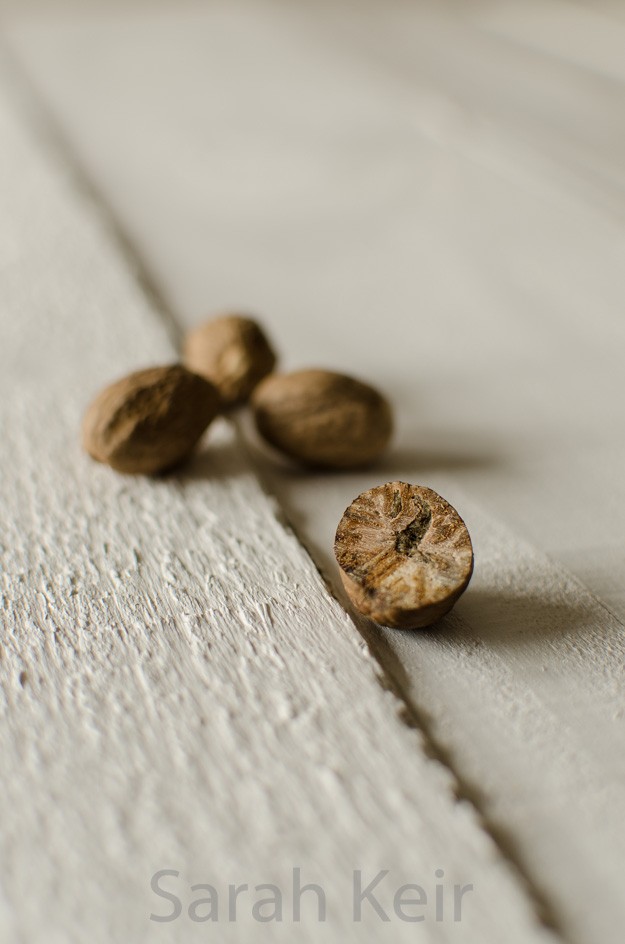
    Nutmeg is an unassuming spice. The brown kernel has a pleasing sweet aroma but the magic happens when it is added to dishes containing dairy products or eggs. Nutmeg has been used in European cuisine since medieval times so no wonder there is a multitude of unique recipes using it; custard tarts, bread sauce, rice pudding, mulled wine and even haggis!

    custart tart-003


    Nutmeg is the seed of a tree that indigenous to the Banda Islands in the Moluccas (or Spice Islands) of Indonesia, though now grown in the Caribbean and Kerala in India. Two spices are obtained from this tree, the other being mace which is the lacy outer wrapping to the nutmeg seed inside. Although mace and nutmeg are not identical in flavour, they are so similar that for most recipes they can be interchanged. Use mace for recipes requiring a whole form such as chutneys and pickles, and use nutmeg for when ground spice is required. It really does need to be ground fresh, as it quickly loses its power when ground; I keep a mini grater obtained from a Christmas cracker for this very purpose. As a little aside, nutmeg is supposedly a hallucinogen but you would have to eat rather a lot of it and the other side effects sound grim! Do not try at home!


    custart tart-002

    This recipe is adapted from ‘The Great British Book of Baking’ by Linda Collister.
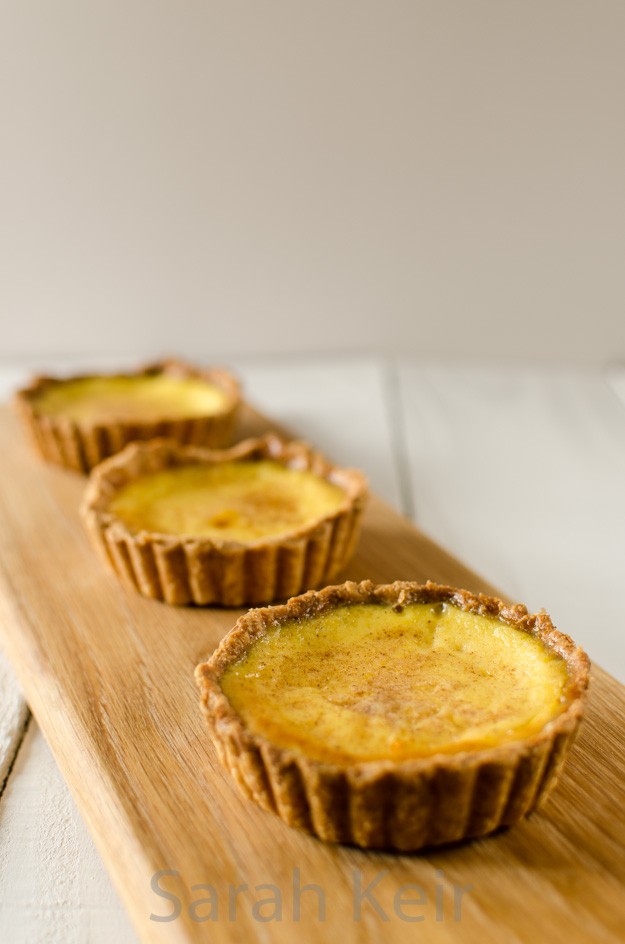
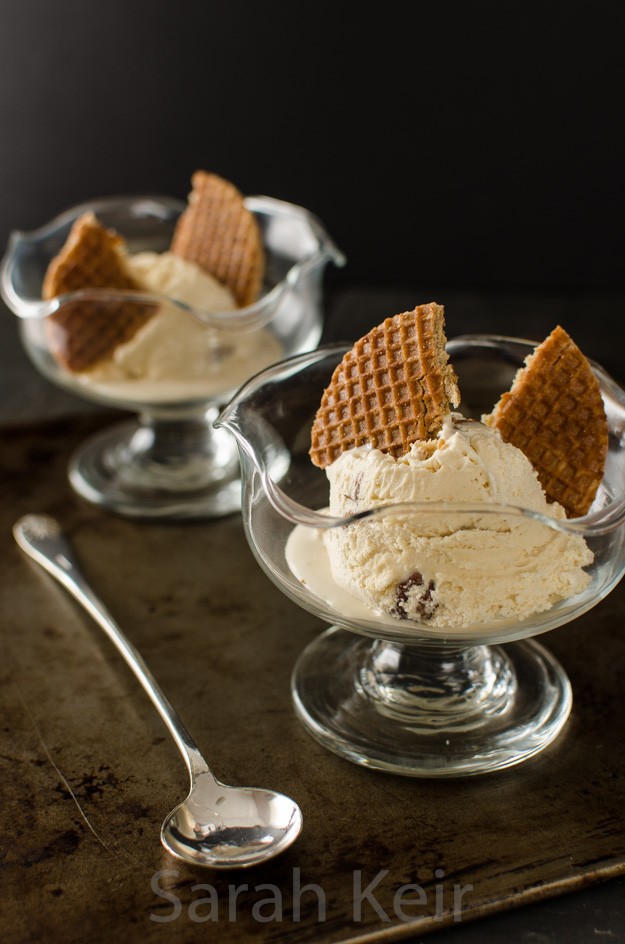
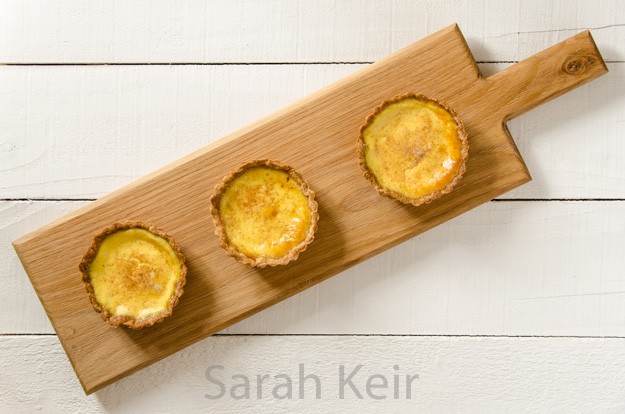
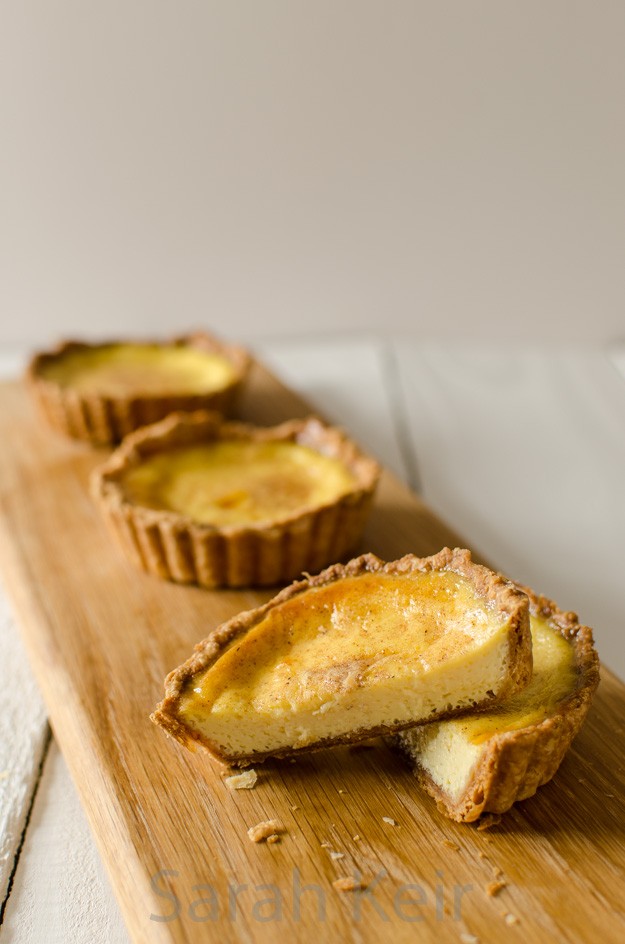
    Custard Tart

    For the sweet shortcrust pastry:
    175g plain flour
    pinch of salt
    2 tablespoons caster sugar
    110g unsalted butter, chilled and diced
    1 medium egg yolk

    For the filling:
    400ml single cream
    200ml milk
    plenty of freshly grated nutmeg (to taste but at least half a kernel)
    3 medium eggs, plus 3 yolks
    75 caster sugar

    Make the pastry – rub the butter into the dry ingredients until makes fine crumbs. Use a round ended knife to mix in the egg yolk and some cold water until it comes together as a firm dough. Wrap in cling film and pop the the fridge for at least 30 minutes, but overnight is better.

    Roll out the pastry until thin and then use to line your tart tin; use a 22cm diameter round fluted tin with a removable base or several individual sized ones. Prick the bottoms all over with a fork. Chill in the fridge for at least 30 minutes (or freezer for 10 minutes if you are short of time). Preheat the oven to 200 ºC/180 ºC fan. Bake the pastry cases blind for 15-20 minutes. To do this, cut out a square of baking parchment a few inches larger than the tin, scrunch up the paper, flatten out and scrunch again. Flatten out the paper and lay over the pastry, fill with ceramic baking beans, dried pulses or even copper coins. Doing this cooks the base so you don’t get a soggy bottom and the baking beans stop the sides from collapsing. Remove the paper and baking beans and return to the oven for another 5-10 minutes. Take out of the oven and with a pastry brush, brush the pastry with one of the eggs (beaten) and return to the oven for 1-2 minutes. This egg layer means your pastry bottom really will not go soggy.

    Turn the oven down to 160 ºC/fan 140 ºc.

    custart tart-004


    Put the cream and milk into a pan and slowly bring to just below the boil, take off the heat and set aside for 5 minutes. Meanwhile eggs, egg yolks and sugar in a large bowl. Slowly pour over the hot cream/milk mixture, whisking constantly. Add about half of the amount of nutmeg you wish to add and transfer the mixture to a jug.

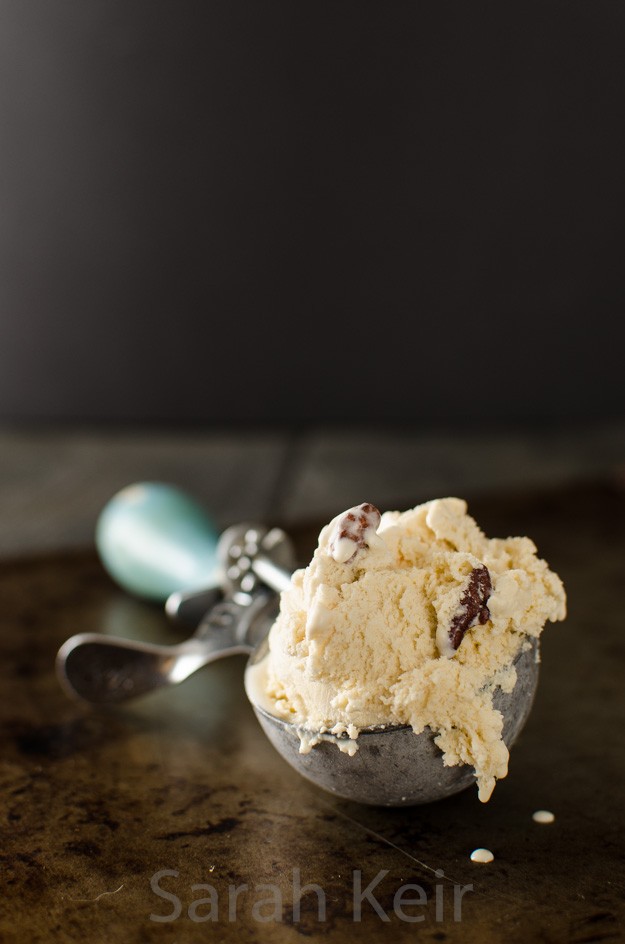
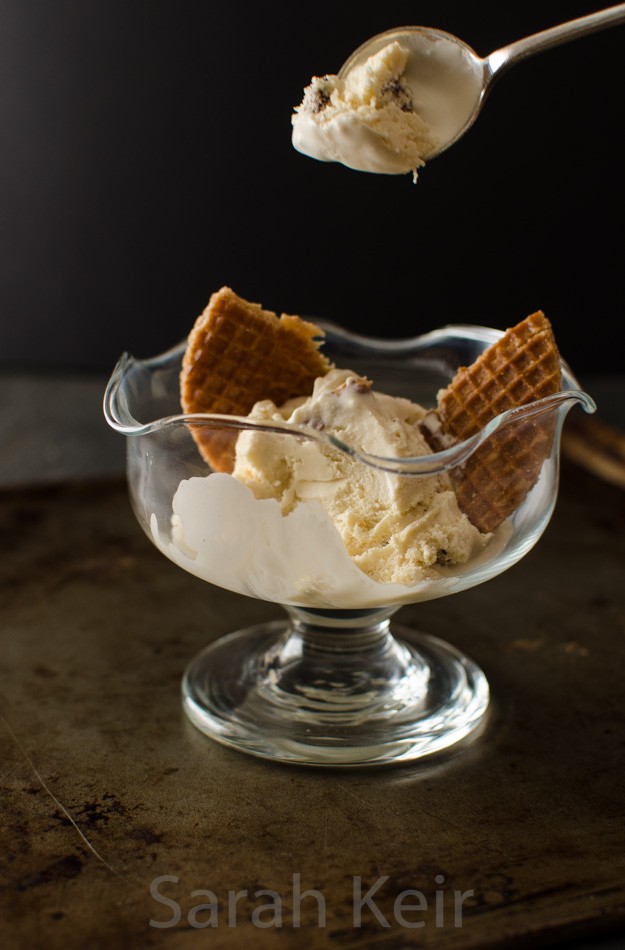
    Set you pre-cooked pastry case on a hot oven tray and place on the top shelf of the oven. Carefully pour in egg/milk mixture right to the brim, carefully slide it into the oven and close the door. Bake the tart for about 30 minutes. The middle of the tart should still have a bit of a wobble (the individual tarts took about 15 minutes). Leave to cool and serve warm or cool, with more grated nutmeg if wished. Best eaten the day it is made.

    custart tart-001


  2. Cupcakes

    April 26, 2015 by sarah

    I have shied away from putting up a recipe for cupcakes so far as they seem to have had their time in the spot-light and are now considered ‘has beens’. I think this is rather harsh as a good cupcake is a lesson in portion control; no guessing how many the cake is supposed to feed and trying to gauge slice sizes. The key though is a GOOD cupcake. Far too often have I been tempted by the bling exterior of a coffee shop or market stall cupcake, just to be sorely disappointed by the dry, tasteless, overly sweet interior with far too much sweet, tasteless icing.

    cupcakes-001

    Coffee cupcakes with coffee flavoured Swiss meringue buttercream and decorated with chocolate covered coffee beans.


    But cupcakes do not need to be like this. For cupcakes to be a joy they must be freshly baked (no more than 24 hours old or they are too dry), as they come out of the oven liberally brush the top with appropriately flavoured sugar syrup, consider filling the centre with jam or fruit curd and consider the icing to be in proportion with the cake below (Swiss meringue buttercream is luxuriant but not too sweet). My favourite cupcakes that I make are a lemon sponge, doused with lemon syrup as they come out of the oven and then filled with lemon curd and topped with lemon cream cheese topping (half cream cheese, half butter, sweetened with a little icing sugar). Decorations should be simple but appropriate and are not the entire reason for a cupcakes existence. Go on, give cupcakes a second chance.

    comic relief-001

    Selection of different cupcakes I made for charity fund raising – lemon, strawberry, chocolate, coffee and almond amaretto.

    Cupcakes


    Makes 12 of larger/muffin sized cakes

    175g soft butter or margarine
    175g caster sugar
    3 medium eggs at room temperature
    175g self-raising flour plus 1/2 teaspoon baking powder
    or 175g plain flour with 2 teaspoons of baking powder
    2 tablespoons of milk
    flavourings – 1 teaspoon vanilla extract, or
    – zest of 2 lemons, or
    – replace 25g of flour with cocoa powder, or
    – replace the milk with 4 teaspoons of instant coffee dissolved in 2 tablespoons boiling water

    Preheat the oven to 180ºC/160ºC fan. Put cupcake cases into hollows of a cupcake tin.

    Put the butter/margarine into a large bowl with the sugar and cream together until light and fluffy.

    Add all the other ingredients in one go and beat on slow speed until mixed thoroughly and a smooth, thick batter is formed. I prefer to do the last bit by hand with a silicone spatula so that all the ingredients from the sides and bottom are thoroughly mixed in and the batter is not over mixed.

    Divide the batter between the cupcake cases – should come three-quarters full.

    Bake for 18-20 minutes, turning half way through cooking. Take out the oven and allow to cool for at least 15-20 minutes in the tin before turning out; this stops the paper cases pulling away from the cake.

    Prick the tops all over with a skewer and use a pastry brush to soak in sugar syrup.

    Sugar syrup – 5 tablespoons of water plus 75g sugar – place in a small pan and heat gently until the sugar is dissolved then allow to cool. Add flavourings – a split vanilla pod or for lemon replace the water with lemon juice. Will last up to a month in a sealed container in the fridge.

    cupcakes-002


  3. Maple Pecan Ice cream

    April 19, 2015 by sarah

    It may seem a strange time of year to have an ice cream recipe but if the heating is on or a fire burning, then why not? Anyway, the weather we have been having over the past few weeks makes me think that this might be the summer so enjoy it while it lasts! Either that or it is global warming and we are all stuffed. Never mind, have some ice cream instead.

    ice cream-002


    You don’t need an ice cream maker to make ice cream; it is just easier with one. If you don’t have an ice cream maker then take the partially frozen ice cream out of the freezer every couple of hours and blend in a food processor or with a stick blender. I only have a very simple ice cream maker which you put the bowl in the freezer for 24 hours before hand. It works fine but I need to let the bowl defrost a little before using it otherwise the mixture freezes solid as soon as it is poured in!

    ice cream-001

    Maple Pecan Ice cream

    150g pecan nuts
    2 egg yolks
    50g soft brown sugar
    200ml milk
    175ml maple syrup
    300ml double cream

    Toast the pecans in a moderately hot oven for about 10 minutes. Remove from the oven and when cool enough to handle, roughly chop. Leave to one side.

    Whisk the egg yolks and sugar until thick and mouse like. Gently heat the milk in a non-stick saucepan until almost boiling then pour over the egg/sugar mix, whisking constantly as you do. Return this to the pan and heat gently while stirring continuously. The custard mixture is thick enough when a finger leaves a trail on the back of a spoon. Remove from the heat and allow to cool fully (overnight in the fridge is best).

    Whisk the double cream until ribbon stage then mix in the cooled custard and maple syrup. Use this mixture to make the ice cream following the instructions of your ice cream maker or the freezer/food processor method. Approximately 2-3 minutes before the end, add the chopped pecans.

    Store in the freezer and eat within a month.

    ice cream-003


  4. My latest embroidery project

    April 8, 2015 by sarah

    After a class last year in free motion embroidery, I was inspired to make some particular pieces/pictures. Unfortunately, they had to go on the back burner until after my exams in February, but for the past month or six weeks, I’ve been busily creating this embroidery picture of our house here in Wigginton. I spent a ridiculous amount of time procrastinating over the choice of fabrics and the placing of them and an even more ludicrous amount of money on fabrics! But I have to say, I am very happy with the finished article. I feel that this attempt is even a bit too perfect; it could do with being a bit more free-form!

    embroidery-001


    I found a deep frame in Wilkinsons to frame it in. But by the time I had painted the frame and jiggled everything so it fitted in the not quite square opening, I shouldn’t of bothered and bought a proper expensive frame! So here is a picture of it framed…

    embroidery-002


    And here is the original photo which was my inspiration; taken last summer at the height of the garden’s glory.

    embroidery-004


  5. Simnel Cake – an Easter treat

    April 5, 2015 by sarah

    I am one of those crazy people that could just eat marzipan. Forget the icing and sometimes even the cake, I go for the marzipan. If you are one of these people too then keep reading; if not then skip this recipe! Simnel cakes are considered an Easter treat these days, but in the past they were part of a Mothering Sunday tradition of girls in service taking a cake to their mothers on the one day off work. The eleven balls on top, to represent the apostles minus Judas, are a Victorian puritanical addition. By the way, has anyone out there baked a scripture cake, where the recipe is hidden in bible verses? Maybe a project for the future?

    simnel-004


    I like to decorate my simnel cake with ribbons and those kitsch plastic chicks in the shops at this time of year. It is amazing how just the past couple of weeks, the weather and feeling in the air has turned spring-like. Even between the squally showers, the daffodils nod their ridiculously over the top yellow-cream heads, birds are shouting ‘come and get me’ from every branch and already the lawn needs mown. Happy Easter everyone!

    simnel-002


    Simnel Cake


    Serves at least 14 – it is rich

    Recipe adapted from BBC Good Food

    500g pack of natural marzipan
    175g butter
    175g soft brown sugar
    4 medium free-range eggs, beaten
    175g plain flour

    1/2 teaspoon baking powder
    pinch of fine salt
    1/2 teaspoon mixed spice
    350g mixed dried fruit – raisins, currants, sultanas
    50g chopped candied peel
    zest of 1 lemon
    1-2 tablespoon apricot jam

    Preheat the oven to 140 C/120 C fan. Prepare a 18cm/7 inch tin like for the Christmas cake recipe here (grease, line and wrap the outside in newspaper).

    Cream the butter and sugar until pale and fluffy. Sift over the flour, salt, baking powder and mixed spice and add the beaten eggs. Beat until well mixed. Add some milk if it is very stiff but you need a fairly stiff batter to support the dried fruit. With a metal spoon, fold in dried fruit, candied peel and lemon zest.

    Put half the mixture into the prepared pan and level the top. Take one third of the marzipan and roll out to be a circle of diameter that will fit inside the tin. Use the bottom of the tin to measure and trim to fit; place on the cake mixture. Add the rest of the cake mixture and smooth the top then leave a slight dip in the centre.

    Place in the middle of the preheated oven for 2 to 2 and half hours until a skewer comes out mostly clean (the melted marzipan will mean it will never be truely dry until completely over cooked). If the top is browning too fast, make a baking parchment or foil hat with a small hole in the centre for steam to escape. Allow to cool fully in the tin before turning  out.

    Brush the top of the cooled cake with apricot jam. Roll out another third of the marzipan and cover the top of the cake, scalloping the edges by pinching the almond paste. Toast this under a preheated grill until medium brown; watch constantly as it burns easily. Roll the remaining marzipan into 12 equal balls and eat one (it much easier to divide into 12 than 11 and the extra ball is a cooks perk!), toast under the preheated grill on foil and when cooled add to the top of the cake, gluing the balls in place with apricot jam if necessary.

    simnel-003


  6. Apple Pie – an old fashioned pie plate recipe

    April 1, 2015 by sarah

    I bought an old-fashioned pie plate in the January sales but it languished in the pan cupboard until this week. It has a classic retro feel about it so I just had to make a good, old fashioned apple pie. Now, normally pastry is not my strong point but I recently bought a pastry blade from Lakeland and it has revolutionised my pastry making. It means that even without a full sized food processor, I can whip together a batch of pastry within 10 minutes and no sticky hands and scrubbing pastry from under my wedding ring!

    apple pie-006


    I love how this apple pie turned out. Having kept the filling simple, the apple flavour really does shine through. Perfect for serving warm with custard or ice-cream or cold with cream. Mmmm! Go on, spoil someone this week with this old-fashioned recipe.

    apple pie-003 apple pie-001


    Apple Pie

    Serves 6-8
    For the Pastry
    250g plain flour
    50g icing sugar
    125g cold butter
    1 egg
    1/2 teaspoon salt
    egg wash (one egg beaten with 1 tablespoon of water)
    caster sugar for dusting
    For the Filling
    2 large Bramley apples
    3 eating apples (need about 1kg apples in total)
    100g soft brown sugar
    1 teaspoon ground cinnamon
    1/4 teaspoon ground nutmeg
    1/8 teaspoon ground cloves
    1 tablespoon lemon juice


    Preheat the oven to 200 ºC/180 ºC fan. Grease a 20cm pie plate with butter.

    Make the pastry by rubbing the butter into the flour, icing sugar and salt, either by hand, food processor or pastry blade, until it resembles breadcrumbs. Crack the egg into the pastry and gently mix with your hands until it comes together into a ball. If the mixture is too dry, add a drop or two of cold milk or water. Wrap the pastry in cling film and put in the fridge to rest and cool for about an hour or more.

    Peel the apples, place in a large bowl and sprinkle with the lemon juice to stop them turning brown. Add the sugar and spices and mix well. Put in a large saucepan and over a medium heat, cook gently for 5 minutes until the apples are tender but not complete mush. Remove from the heat and allow to cool completely.

    Divide your pastry in half and on a worktop dusted with flour, roll out to about 1/2 cm thick. Transfer the pastry to the pie plate by drapping over the rolling pin. Ease the pastry into the dish, making sure it is well pushed into the sides. Sprinkle the base of the pastry with a handful of ground almonds, dry cake crumbs or bread crumbs; this will absorb excess water from the apples so the bottom of the pastry crisps up. Pack in the cooled apple mixture into the pie; it should be domed high as it will sink down.

    Roll out the other half of the pastry, also to 1/2 cm thick. Run a line of egg wash around the rim of the pastry in the tin. Carefully lift the lid onto the top of the pie.

    Use your forefinger and thumb to firmly crimp the edge of the pastry to ensure bottom and lid are well glued together.
    Brush the top of the pie with the egg wash and sprinkle over the caster sugar.
    With a small sharp knife, make a couple of small slits in the top of the pie so that steam can escape.

    Place the pie in the preheated oven for 40-45 minutes until golden and firm. Serve immediately or allow to cool.

    apple pie-004