RSS Feed

September, 2014

  1. Wedding photography

    September 28, 2014 by sarah

    I can finally reveal some of the photos I took at a friend’s wedding a few weeks ago. It was a very busy and tiring day but I really enjoyed the challenge of something new and different. It was the first time ever I had used a flash and even those photos came out presentable! The last photo is one my husband took of me in my party frock.

    AnnieAnt-001 AnnieAnt-002 AnnieAnt-003 AnnieAnt-004 AnnieAnt-005 wedding-001


  2. Fruits of autumn – Spiced Damson Chutney

    September 27, 2014 by sarah

    For the past few years our annual autumn pilgrimage has been to a National Trust property south of London, in which car park contains several large and very productive damson trees. Every year we have visited the damsons have been left to rot and fall off so we don’t at all feel guilty filling a couple of carrier bags worth; call it membership benefits. The first year we found this secret source was quite by chance and we most definitely are going to keep it secret. This year I saw tiny trays of damsons in sale in Tesco for a horrendous sum. But I do wish there was somewhere closer to pick or acquire them.

    damson-003

    Damsons are a subspecies of plums; the fruits are smaller than typical plums with a tart sourness that when cooked makes the most delicious rich fruity flavour with a tang. One or two types can be eaten raw, including the ones we liberated which I think are ‘Merryweather’. Damsons were once widely grown, including in nearby Buckinghamshire, until falling out of favour post Second World War. Did you know that they were used to dye cloth and straw for hats and were used to produce the khaki green of uniforms in the First World War?

    We use our damsons to make the most delicious wine, jam and jelly. Because the fruit is high in pectin and acid, it sets very easily to make a delicious jam or jelly without additional pectin or lemon juice. The only pain is stoning them which is fiddly because the fruit clings to the stone so by far the easiest way, whatever recipe you are using, is to stew them first, mash with a potato masher, don rubber gloves and go fishing for the stones. Tedious but well worth it. The damson wine we made last year was the most successful of the homemade wines we have ever made and won me first place and a trophy at the local show. There are two fresh demi-johns on the go as I type this, bubbling away in the corner. There are numerous other ways of using this glut of fruit; damson ice-cream, damson crumble, damson gin, damson cheese, damson sauce (particularly good with gammon and game, like cranberry relish).

    damson-004

    This recipe is courtesy of the queen of cooking, Delia Smith.

    Spiced Damson Chutney

    1.5kg damsons
    2 heaped teaspoons ground ginger
    2 cinnamon sticks
    25g allspice berries
    1 tablespoon cloves
    2 star anise
    1.2 litres vinegar – cider or white wine vinegar have the best flavour
    450g cooking apples, peeled and cored
    3 onions, peeled
    3 cloves of garlic, peeled and crushed
    450g seedless raisins
    900g sugar – mixture of at least half soft brown and granulated sugar
    2 tablespoons salt
     
    Stew the damsons gently with 250ml of the vinegar until very soft. Leave to cool then, wearing rubber gloves, fish out all the stones.
    Put the stewed stoned damsons into a large preserving pan. Finely chop the apples and onions (using a food processor is perfect) and add to the pan.
    Tie the spices together in muslin with string, drop the spice bag into the pan and tie the other end of the string to handle of the pan.
    Add all the other ingredients and stir well.
    Bring to the boil and reduce the heat down so the pot gently simmers away for 3 to 4 hours. You need to stir fairly often and almost continuously for the last couple of hours because like all chutneys it tends to stick to the bottom of the pan – you don’t want burnt chutney.
    You will know the chutney is ready for potting when a channel drawn across the top stays in place for 5 seconds or so and does not fill with liquid (the vinegar).
    While it is still warm, pot into hot sterilised jars , filling to within 10 milimetres of the top. Cover with a waxed disc and seal with a vinegar-proof lid.
    Leave to cool entirely before labelling. This chutney needs to mature for at least 3 months before eating.
     
    damson-001

    The start of cooking.

    damson-002

    Trying to show you when the chutney is ready for potting but the steam kept getting in the way!


  3. Maderia cake – a celebration cake for decorating

    September 21, 2014 by sarah

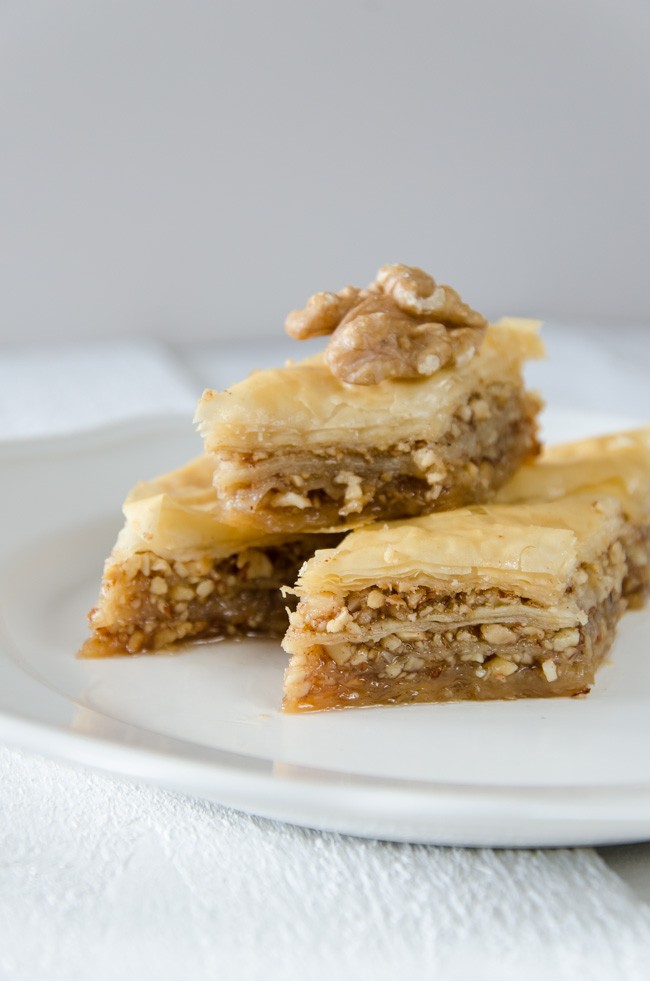
    A madeira cake is ideal for celebration cakes as it is firm and moist and makes a good base for carving, icing and decorating. Glycerine can be added to the recipe to improve moistness on keeping but I haven’t tried this and would not recommend keeping this cake for more than a week even when iced. You want the cake to taste good as well as look good!

    This is the recipe I used for my poppies cake for the 2014 Wigginton Show. Although the judges didn’t cut it or taste, I can verify that the cake was still moist and tasty 5 days after I made it and 4 days after it was iced.

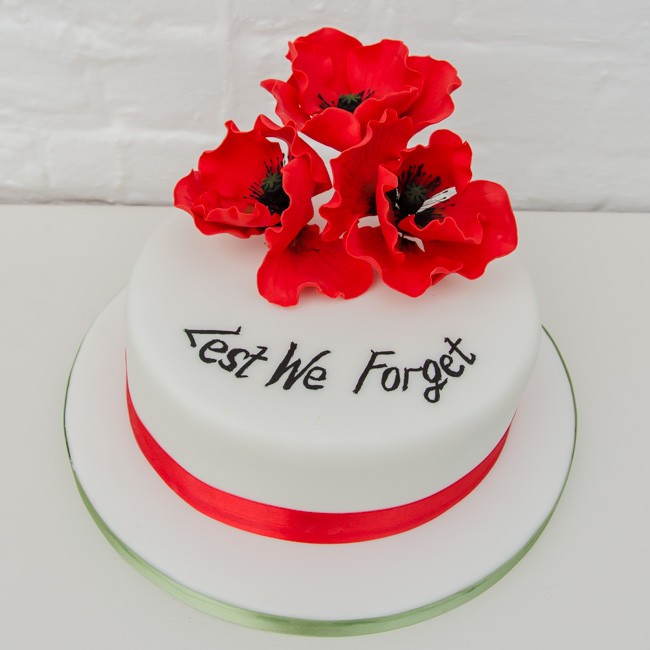
    I really enjoyed making the sugar paste poppies; I enjoy taking on a new challenge, researching the project and seeing how it turned out. My initial thought was for a bunch of roses with some other flowers and leaves but quickly realised that this was over ambitious in the time I had. When I was thinking about a single type of simple flower that looks good on its own, there was a flurry of news reports about World War One so this was an easy decision – a simple flower and a topical subject! I unfortunately don’t have photos of how I made the flowers to show you but I used two online tutorials – this one and this one. I didn’t have a veiner so I gently impressed the back of a knife into the petals when they were on the foam mat.

    maderia cake-004

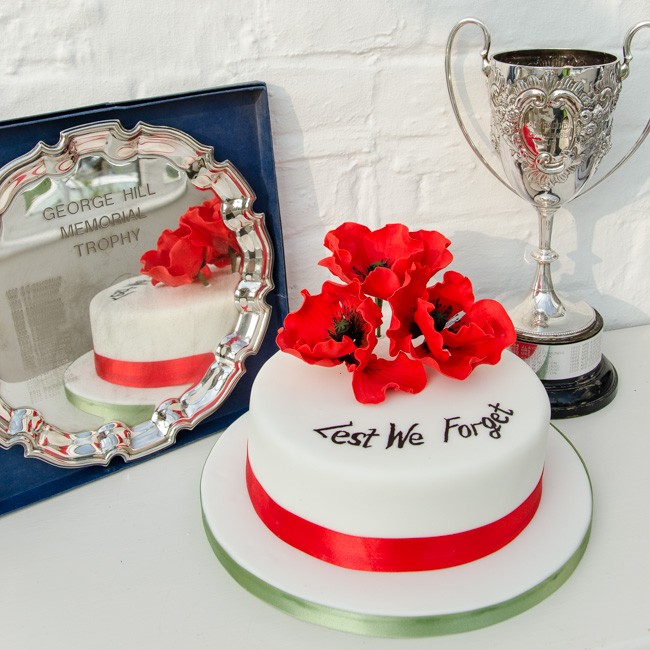
    ‘Lest We Forget’ cake with Lady Hadden Challenge Cup (most points in home classes) and George Hill Memorial Trophy (best wine)

    maderia cake-001

    8″ (20cm) round Madeira Cake

    Ingredients

    • 375g plain flour
    • 1½ teaspoons baking powder
    • 315g caster sugar
    • 315g unsalted butter
    • good pinch of fine salt
    • 5 medium eggs, cracked and beaten individually
    • 1 teaspoon vanilla extract or zest of 2 lemons
    • 3 tablespoons of milk

    Method

    The eggs and butter need to be at room temperature before you start. Line the 8″/20cm loose bottom or springform tin with baking parchment. Around the outside of the tin wrap and secure a good thickness of newspaper – this helps the cake bake more evenly and helps avoid a domed top.

    Cream together the sugar and butter until very light and pale. Add the beaten eggs one at a time with a spoonful of flour between each one to prevent curdling. Then mix in the vanilla. Sift over the flour, baking powder and salt and fold in with a metal spoon. Add enough milk to make a soft dropping consistency; you may not need it all. Alternatively, after creaming the butter and sugar, dump in the eggs, milk and sift over the dry ingredients and use an electric mixer and beat for 1 minute only.  Add any flavourings if wished and for the final mix use a rubber spatula to make sure all ingredients on the bottom and sides are incorporated.

    Place the mixture into your prepared greased and lined tin. Smooth the top with a spatula, make a shallow depression in the centre and give the tin a sharp tap to remove any air pockets.

    Place the cake tin in the centre of a pre-heated oven 160°C (fan 140 ºC) for 1½ to 1¾ hours.  I always add a tray of water in the bottom of the oven whilst baking to add more moisture to the cake. The cake may take up to 2 hours to bake but if it looks like it is browning on top before the middle is done then make a foil hat with a small hole in the middle for the steam to escape. Allow to cool completely in the tin.

    You can flavour the cakes with a lemon mixture which is poured over the baked cake whilst still warm and still in the tin, but first make small holes in the cake using a long wooden skewer to allow the mixture to pour through.

    Buttercream Icing


    Enough to fill and cover an 8″/20cm cake – if doing as a cake crumb layer then final icing I think you need a bit more than this but this amount is adequate if covering with fondant after.

    Ingredients

    • 150g unsalted butter
    • 250g icing sugar
    • 1/2 teaspoon vanilla essence
    • 1 tablespoon milk


    Make sure the butter is very soft but not melted; beat for a minute so smooth and soft.

    Gradually beat in the icing sugar, sifting it over the butter. Add the vanilla essence and milk at the end to form a smooth icing.

    maderia cake-002

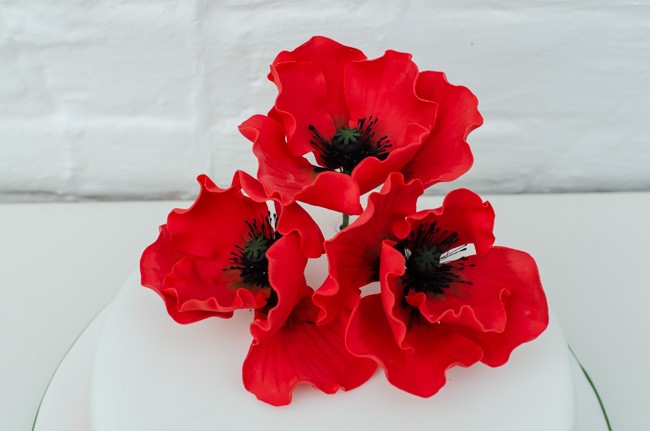
    A close up of the poppies

    maderia cake-003

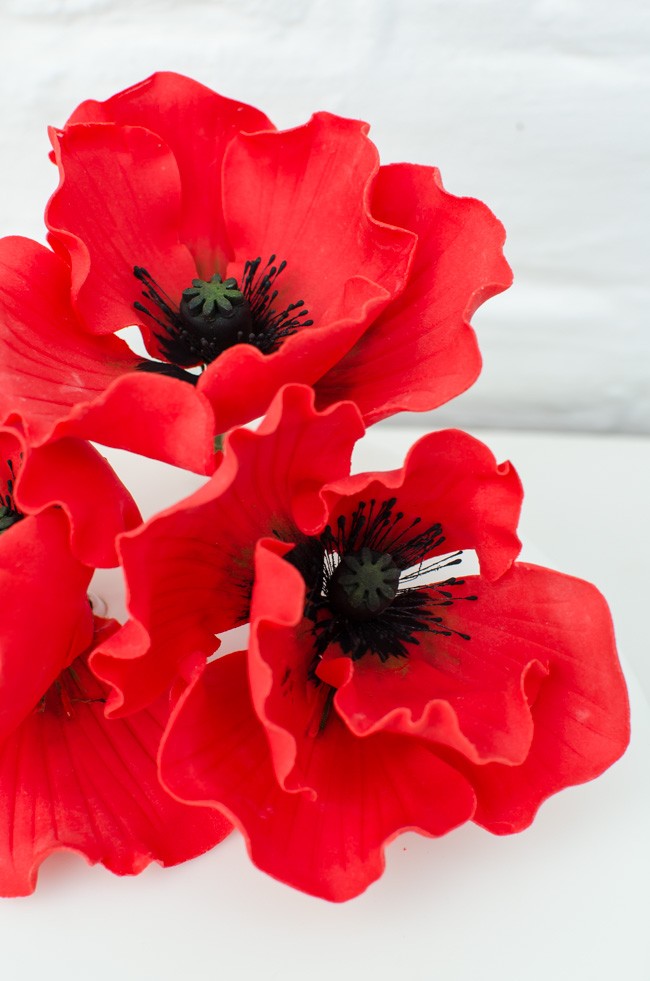
    The poppies in more detail.

    maderia cake-005

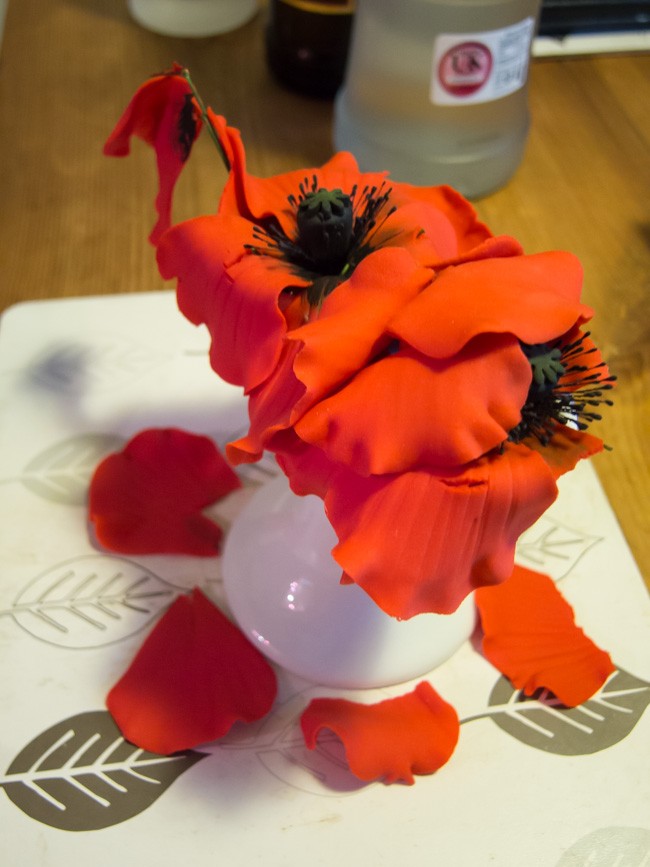
    It was so humid this weekend that the poppies flopped and all the petals fall off!


  4. Chocolate raspberry cake

    September 14, 2014 by sarah

    I have been lusting after a truly chocolatey cake for a few weeks after tasting some rather disappointing imitations (or ‘brown cake’ as I call it). And this cake hit the spot. Unfortunately I made it for friends at work so I couldn’t cut into it to show you what it looked like inside but believe me, it is a gorgeous pink creamy pillow. This cake eats like a dream – powerful chocolate flavour, not too sweet with a creamy centre and the tartness of the raspberries cutting through the richness.

    _1SK7112

    Chocolate Raspberry Cake


    FOR THE CAKE
    150ml milk
    1 tablespoon of butter
    1 teaspoon vanilla extract
    3 eggs
    200g caster sugar
    175g plain flour
    3 tablespoon good quality cocoa
    1 teaspoon bicarbonate of soda
     
    FOR THE FILLING
    150ml double cream
    150g raspberries
     
    FOR THE GANACHE ICING
    120ml double cream
    120g good quality dark chocolate, chopped finely
    1 tablespoon golden syrup
    15g butter
    125g raspberries
     
    Preheat the oven to 180 ºC/fan 160 ºC.
    Grease and line a 23cm springform tin.
    Pour the milk into a small saucepan with the butter and heat until warm and melted. Add the vanilla.
    Whisk the eggs and sugar until very light and thick (ribbon trails). Pour in the milk mixture, whisking all the time. Sift over the dry ingredients and carefully fold in until no trace of flour lumps remain. 
    Pour into the tin and cook for 20-25 minutes until light and springing in the centre. Allow to cool in the tin for 15 minutes then finish cooling on a wire wrack with a tea towel over so it doesn’t dry out.
    The cake must be completely cool before filling and icing. It can be made 24 hours in advance but no longer than that as it will dry out. Make sure it is well wrapped in baking parchment then a carrier bag.
    Split the cake in half.
    Whip the cream until thick but not stiff. Add in the raspberries, crushing them against the side of the bowl to release the juices so you get a wonderfully mottled pink mixture.
    Sandwich the two halves of cake with the raspberry cream.
    To make the icing, place the cream, chocolate, syrup and butter in a glass bowl over a pan of simmering water ( a bain marie) and heat until it looks like the chocolate is half melted. Take off the heat and with a spoon beat until smooth. Leave to cool long enough so it thickens (it took mine about 30 minutes at UK summer temperatures).
    Pour and spread the ganache over the filled cake. Decorate with the raspberries.
    Do not refrigerate this cake and eat within a few hours.
     

  5. Bakewell Tart

    September 6, 2014 by sarah

    ‘A bakewell tart (maximum tin 8″)’ is one competition section in this years local show, so I though I’d give it a go and enter. We went to Bakewell, the town itself, a couple of years ago on a weekend trip and tried the Bakewell Tart there but it was most definitely a pudding rather what I would class a tart so that wouldn’t do for the show, though it was very nice. In fact, delving into the history reveals that today’s frangipan and jam filled tart bears no resemblance to puddings of olde that had custard and candied fruit as the filling of a puff pastry case. I used the Queen of baking’s (i.e. Mary Berry) recipe as a guide and tried to steer clear of any Kiplings cakes resemblance.

    I am please with how my initial Bakewell tart turned out so I decided to go with this recipe for the show. I will have to make it 48 hours in advance so finger crossed it doesn’t go soggy! The pastry was lovely and thin and crisp, plenty of jam so you could tell what flavour it was and the frangipan was a dense sponge with a lovely almond flavour without being too heavy. Hope the judges agree! I will find out in just a few hours so will post an update then!

    9/9/14 – update – it got first in the show so the recipe can’t be too bad!


    _1SK7079

    Bakewell Tart

    Makes one 8″/20cm tart plus a couple of individual ones
     
    350g shortcrust pastry, either bought or for a show must be made
    (175g plain flour, 75g chilled butter, pinch salt, cold water – rub the butter into the flour and salt, when it resembles breadcrumbs add enough cold water to bring it together to form a soft dough, wrap in cling film and chill in the fridge for at least an hour)
     
    jar of good quality raspberry jam
    115g  unsalted butter, softened/room temperature
    115g caster sugar
    2 eggs plus an extra yolk
    1/2 teaspoon vanilla essence
    1/2 teaspoon almond essence
    115g ground almonds
    20g plain flour
    1/2 teaspoon baking p0wder
    flaked almonds for the top
     
    Roll out the dough on a lightly floured surface and use to line an 8″/20cm loose bottom flan/tart tin. Use the left over pastry to line a couple of deep individual tins. Make sure the pastry is right up to the corners and trim the edge carefully and prick the base all over with a fork. Put in the fridge to chill for 30 minutes.
    Preheat the oven to 200 ºC/180 ºC fan.
    Line the pastry cases with baking parchment and fill with baking beans. Blind bake for 15 minutes (probably 10 minutes for the individual tarts) then remove the beans and paper and return to the oven for another 5 minutes until the base  is cooked through but the edges are not coloured too much.
    Take the tarts out of the oven and allow to cool. Turn the oven down to 180 ºC/fan 160 ºC.
    Make the filling by whisking the butter and sugar until creamed then add the flavourings to the eggs and add all the remaining filling ingredients except the jam and flaked almonds. Fold together until well mixed.
    Spread jam generously over the base of the pastry tarts – I used about half a jar on the big tart.
    Top the jam with the frangipan and spread until smooth and the frangipan is right up to the pastry edge and level with it. Sprinkle over the flaked almonds.
    Place on a baking tray in the preheated oven for 30-35 minutes, turning a couple of times so it colours evenly. If it is colouring too much then loosely cover with foil.
    Leave to cool in the tin for 10-15 minutes then finish cooling on a cooling wrack.
    Decorate with white icing if wished (icing sugar with enough water or lemon juice to make a pouring consistency).
     
    _1SK7087


  6. Baklava

    September 3, 2014 by sarah

    There really is a hole in my body that can only be filled by a gooey, sticky pastry and the baklava hits the spot. Whether it is for mid morning coffee, a post lunch pick me up, an easy desert or post dinner coffee petit four. Considering how expensive it is to buy ready made, it is ridiculously easy to make but everyone will think you spent hours in the kitchen. And you can customise it to your own tastes – less syrup, more spice, different nuts etc. Give it a whirl.

    baklava (2 of 4)

    Baklava

    150-200g unsalted or slightly salted butter, melted in small amounts (in microwave is the easiest way)
    1 pack of fine filo sheets (16 sheets or 200g)
     
    Filling
    350-400g roughly chopped nuts with some ground finer
    (mainly walnuts plus almonds, hazelnuts etc but no peanuts)
    1 tsp ground cinnamon
    1 tsp ground mixed spice
    60g caster sugar
     
    Syrup
    300ml water
    360g caster sugar
    100ml sweet sherry
    3-5 whole cloves
    1 stick cinnamon broken up
    zest of an orange
    2 tablespoon clear honey
    3 tsp lemon juice
    options – orange blossom water
     
    baklava (1 of 4) baklava (3 of 4)
     
    Preheat the oven to 180 ºC/fan 160 ºC.
    Brush the sides and base of a baking tin about 18 x 25 x 5cm in size with melted butter.
    Make the filling by combining the filling ingredients in a large bowl and then dividing into 3 equal lots.
    Spread the filo pastry on a board or tray and cover with a slightly dampened clean tea towel to stop it drying out.
    Butter sheets of the pastry and fold into the base of the baking tin to use about 4 sheets.
    Sprinkle over a one third portion of filling and level off so even coverage over the pastry.
    Put in the next set of folded buttered filo pastry and filling and repeat this process, finishing with pastry on the top, well buttered.
    Cut into slices while in the tray before cooking with a sharp knife – square or diamond shapes.
    Bake in the preheated oven for 30-45 minutes until a dismantled slice is cooked all the way through.
    While the baklava is cooking, make the syrup by combining all the syrup ingredients in a pan, stir until the sugar is dissolved then bring to the boil. Reduce the heat under the pan so it simmers and simmer for 15 minutes. Leave to cool.
    When the pastry comes out of the oven, strain over the syrup until you can just see the syrup coming up to near the top of the pastry. Leave to cool entirely in the tin.
    Store in an airtight container and it will last up to a week – if you can resist that long!
     
    baklava (4 of 4)