RSS Feed

December, 2014

  1. Meringue Mushrooms

    December 30, 2014 by sarah

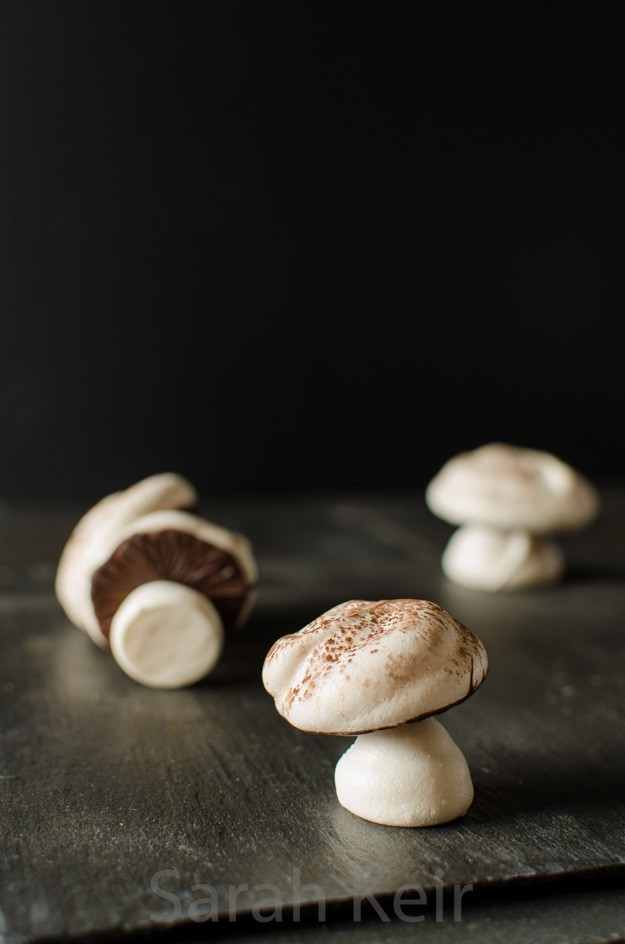
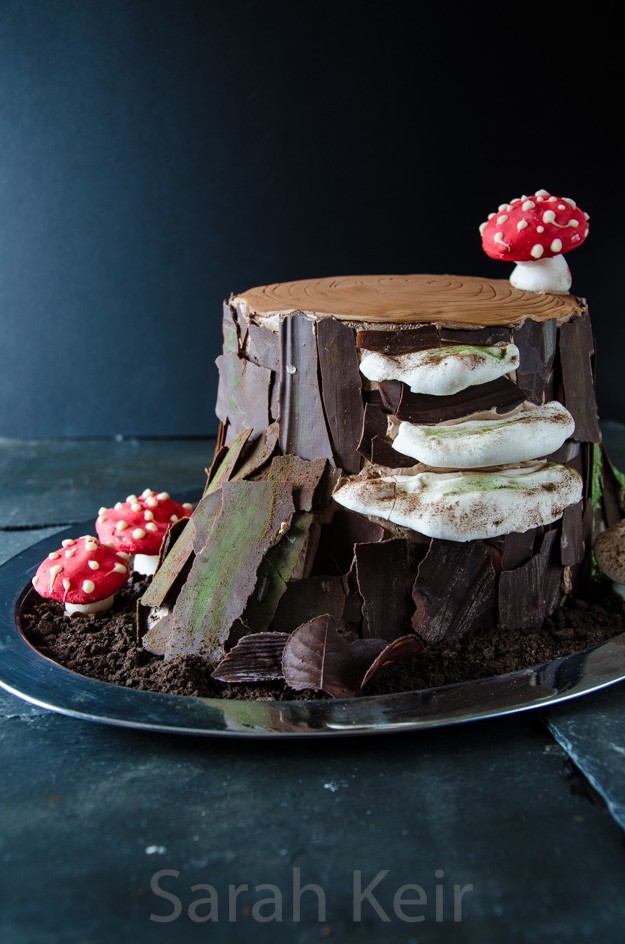
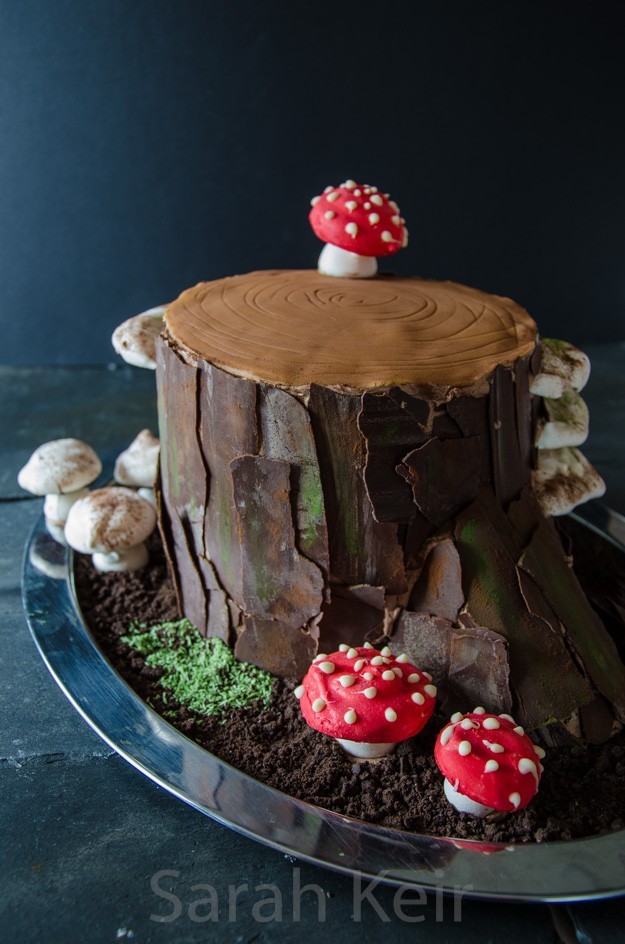
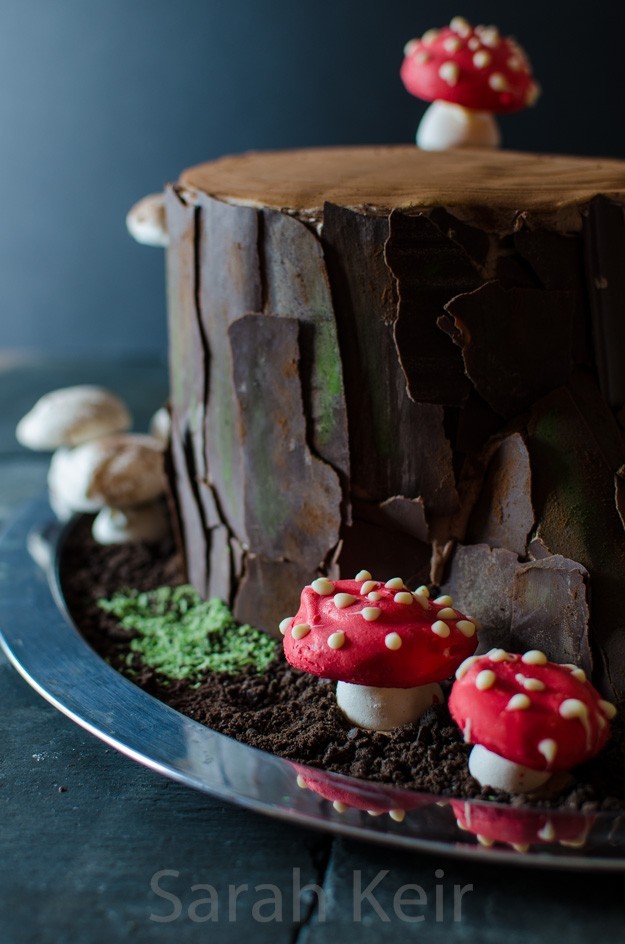
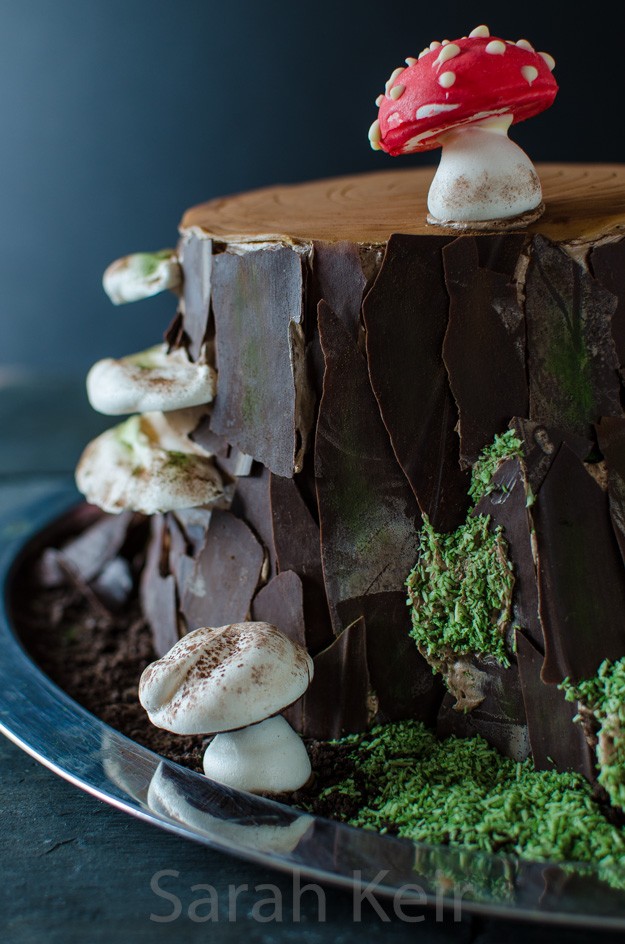
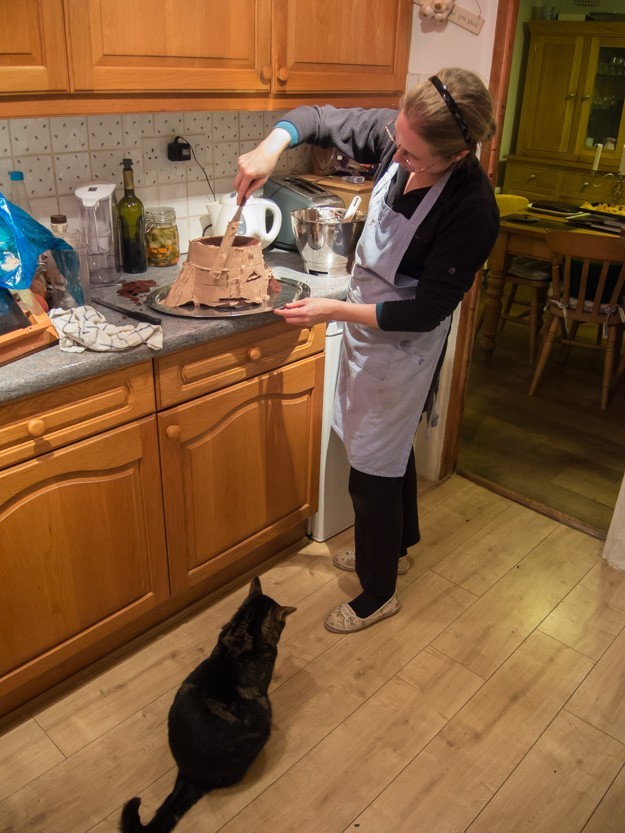
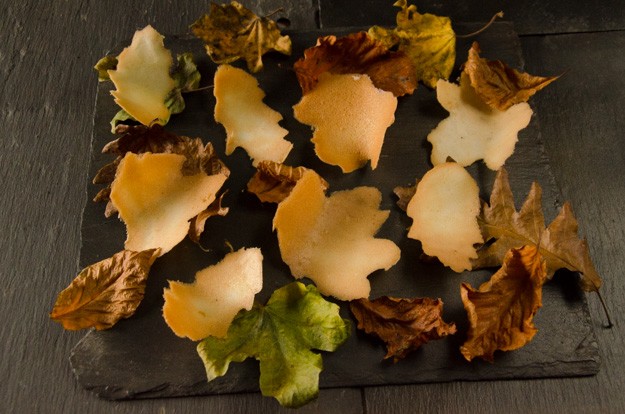
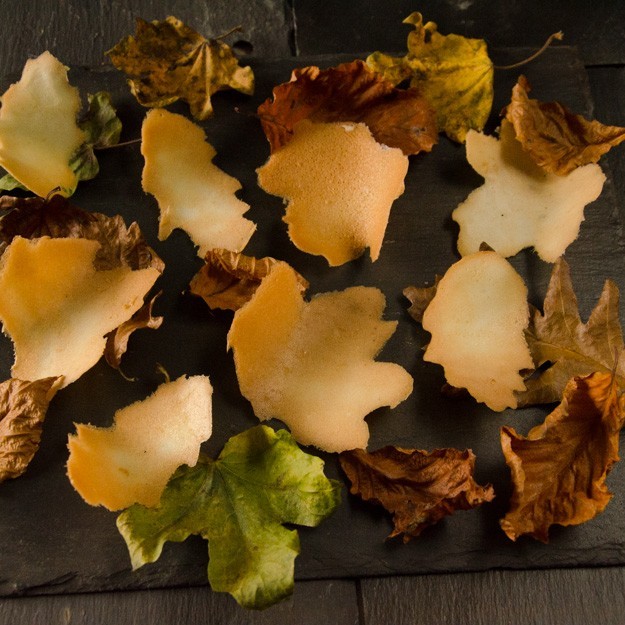
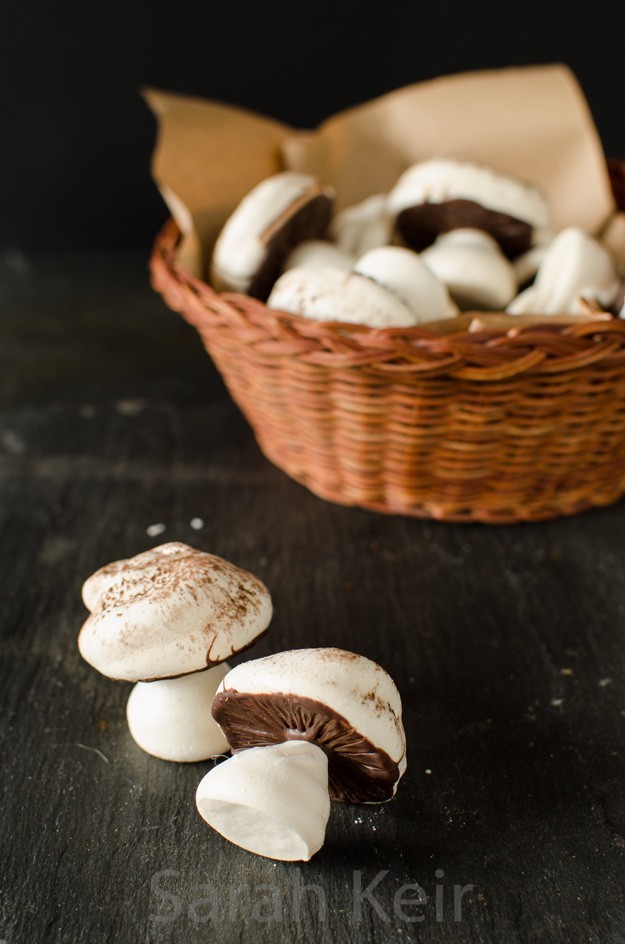
    My idea for the stump de Noël cake came indirectly. I saw pictures of beautiful traditional bûche de Noël that were decorated with meringue mushrooms but a bûche would not be large enough to feed the number of people expected at the Christmas party so the cake metamorphosed into a larger stump which required more and more elaborate mushrooms. They are all made very simply from French meringue; field mushrooms with dark chocolate gills, bracket fungi from half moons of meringue dusted with cocoa powder and fly agarics decorated with the quintessential toadstool red cap with white spots.

    meringue-003


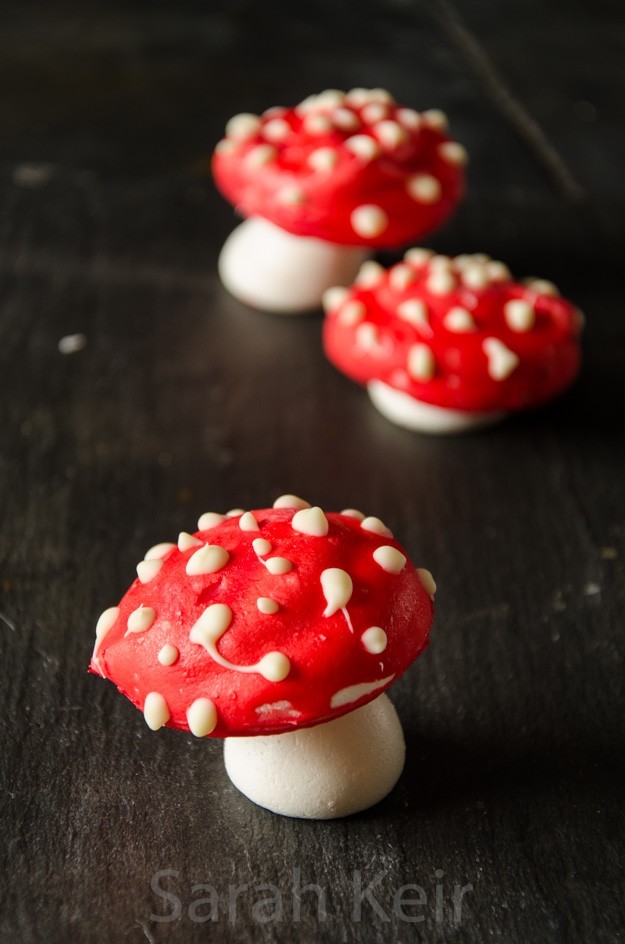
    I felt I had to try and make the fly acargic toadstools; the myth from the far icy North of reindeer flying apparently comes the eating of fly agarics which are supposedly hallucinogenic. I don’t recommend trying them; all our mushroom collecting books suggest they are nasty poisonous. The fly agarics were the hardest to make because white chocolate is a nightmare to work with. Three times I melted white chocolate and added red gel paste and three times the chocolate seized. I read all the tricks I could; I added it before melting the chocolate, I added it to some melted chocolate and then added it to the rest. I tried freeze dried raspberry dust moistened with water instead but that wasn’t red enough. In a fit of desperation I read somewhere in blogland that adding a little water to chocolate is a disaster (it seizes) but if you add alot then something miraculous happens. And it did. I added about equal volume of hot (almost boiling) water to a lump of seized white chocolate which I had coloured red, beat it vigorously with a wooden spoon and lo and behold, liquid red chocolate! I used this to dip half the cooked meringue tops (I did it twice, repeating the process when the first layer was set in order to get a good strong red colour). Once set, I added white dots in melted white chocolate. I think next time I make them, I will try colouring the meringue for the tops red so there is no messing around with finicky white chocolate.

    meringue-004

    Meringue Mushrooms

     
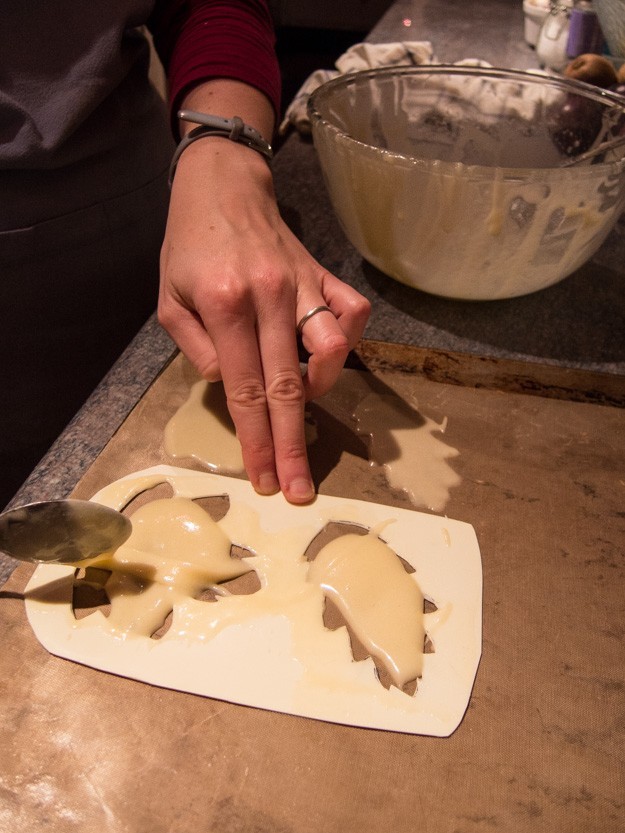
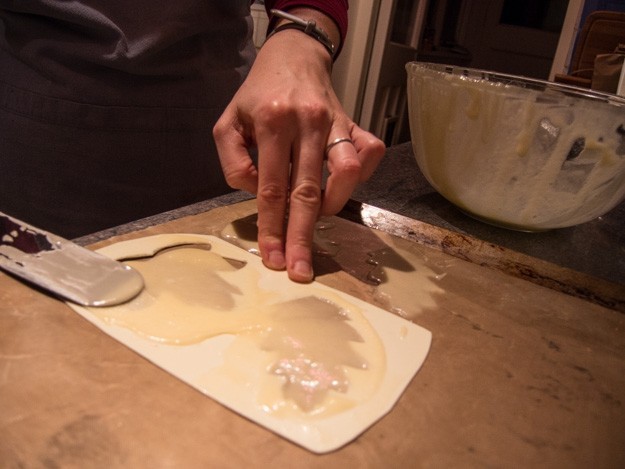
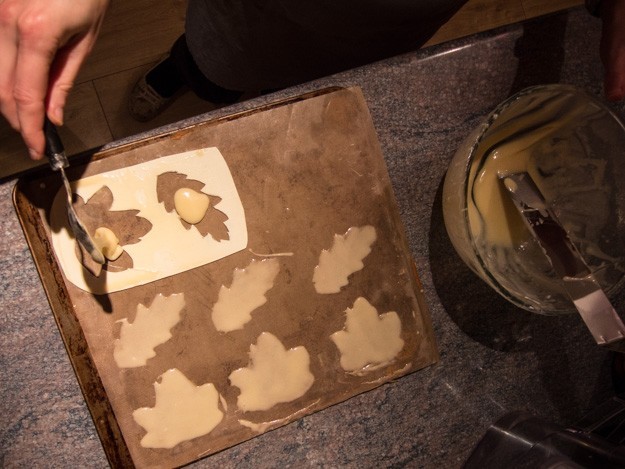
    3 medium egg whites (60g) at room temperature
    1/4 teaspoon cream of tartar
    pinch of salt
    75g caster sugar
    25g icing sugar
    cocoa powder and melted chocolate to decorate
     
    Prepare two large baking sheets by lining them with baking parchment (siliconised paper). 
    Preheat the oven to 100 ºC.
    Make sure a large glass/pyrex bowl and whisks are completely clean of any grease – I wipe down with kitchen paper dampened with vinegar.
    In the large bowl, whisk the egg whites, cream of tartar and salt until soft peaks form.
    At this stage, add the caster sugar one tablespoonful at a time, whisking well between each addition. When all the caster sugar is added, sift over the icing sugar and then whisk again until the mixture is thick and glossy. Stop at this stage otherwise over beating will cause the bubbles in the egg whites to breakdown and you’ll end up with runny meringue.
    Put the meringue in a pipping bag fitted with a 1 to 1.5cm plain nozzle.
    To pipe the caps, hold the bag vertically just above the baking sheet and squeeze the bag with even pressure until a round is formed – size and height up to you. Stop squeezing and twist the bag to remove. If any meringue peaks stay sticking up then you can flatten them with a dampened finger. Repeat this to make about 20 caps, leaving at least a couple of centimeters between each disc.
    To pipe the stems, hold the bag vertically again but as you squeeze the bag, pull upwards to form a vertical stem of meringue. Don’t worry if they are a little lopsided – it adds to the mushrooms charm. Use the remaining meringue to make as many stems as possible.
    The bracket fungi were made from meringue piped into semi-circles with the inner circumference roughly what I though the curve of the cake would be.
    Dust with a light shower of cocoa powder over the meringue caps that will become regular mushrooms (I did half and half without).
    Place in the preheated oven for about an hour and half. Turn the oven off, prop the door open ajar and leave to completely cool.
    To assemble the mushrooms, use a metal skewer or small knife to make a small hole about 0.5cm diameter in the underside of the mushroom caps.
    Melt plain chocolate and when cooling down, paint the underside of the caps with the chocolate, use a toothpick to draw gill lines in the chocolate, drawing into the centre and firmly press a meringue stem into the centre of the underside of the cap so that it seats itself into the hole you made with a good glob of chocolate around. Set upside down on a baking tray until the chocolate has set.
    For the fly agarics, I made the holes in the underside of the caps then decorated the caps with red chocolate and piped on white chocolate spots and once dry I used some more melted white chocolate to fix the stems into the underside of the caps.
     
    meringue-001

  2. More machine embroidery

    December 28, 2014 by sarah

    I decided to use my new found embroidery talents to make Christmas presents.

    embroidery-003

    ‘Secret’ santa present for a nurse at work – Betty the basset hound.

    embroidery-001

    Christmas present for my Mum – her springer spaniel Corrie.

    embroidery-002

    And her working cocker spaniel Millie.


  3. Stump de Noel – a special chocolate Christmas cake

    December 27, 2014 by sarah

    Here is a picture of the chocolate cake I made for our work Christmas Eve party. I am very proud of it!

    noel-005


    I feel this was one of my most successful cakes yet. It looked stunning and tasted delicious! By 6pm that evening there was just one small knob of cake left and some crumbs!

    noel-006


    Inside is a four tier moist buttermilk chocolate cake. I also made a tray bake using the same recipe and decorated it with left over meringue mushrooms and buttercream. Between the two, the cakes fed 30-40 people with generous slices. I will post the recipes for the chocolate cake and chocolate Swiss meringue buttercream and I’ll put up the directions for the meringue mushrooms imminently. This was my second or third attempt at Swiss meringue buttercream. Previous attempts were rather heavy but this time it turned out how is was supposed to be and it was the perfect soft creamy feeling in the mouth but not overbearingly buttery or sweet; almost like eating chocolate mousse on a cake! I think the difference has to be in using a stand mixer to make it; it really gets lots of air into the meringue. So I can reveal one of the Christmas presents from my husband; a Kenwood stand mixer. I had to open it before the day so I could use it to make this cake but is had been sitting on our bedroom floor for about 3 weeks prior to this so I knew what I was getting (plus my husband asked what model I wanted so it was a bit of a give away)!

    noel-007


    It wasn’t until I had added the extras to the finished cake did it sit so resplendent on its old silver tray. This whole cake is most definitely better than the sum of its parts; meringue mushrooms, chocolate shards for bark, fudge cut surface with rings, oreo cookie dirt, green coconut moss, chocolate and tuile biscuit leaves. It was an endevour to get this cake together. I think it was a total of about 10 hours work; 4 hours at the weekend making chocolate things and the meringue mushrooms and 6 hours on the afternoon/evening before the party to make the cake and icing and assemble it. I love how this cake looks rustic and rough around the edges but that it only adds to the reality of the finished art work. It is a cake to be proud of!

    noel-008


    Here are some pictures of me making it.

    noel-004

    The cat helping.

    noel-001

    The four tiers and some of the tray bake.

    noel-003

    Piping on the icing.

    noel-002

    Perfect SBC consistancy.


  4. Chestnut and Almond Cake

    December 20, 2014 by sarah

    Being a foodie has it down sides. Apart from the inevitable battle of the bulge (i.e. weight gain, not anything to do with trumpets) and the critical assessment of every meal you eat, you end up with an odd assortment of ingredients lurking in the fridge and cupboards and nothing real to eat on a day to day basis. Or at least I do. After a bit of a cupboard tidy out at the weekend (really to fit in more special buys), I found a tin of chestnut puree (out of date by 6 months) and some tiny jars of homemade marron glacé in syrup (in which the sugar had crystalised – I made them at least 2 years ago). Most of the recipes I searched for required sweetened chestnut puree or marron glacé puree but they sounded too sweet and sickly. So this recipe is a hash up of a couple of different recipes; Nigella in’How to be a Dometic Goddess’ and this recipe on someone else’s blog. My recipe can easy be made dairy free (see the added notes) and is naturally gluten free, being based on ground almonds and the chestnut puree. It is not calorie or guilt free; it is rich and dense but not overwhelmingly sweet or cloying like some chestnut based recipes can be. It is so moreish and decadent; perfect for this for this time of year. And apparently chestnuts are good for you.

    chestnut-002


    This year I bought my chestnuts from Oxford covered market and they are a complete contrast to the ones in the supermarkets. They are so large, moist and sweet. We roasted them on our sitting rom fire last weekend and the sweet nutty smell filled the house with seasonal joy. I made my own marron glacé a few years ago but I have to say it was not worth the effort, no matter how expensive they are! I did find a small jar of crumbled bits in syrup that I had stashed away and that made a perfect finish for this cake. Feel free to buy them rather than make them; I won’t hold it against you. Next time will try adding 250g melted plain chocolate to the mixture, as Nigella has in her recipe. This recipe is very rich and feeds 10-12 easily. It doesn’t need cream to counteract any sweetness but some creme fraiché would go well if serving this cake for desert.

    chestnut-001

    Chestnut and Almond Cake

     
    4 large eggs, separated
    200g caster sugar
    100g butter (or replace with 70ml of vegetable oil for vegan version)
    200g ground almonds
    400g tin of chestnut puree (make sure unsweetened)
    1/2 orange, zested
    1 teaspoon baking powder
    1 teaspoon vanilla extract
    1-2 tablespoon honey flavour liqueur or rum or almond milk
     
    For the chocolate covering
    200g plain chocolate
    1 tablespoon glucose syrup or golden syrup
    pinch salt
    70g butter or 100ml cream or 70g dairy-free margarine
     
    Preheat oven to 180 ºC/160 ºC fan.
    Line the bottom and grease well a 20cm/8 inch springform tin.
    Whisk the egg yolks, sugar and vanilla extract together until light in colour and creamy.
    Add the melted butter – make sure it is only at blood temperature, no hotter.
    In a bowl, tip the chestnut puree and fork up until smooth paste.
    Add the chestnut puree, ground almonds, orange zest and baking powder to the egg/sugar bowl and mix well; add the extra liquid as required so mixture not too stiff (it should fall off the spoon easily).
    In a large clean bowl, whisk the egg whites until stiff peaks form. Add a quarter of these whisked whites to the cake mix and beat to loosen the mixture. Gently fold in the rest of the whites being careful not to knock out too much air.
    Pour into the tin and place in the middle of the oven. Bake for about 45 minutes to an hour until a skewer comes out clean. Leave to cool entirely in the tin before running a knife around the outside and turning upside down onto a plate. Don’t worry if the cake looks dry and cracked – it won’t be dry inside.
    Make the chocolate covering by putting all the ingredients for the covering into a bain marie (i.e. a bowl over a gently simmering pan of water), stir until smooth then pour over the cake. You may need to wait 10 minutes or so for the covering to thicken – if it is too thin it will just run off the cake.
    Allow the covering to set before serving.
     
    chestnut-003

  5. Medlars – cheese and jelly

    December 14, 2014 by sarah

    When we were on holiday in Suffolk at the end of October, we came across a medlar tree in the car park of a National Trust property. I had a vague recollection of reading about medlars and being intrigued about this very old fruit, so after asking we filled a carrier bag full. They didn’t seem promising at that stage. I bit into one and it was hard and astringent (really unripe) but after some internet research, I found that they are only edible after ‘bletting’ which really is just another word for allowing to go rotten. So when we got them home, I laid them out in a flat box and put them in the shed. And forgot about them. Until this week. When I entered the shed I could smell a ripe fruity smell, which I followed to find the box of now bletted medlars! They had changed colour from a yellow green to deep brown. Eating them fresh is probably an acquired taste because at first I wasn’t sure if they were any good but after a few days of trying them, they grew on me. The fresh is a disgusting brown colour and a grainy but completely mushy texture, but the flavour is unique; like stewed apple with a hint of rhubarb. So here are a few posts on what I made with my medlars!

    medlar-003


    Medlars are related to roses and therefore apples. They contain about 5 large pips and a have a fairly tough skin. They were a fruit popular in medieval times and known as ‘cats (or dogs) arse’ because of their curious shaped bottoms! I have to say from a veterinary/anatomical point of view, they are not very anatomically correct. An unusual sweetmeat was made from spiced medlar cheese called chardequince, though it was made from that Cinderella of the British orchard, the medlar rather than the more popular quince. The historic food website has all manor of old food facts and trivia and you can see these chardequince. Also this kind of cheese is not a dairy cheese; it is an old-fashioned preserve made with fruit puree and sugar that is slowly simmer for a long time to reach a stiff consistency that is sliceable. Fruit cheeses are traditionally served with cheeses or meats but can also be eaten as a sweet (kind of like fruit pastilles) at the end of a meal or with nuts and port. They should last for a long time, a year at least, but I am keeping them in the spare fridge just to be safe as I don’t have an old fashioned larder (on the wish list though).

    medlar-002


    I have included both recipes here on the same page because they both start out the same. Take the bletted medlars and squish them in your hands into a large pan; if they are well bletted then this is easy. Add enough water to come half way up the fruit and simmer on a medium heat for 15-20 minutes until well and truly mushy. Use a potato masher to get the flesh out of the fruit.

    Medlar Jelly


    Put the cooked fruit and liquid into a jelly bag and suspend at least overnight to allow the juices to drip out. Give a little squeeze to release some more juice (I think I did it too much because the finished jelly was cloudy). Measure this juice into a pan and add the juice of a lemon and 450g granulated sugar for every pint of medlar juice. Warm slowly until the sugar is dissolved and then boil furiously until setting point is reached (it took about 10 minutes for mine). Take off the heat and allow to stand for a few minutes, skim off the scum and pot into sterilised jars while still boiling hot.
     
    medlar-006

    Medlar Cheese

     
    Take the stewed medlars and push the flesh though a sieve, discarding the skins and seeds. This takes ages; put some music or course work on in the back ground!
    Weight the puree into a heavy bottomed pan and add three quarters this weight of granulated sugar (e.g. 1kg puree will need 750g sugar) and the juice of a lemon.
    Heat gently, stirring frequently and constantly towards the time when the cheese is thickening. It is ready when you draw a spoon through the mixture and it stays parted for a few seconds – like the Red Sea! Prepare some moulds (muffin/cupcake pans, mini loaf tins, large loaf tins) by greasing the insides with some oil with no flavour (I used regular sunflower oil) using some kitchen paper. VERY carefully tip/spoon/pour some of the mixture into the moulds and level. Be very careful; it is like molten lava! Leave to cool overnight before turning out and wrapping in greaseproof paper. 
     
    UPDATE 21/9/15 – I tried making damson cheese with this recipe but waiting long enough for the Red Sea meant the mixture was over cooked – it tasted like burnt sugar and was so hard, it would not come out of the moulds and was not cuttable! I think less cooking next time. It is also very time consuming; took over and hour and a half to get this thick.
     
    medlar-007

  6. Spice 8 – Mustard seeds – homemade mustard

    December 7, 2014 by sarah

    Mustard seeds are small seeds of three related brassica (yes them of cabbage, turnip and broccoli fame) plants that give black, brown and white/yellow mustard. It is one of the few spices that will grow in the UK. The heat and fire in mustard seeds is only released once the seeds are broken down and this usually means grinding them and adding moisture. The heat molecules (icothiocyantes) are short lived unless something acidic (like vinegar) is added to the mix and are heat inactivated so once roasted like other spices often are, they remain with just a vague sense of mustardiness is left.

    Mustard seeds are a common ingredient in Indian cuisine and others of the region, especially in pickles, chutneys and vegetable dishes. Mustard oil, extracted from the seeds, is also often used. But perhaps the biggest use for mustard seeds in the cuisine of Western countries is as made into the condiment mustard in all its multitudinous varieties, for serving with cold meats, roast beef, and adding to mayonnaise, vinaigrettes, marinades and sauces. In its dry form, powdered mustard lacks potency; the addition of water releases the pungent compounds. The pungency of mustard is always reduced by heating; if added to a dish during cooking, it gives less pungency than if added afterwards. The many varieties of prepared mustards have a wide range of strengths and flavors, depending on the variety of mustard seed and the preparation method. The taste and “heat” of the mustard is determined largely by seed type, preparation and ingredients.Preparations from the white mustard plant have a less pungent flavor than preparations of black mustard. The temperature of the water and concentration of acids such as vinegar also determine the strength of a prepared mustard; hotter liquids and stronger acids denature the enzymes that make the strength-producing compounds. Thus, “hot” mustard is made with cold water, whereas using hot water produces a milder condiment, all else being equal.

    mustard-002


    Mustard seeds can easily be bought in bulk from Asian/Indian grocery shops. The advantage of making mustard condiment yourself, is that is infinitely customisable and you know exactly what has gone into it. You could use a local beer or mustard for a local feel or herbs from your garden (tarragon is traditional). You could alter the heat by increasing the proportion of black seeds or even adding a chili. This mustard will keep for at least a month in the fridge.

    Homemade Beer Mustard

     
    200g black mustard seeds
    150g yellow/white mustard seeds
    500ml beer or ale
    175ml cider vinegar or white wine vinegar
    1 tablespoon sea salt
    8 tablespoons runny honey
    1/4 teaspoon ground tumeric
    1 tablespoon ground mace
     
    Mix the mustard seeds and beer in a glass bowl, cover and leave overnight or 24 hours.
    Sterilise small jars for the mustard – clean well and set in an over set at about 120 ºC for 15 minutes or so, leave to cool in the oven.
    Tip all the ingredients (including the soaked mustard seeds and any excess beer) into a food processor and process until thick. You will need to scrape down the sides a couple of times. Stop when the mustard has achieved the desired consistency – I like mine more whole grain.
    Leave the mustard to sit for 15 minutes at least before tasting and adding more honey etc as you think it needs it.
    Spoon the mustard into the cooled jars, tapping gently on a a wooden board to release trapped air bubbles. Seal tightly and store in the fridge.
     
    mustard-003

  7. Tuile leaf biscuits

    December 4, 2014 by sarah

    Autumn feels the right time to make biscuits like this. With their delicate shades of cream and brown and the crisp crunchy texture, they are so like the real leaves that inspired them. I thought that tuiles would be hard to make as they are so delicate but although a fairly messy process (definitely time to get the pinnie on), they weren’t as bad as first feared. There certainly was some trial and error, especially with cooking times to get enough colour for them to be almost brown and leaf-like but also soft enough to be formed into different shapes. I think next time I may experiment with adding some coco powder to the batter in place of some of the flour, to give a darker colour without them needing so long in the oven. Also perhaps adding a little flavouring with almond or vanilla extracts.

    tuile-005


    Instead of buying expensive stencils, I cut out shapes from the thick plastic of an ice cream tub lid using a craft knife. I tried thinner plastic sheets but the tuiles were too thin to lift off the baking sheet. The choice of shape is entirely up to your imagination and biscuitry skills.A simple circle tuile could be drapped over the bottom of a cup or glass to form a bowl perfect for posh ice creams or sorbets. Fancier shapes could be used to top patisserie.

    tuile-002 tuile-003 tuile-004

    Tuile Biscuits

     
    2 medium egg whites
    70g icing sugar
    40g plain flour
    35g butter, melted
    pinch of salt
    optional – almond extract or vanilla extract
     
    Preheat the oven to 170 ºC fan. Line a flat baking sheet with a silicone baking sheet or mat.
    Beat the egg white and sugar with a whisk until combined. Sift over the flour and salt and whisk these in. Make sure the butter is only tepid and then beat that in too.
    Leave the mixture to sit for 30 minutes before using so it thickens.
    Place the stencil in the corner of the baking sheet on the silicone mat. Using a small offset spatula, spread the batter in a thin layer over the stencil, scraping off the excess. Carefully lift the stencil. Repeat to cover the baking mat.
    Bake until the tuiles are golden, only takes 5 minutes or so. Working very quickly, use a spatula to lift the tuiles off the baking sheet and drape them over a rolling pin or gently fold into an egg carton. If the tuiles get too stiff to bend then pop the tray back in the oven for 30 seconds or so.
    Repeat the process until all the batter is used. Store in an airtight container but the tuiles are best eaten within 24 hours of  making them as they go soft.
     
    tuile-006