RSS Feed
  1. Treacle Tart

    May 10, 2020 by sarah

    I started this blog post over 6 months ago and never got to the stage of finishing and publishing it. It may not be the time of year for stodgy, warming food with the current summer-like weather, but it is most definitely the time for comfort food! Especially recipes that are easy to make. With flour in short supply at the moment, I recommend you use ready made pastry, either fresh or frozen works, as the supermarkets seem to be stocking this at the moment without issues. The recipe contains only a couple of eggs so hopefully you can spare these and I have seen the local supermarket selling golden syrup. Satisfy those sweet-tooth cravings!

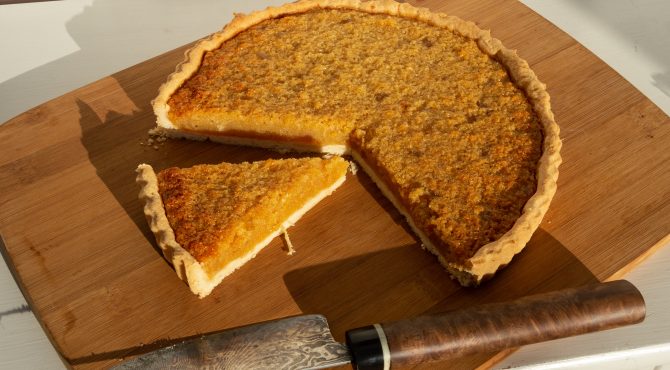
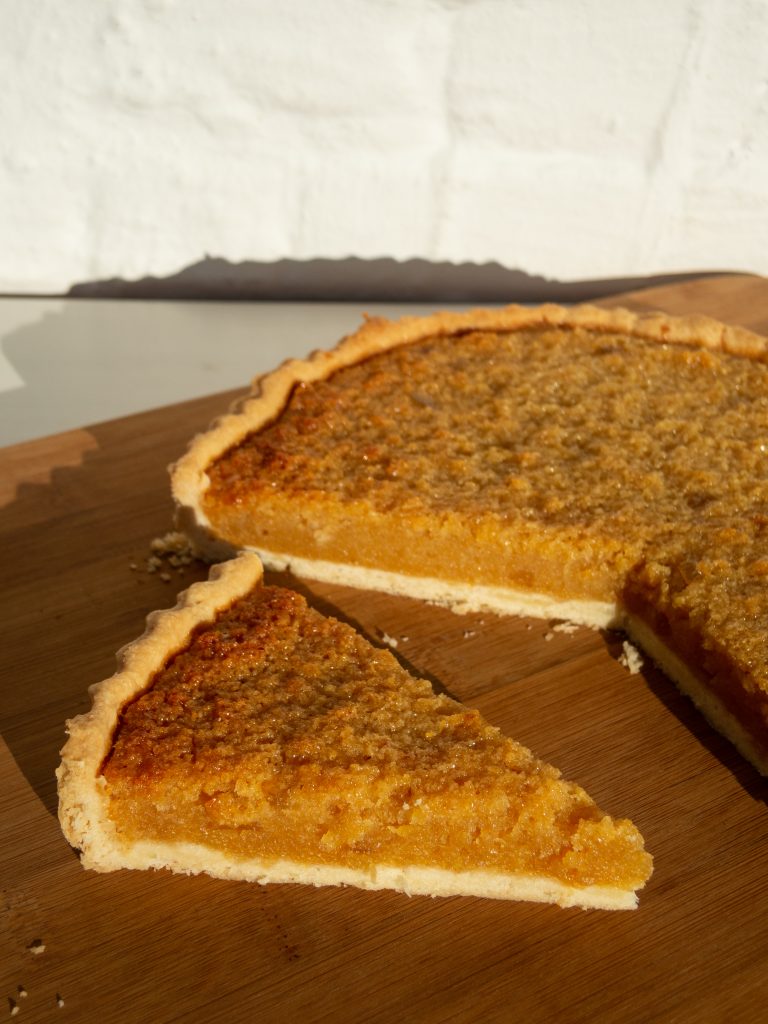
    November 2019 It is that time of year when I am craving comforting, warming food. Calorie heavy but oh so tasty. Something to keep out the cold from the inside. For those of you that have not had a traditional British treacle tart before may well be put off by the unprepossessing list of ingredients and even the name but this is definitely one of those dishes where the finished article far exceeds the sum of its parts. For a start is made with something called golden syrup, a buy-product of sugar making, either cane or beet. Treacle tarts are no longer made with true treacle or molasses which modern palates would find too strong and bitter tasting. Golden syrup has its own distinct but subtle flavour of slightly caramel-like and a hint of acidity at the end that makes it so moreish. It is a partially inverted sugar so I often use it if I have run out of commercial invert sugar in my confectionery and chocolate making. It is nothing like corn syrup and corn syrup cannot and must not be substituted in this recipe.

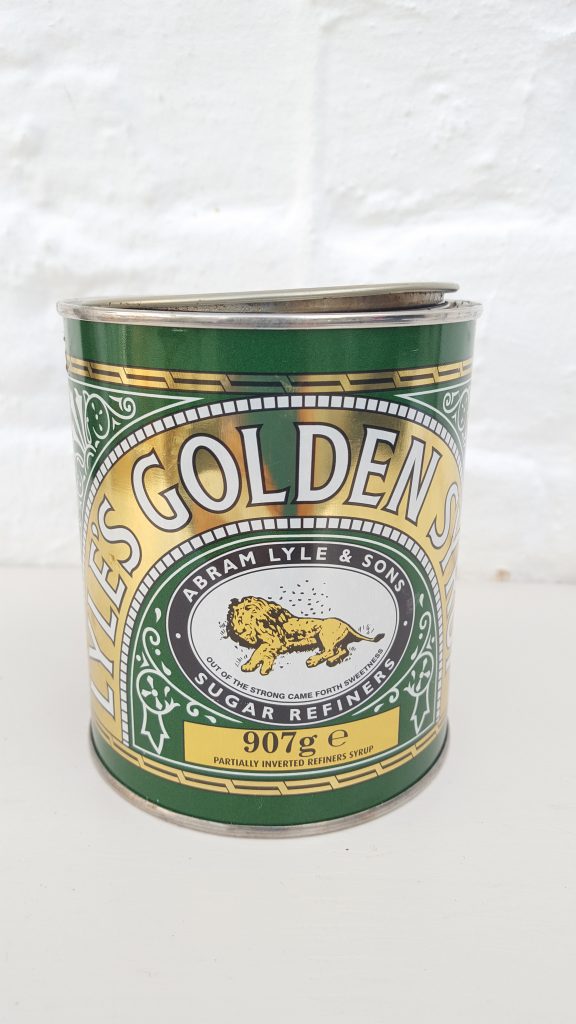
    I love the tin that Tate and Lyle Golden Syrup comes in but it wasn’t until I made this recipe did I notice the picture on the front and looked up what it means. The tin bears a picture of a rotting carcass of a lion with a swarm of bees and the slogan “Out of the strong came forth sweetness”. It is apparently a Biblical reference but rather gross! Luckily that does not reflect on the contents of the tin.

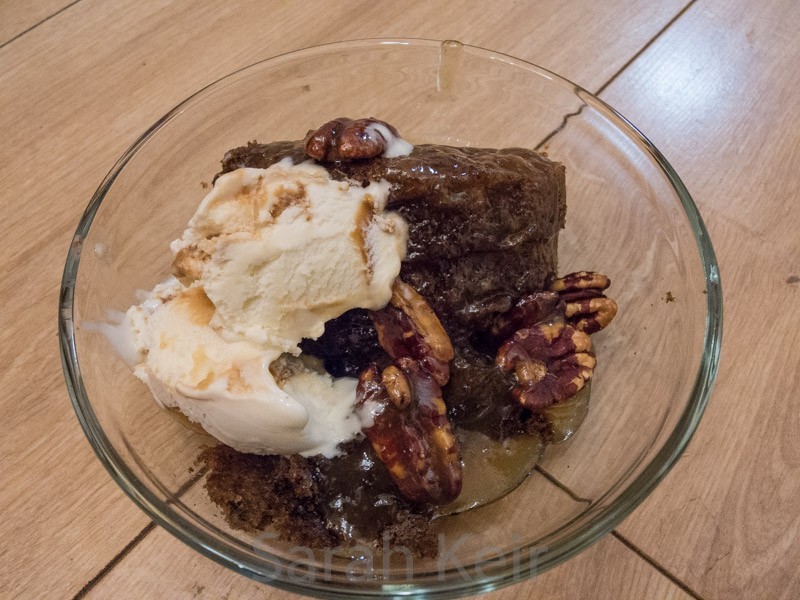
    This recipe is an amalgamation from several online but particularly this one in The Guardian from Felicity Cloake, the tester of all good recipes. Makes 8 generous slices or 10 good sized slices; the remainder freezes well. Serve with your favourite additional calorie side such as cream, custard or vanilla ice-cream. Delicious at room temperature or my favourite, slightly warm from the oven. Do not store in the fridge!

    Treacle Tart

    • 500g block ready made short-crust pastry (do not use sweetened or enriched pastry) or make your own with 300g flour and 150g butter.
    • 50g butter
    • 400g golden syrup – sit the jar in a bowl of hot water
    • 140g white breadcrumbs, made with slightly stale or toasted bread
    • 2 medium eggs, well beaten
    • 3 tablespoons of double cream
    • 1 tablespoon lemon juice and zest of one lemon
    • Optional – couple of knobs of stem ginger in syrup, finely chopped.

    Use the pastry to line a 23-24cm deep, loose-bottomed tart tin. Chill well while an oven heats to 200 C/fan 180 C. Prick the bottom of the pastry case, line with foil or grease-proof paper and weigh down with rice/beans/pastry ceramic beads. Blind bake for 15-20 minutes until just going golden, remove the blind baking stuff and return to the oven for another 5-10 minutes. Remove and brush the bottom well with some of the beaten egg and return to the oven for another few minutes to cook the egg – this will stop any sticky leakages!

    Reduce the oven temperature to 140 C.

    Melt the butter in a pan, add the golden syrup and continue to heat until warm through.

    Remove from the heat and add the eggs, cream, lemon and, if using, the ginger and stir well together. Pour over the breadcrumbs, mix swiftly and allow to sit for a few minutes. Do not over mix otherwise it will become chewy.

    Pour the filling mixture into the pastry case, sit all on a large baking sheet to collect any oozes and return to the oven at the lower temperature. It will need 35-40 minutes, and is cooked when still a little soft in the centre and only a hint of golden-brown colour on the outside edge.


  2. Mynce Pyes

    December 12, 2021 by sarah

    The past few years I have become increasingly interested in historical cooking. So much so that my husband bought an original 18th century cook book for me for a Birthday a few years ago (and spend an obscene amount of money to purchase it). In particular mediaeval and Tudor cookery has particularly interested me. And so hence this weekend I decided that it was only right and proper that I recreated a Tudor mince pie as it is advent.

    Modern mince pies lost their meat only about 150 years ago and until that time were a combination of minced meat, dried fruit and spices contained in a pastry container. The combination of sweet and savoury may be unusual to our tastes but it really shouldn’t be – it is still common in Asian and Persian cookery. Personally, I love the combination as long as the sweet doesn’t over power and in this pie it doesn’t.

    Spices have long been associated with celebration, originally because they were so exotic and expensive. They were worth more than their weight in gold. Saffron is the typical example of this, though I left it out of this pie firstly as I didn’t have it and secondarily I don’t like the flavour, because the golden glow it gives is reminiscent of actual gold.

    The pastry case used to be called a coffin (cofynne) and until recent centuries was only a vessel to hold the fillings and not made to be eaten, though perhaps they were recycled by the house staff for their meals or given to the needy as alms. I have used a hot-water crust pastry as per this recipe on the English Heritage website – it might not be be entirely authentic but I wanted to try making it (for the first time) and have a pie at the end that we could eat for dinner, pastry and all.

    My other source of information was a 15th century cookbook, a reprint which I picked up in the charity shop (Harleian MSS 279). Reading the text requires some deciphering as it is a mixture of old English, French and Latin but it is written phonetically so can be worked out.

    Mynce Pyes in 15th Century style

    • 750g minced beef or veal (mutton is traditional too)
    • 100g beef suet
    • 50g currants
    • 50g sultanas or raisins (roysonys of coruance – raisins or currants)
    • 100g dried figs, finely chopped (fygys) – could use dates instead
    • 50g prunes finely chopped
    • 50g pine nuts (pynez)
    • Spices – 1 tsp ground ginger, half a tsp cinnamon, half tsp ground pepper, 1 tsp brown sugar, quarter tsp ground cloves. Recipes often call for mace and saffron but I had neither. You can also add rose water or orange blossom water.
    • 1 tsp salt

    For the pastry (I made double this amount and it was more than enough to make two 15cm diameter pies, the English Heritage recipe says this amount is suitable for a 20cm diameter tin).

    • 450g plain flour
    • 1 tsp salt
    • 100g lard
    • 60ml milk
    • 150ml water

    Fry the mince and break up any lumps, put in a bowl and add the other filling ingredients and mix well. Mine looked a little dry so I added a little beer.

    To make the pastry, heat the lard, milk and water in a pan until the lard is melted and then bring to the boil. Then pour over the flour and salt and beat well with a wooden spoon before giving a knead to ensure it is smooth. Leave about one quarter of the dough to the side to form the lid. Press the dough into the tin to form base and sides.

    Sprinkle some ground almonds on the pastry case base to absorb excess liquid then pack in the filling – it needs to be packed fairly densely. Roll the remaining dough to make a lid. Moisten the top of the dough walls with water then place on the lid and squeeze closed with fingers and thumb. Cut a couple of slits in the lid to allow steam to escape.

    Cook at 200C fan oven for 15 minutes then turn the oven down to 160C fan and cook for a further 1 and a half hours. Check the interior is cooked with a thermometer (needs to be over 80C). Allow to cook before unmolding. Serve hot, warm or cold. I glazed the outside of the pye with melted medlar jelly to give it a nice glossy sheen.

    @EnglishHeritage

    The cut pye in all it’s glory!

  3. Gwatkins Cider

    December 25, 2019 by jimkeir

    If there’s anywhere to begin, this is it. Cider has a bit of a reputation to lose; alco-pop, painfully sweet, flavourless, only for kids trying to get as drunk as possible as fast as possible.

    Wrong.

    Actually, in many cases, right, but that’s not why we’re here. I’m a cider fan and will usually try a local if we’re out and about in any cider-producing region. Northwest France does it pretty damn well, but no matter where it comes from, any and all cider or perry I try now is compared with Gwatkins and I genuinely doubt that any will come even close.

    We found this on tap at Ludlow Food Festival a few years ago. I’m fairly sure it was Mr. Gwatkin himself on the stand, it was a hot day, and a light perry (pear cider for the uninitiated) seemed like just the ticket. A couple of mouthfuls later we circled back round and told him this was the best we’d ever had by a long way. It still is.

    Perrys are harder to make than ciders because the fruit has to be perfectly ripe and perfectly treated – any damaged or bruised fruit affect it much more than they would an apple cider. It needs to be made with perry-specific pear varieties which aren’t common any more. This perry wasn’t overly sweet and had a sublime combination of fruit and floral flavours and then, after that had begun to fade, a wonderful tangy aftertaste that lasted longer than such delicate flavours should do. We had a few pints of that, that day.

    Ciders now tend to be incredibly sweet and, lordy me, made even sweeter by adding strawberry or rhubarb flavourings and shipping them from New Zealand. Not Gwatkins. They’re made in the traditional way using traditional, old, cider-specific apple and pear varieties and they have bite. A barman at a fantastic beer festival, Eddyfest (which will be listed here soon!), was muttering about having sold out of all of the ultra-sweet imported ciders and being completely bemused as to how people could drink them. We’d both just poured away a pint of two different ciders that were genuinely so sweet they were causing pain, and had circled back to the bar for pints of Gwatkins. I offered him a sip – I think it was the Yarlington Mill – and he did a bit of a double-take, took another sip, and said “by God you’re going to know you’ve had a pint of cider after one of those”.

    Gwatkins. The way cider should be. And they do mail order.

    https://gwatkincider.co.uk/


  4. In The Beginning…

    December 25, 2019 by jimkeir

    It all began, as some things do, with a cheese sandwich. This particular beginning wasn’t related to permanent intestinal damage the likes of which would make a Bupa shareholder cry, which is indeed something that can begin with a cheese sandwich. That was in India. This beginning was a determination to persuade as many people as possible that British food ought not to be dismissed, as many people – mostly Brits – seem to think. “Aah, British food, fish and chips, roast beef, terrible bread”. Yes, we do have terrible bread, but only if you buy it in [insert name of litigious supermarket chain here].

    I wish I could say exactly where this sarnie epiphany was created but it’s been lost to the depths of time. I clearly remember it visually but, other than probably being in the north of England, can’t narrow it down any more than that. What I do remember though, is the cheese sandwich. A simple cheddar buttie, salad and crisps, exactly like you’d get in any little independent tearoom that had a bit of pride in what it served – but this was different. A level above. The cheese paired perfectly with the bread. The bread was made in the same village. The salad was the exact right blend of sweet, bitter and crispy to counter the flavours and textures of the sandwich.

    Just because it’s simple doesn’t mean it isn’t good food. In fact, it can mean just the opposite – simple dishes have less fiddly bits, less distractions, to hide behind if something’s not right. Picture being somewhere that advertises a “dining experience”; the decor, the waiters that spang into existence exactly, and only, when they’re needed, the extremely high china-to-food-coverage ratio of the plates, actually being able to get a parking spot. One detail being not 100% perfect might be noticed but is just one tiny detail out of the whole experience. With fish and chips in a bag, if it’s not right then it’s not right.

    I call it my “standard candle” test, a phrase stolen from astrophysics. If I’m somewhere that prides itself on it’s food and likely to eat there more than once, I’ll typically order the house burger. The heathen option, the last thing on the menu, added especially and grudgingly for people who balk at eating anything they’ve not personally microwaved in the past. Why? Because a burger gives you no place to hide. If a kitchen, a chef, can make the simple, globally-served, no-thought-required burger into something special then they’ve really mastered their art. Too many trimmings? Fail. Can’t taste the beef? Fail. Too thick to actually pick up? Fail. (Probably). Brioche buns? Those are a sweet breakfast or dessert item for chrissakes. Basic mistake. Fail.

    So back to the cheese sandwich. Britain really does produce world-class food, in a distinctive style. Just like the French, Italians, Spanish, Indian, Chinese, Thai and so on – not necessarily better, but different and just as worthy of attention. We need to be able to persuade the rest of the world of that. Hell, we need to persuade most British of that, especially those that have only ever really experienced chain-pub and supermarket food.

    These short posts are simply listing places we’ve been, food we’ve had, real cider and ale, places we’ve stayed in a few cases, that have been outstanding. Few if any will be for “twiddly” food. Most will be for the simple, honest, dare I say rustic food that Britain does – or can do – spectacularly well. There’s a few overseas places listed too but in the main we’re showcasing British produce.

    Enjoy.


  5. 40 things to do at 40 (ish)

    December 1, 2019 by sarah

    You might of guessed by the title; I have a Big Birthday coming up in a couple of weeks. I thought it would be nice to have some personal goals to achieve this coming year. I am not concerned if it takes me longer than a year to achieve them all. I deliberately haven’t put any work related goals on this list as I know these will take time and I don’t want to rush them.

    In all truth, I am not that bothered about turning 40. When I was 20 it seems a life time away, too far away to contemplate. Now that I have lived that life between 20 and 40 I can say I would not of changed a thing. Perhaps some of my husband’s philosophy has rubbed off on me. When I turn 40 I am actually only 39 and a day.

    1. See glow worms in the UK.
    2. Hear nightingales in the UK.
    3. Learn the names of 40 native plants and how to identify them
    4. And sketch them. Need a nice new sketch book then!
    5. Re-read all the James Herriot books. Probably buy on Kindle.
    6. Challenge myself to improve my fitness. Actually stick to it, though running in the mud and dark is not fun especially when Champneys Range Rovers try to push me off the road!
    7. Run a half marathon. Too optimistic – what do you think?
    8. Eat in a Michelin starred restaurant, for a lazy lunch. Dinner by Heston Blumenthal? Le Gravroche, Roux Jn?
    9. Afternoon tea in a grand London hotel. The Ritz? The Wolseley? Claridges? Lanesborough?
    10. Eat somewhere quirky. St John’s? Mr Fogg? Fine dining vegan?
    11. Drink a seriously expensive bottle of wine – £30 plus. That is expensive for me!
    12. Go out for cocktails somewhere quirky and smart.
    13. Teach a craft class.
    14. Present or speak on a veterinary theme to a room full of strangers.
    15. Stonehenge at dawn.
    16. Walk a long-distance foot path. Hadrian’s wall? West Highland Way?
    17. Go to a live music festival.
    18. Go to a spa and actually enjoy it and not feel out of place!
    19. Get dressed up all posh – dress, hair, make-up – for a night out.
    20. Perfect making homemade pizzas.
    21. Go wild swimming.
    22. Volunteer.
    23. Learn crewel work for Tudor re-enactment at Kentwell.
    24. A surprise.
    25. A special piece of jewellery – perhaps this by Rauni Higson as I love the structural simplicity of her fold forming.
    26. Make jewellery with a new technique and this jewellery school means I can combine with a trip to visit my parents!
    27. Grow in a leadership position.
    28. Get some non-clinical veterinary articles published. This is definitely outside my comfort zone!
    29. Start doing podcasts for my veterinary blog. Even more outside my comfort zone – in front of a camera and talking!
    30. Get a will done.
    31. Go to a cider festival.
    32. Go to Portmeirion Village, Wales.
    33. Visit Lindasfarne Island.
    34. Swim in the Roman baths in Bath. Found out this is not possible any more – but perhaps in real Roman baths in other countries?
    35. Go to the Scilly Isles.
    36. Hold a pop-up dinner or afternoon tea club.
    37. See the Northern lights – Trumso? Do not take any photographs.
    38. Go to the Hay book festival.
    39. Complete our wedding album, only 10 years late! And donate my wedding dress to charity.
    40.  To be added to during the year!

  6. An easy way of image transfer

    July 15, 2019 by sarah

    I first read about this method of transferring an image onto fabric a couple of years ago. I know exactly when it was because I printed out an image I wanted to transfer to some napkins I had bought and it has the date on it and had the Citra-Solv posted from the USA (more of this below). This project sat in my ‘to do at some point’ pile because frankly I had more important things to get on with than some nicely decorated napkins! But the time came to give this a try at the weekend. I wasn’t expecting much, but having done the napkins, and a T-shirt, and a tea towel, and only having to stop because of the requirement to make dinner, I can attest that it is truly addictive. And magical!

    Having done the initial dabbling, as usual, my mind is spinning with endless possibilities: transfer of designs to fabric for embroidery; transfer of design for lino carving; personalised T-shirts; T-shirts for hen parties; transfer of logos onto hand-made items; quilting designs; funky tea towels…. The possibilities seem endless. And the images are permanent! I have used Modge-Podge to transfer images to fabric in the past but that was so much messier and the images much less crisp that this Citra-Solv transfer method. What ideas can you think of to use this technique on?

    I have only used Citra-Solv for this technique so I cannot attest if other solvents work. I have not seen Citra-Solv for sale in the UK so I ordered it from the USA. At about £15 for a bottle, it is not pocket money but I only used a tiny amount for the projects I have done so far so it is going to last a long time. It says it is natural and safe, but something that does this to ink and plastics I would treat like DEET i.e. with care. I have only tried transferring to fabric but I have read online that you can transfer to leather, wood, and paper. The denser the weave of the fabric, the sharper the image you get but the softer images have a charm of their own. I also understand that you can transfer colour images, but as I don’t have a colour laser printer I can only do black at this time.

    And that is the most important point. You can only use images that are printed from toner by laser or copier, it will not work with ink-jet. You also need fresh images – the one I printed off a couple of years ago didn’t work as I guess something happens to the ink over time. If you have words in your images, remember to mirror-image your picture otherwise you can’t read the wording (note the first one I tried with the backwards ‘thyme’!).

    What you’ll need:

    1. Citra Solv. Pour a little into a small ceramic or glass bowl.

    2. Toner copy of the image you want to transfer.

    3. Surface to transfer onto – some densely woven fabric to start. Place on top of a firm surface that is not painted or varnished – a spare bit of pywood worked well for me.

    4. Masking tape to hold the image in position while transferring.

    5. Paper towel or soft clothfor applying solvent.

    6. Spoon for burnishing.

    Get your stuff ready – Citra-Solv, board, fabric, image copied, spoon, masking tape.

    Step 1: Make a toner copy of the image you want to transfer.

    Cut the image out, with enough margin around it for taping onto your surface.

    Step 2: Tape the image face down onto your surface.

    Place the fabric onto the backing board, or if doing a T-shirt put the board inside the T-shirt. Iron it first if it has creases or wrinkles. Place your image face down onto the fabric where you want it to be and use some bits of masking tape to stick it in place.

    Step 3: Rub Citra-Solv onto the back of the paper using a paper towel.

    Make sure the paper towel is not too wet with the solvent, and rub quickly – just enough until the paper becomes transparent and the image shows through.

    Step 4: Use the back of a spoon to burnish the image.

    Press firmly, using a circular motion and making sure to burnish the whole area of the image. Stabilize the paper with your other hand so it doesn’t shift.

    Step 5: Lift the paper to check that the image is fully transferred.

    The tape keeps it in place while you lift. If you see any areas that aren’t crisp and clear, lay the paper down and burnish those specific areas again, until you have the whole image nicely transferred.

    Step 6: Remove the paper and there it is! Image transferred!

    The remaining Citra-Solv with evaporate. Some people have advocated ironing the image to set the transfer so this is what I did. But the transferred image is permanent i.e. the fabric can go into the washing machine (on cool and no bleaching agents). Just don’t be tempted to clean it in Citra-Solv otherwise your image will disappear!

    What uses can you see yourself using this for? Please post comments below.


  7. Our Antarctica and South America trip

    April 2, 2018 by sarah


    We have been back from our trip of a lifetime for only a week and already in some regards, it seems a million years ago! But at least I have nearly 9,000 photos to sort to help remind me of this fabulous trip. I have managed to trim it down to 300 photos that capture some of the wonder things we saw and experienced. Remember these photos are copyrighted so if you’d like to use one or to have one printed, please ask. Enjoy!

    Antarctica and South America


  8. Sticky Toffee Puddings – a microwaveable steamed treat

    November 26, 2017 by sarah


    I feel this recipe is a little like cheating as it is so easy to throw together and then it is cooked in the microwave for a super quick treat. No steaming involved. AND it freezes very well so you can also have a luscious dessert at the ready! I have no idea where this recipe came from – it is hand written in my recipe collection that I started when I was a student. I use plastic pudding bowls for this recipe. I have a collection of various sizes from when I have purchased sponge or steam puddings in the past and some come with plastic lids. So in future don’t throw those bowls away – they are useful.

    Sticky Toffee Puddings

    Serves 8

    175g stoned dates, finely chopped by hand or food processor
    1/2 teaspoon vanilla extract
    2 teaspoons of instant coffee granules (or if none in the house, use hot coffee instead of water for soaking the dates)
    3/4 teaspoon bicarbonate of soda
    75g soft butter
    150g caster sugar (golden if available)
    3 medium eggs, beaten
    175g self-raising flour, sifted

    For the sauce:
    25g pecan nuts, toasted and chopped
    175g soft brown sugar
    110g butter
    6 tablespoons of double cream

    Put the chopped dates in a bowl and pour over 175ml boiling water. Add the vanilla extract, instant coffee and bicarb and leave to one side. If you don’t have any instant coffee then use freshly brewed coffee instead of the boiling water but make sure it is scalding hot.

    In a large bowl, cream the butter and sugar until pale and light. Gradually add the eggs a little at a time. Fold in the sifted flour and then the wet date mixture. A very sloppy mixture is normal.

    Pour the batter into lightly oiled containers – either ceramic ramekins or the plastic tubs that bought sponge puddings come in. Make sure they are no more than half full! Cover loosely and microwave on high for 2-4 minutes, depending on the size of the pudding bowls.

    Take out and leave to cool for a few minutes.

    Make the sauce by combining the sauce ingredients in a pan and gently heating until the sugar has dissolved then bring to the boil.

    Serve by turning out the puddings onto a heat proof tray. Preheat the grill to high and have a shelf at a level that the puddings will fit underneath. Pour the sauce over the top of the puddings, knock off any nuts off the top of the puddings (otherwise they burn), put under the grill until hot and bubbling. Serve immediately with ice-cream, cold pouring cream or custard as your fancy takes you.


  9. Rum Babas or Savarins

    November 11, 2017 by sarah


    A French treat (baba au rhum) and so very retro – a fitting post for my blog when it has been such a long time since I last posted! From a limited check with work colleagues, most people seem to have heard of them but not be entirely sure they are. Rum babas are yeasted enriched dough cakes, soaked in a rum based sugar syrup. They are traditionally eaten in France for Sunday dinner with a good helping of chantilly cream. They seem to be making a bit of a come back so here is a post ahead of the curve! And having made them, I can say they are not something to be scared of and once you have tasted boozy sponge, you will hopefully be converted too!


    The enriched dough from which babas are made of is also known as a savarin dough. Traditional rum babas are made in small ring moulds that are known as savarin moulds, though you can also get large ring moulds and then the cake that is made is called a savarin! From internet searching, it looks like most modern chefs bake the babas in dariole moulds as these are something that most kitchens will have rather than having to buy specialist moulds. Indeed, for this recipe I made 4 traditional type babas in aluminium dariole moulds and then the rest of the dough went into a large fluted tin (it said it was a brioche tin on the label) and all turned out great. So I think the lesson for this is that it doesn’t actually matter what tins you use as a mould – how about trying individual loaf tins or tart tins (probably not loose bottom type) or even silicone moulds – you may need to adjust proving and baking times.

    Because this is an enriched dough, you need to know a few things about how it will behave. It will take a long time to rise and will rise better if kept warmer than you would do for bread dough as if it is too cold, the butter will firm up and the bubbles will struggle to get the rise. Professional chef websites recommend between 30°C and 40°C – I used my lizard heat mat under the bowl and then the molds and this worked perfectly. Also the dough needs a long and energetic beating to get the gluten to develop so really a stand mixer with a dough hook is pretty essential unless you have muscles like Arnie! Additionally it can be difficult to tell when done as the cake will colour quite fast in the oven.

    This recipe is adapted from ‘Patisserie Maison’ By Richard Bertinet. The original recipe called for fresh yeast which is a pain to find so I used the sachet instant stuff it worked out just fine. This recipes makes a lot of dough and is far too much for just half dozen babas but a mixer struggles with smaller quantities. The cooked babas freeze well or use the rest of the dough in a large tin.


    Rum Baba – Ingredients
    FOR THE FERMENT
    150g strong white bread flour
    7g sachet fast action yeast
    150ml warm milk

    FOR THE DOUGH
    4 medium eggs
    150g very soft unsalted butter
    extra butter for greasing the moulds
    50g caster sugar
    1/2 teaspoon fine salt
    125ml warm milk
    400g strong white bread flour
    grated zest of a lemon or an orange

    To make the ferment, mix the yeast into the flour and then whisk in the warm milk with a spatula or metal whisk. Cover the bowl with cling film and leave the ferment somewhere very warm for 2 hours until very bubbly – on top of a lizard heat mat is perfect.

    Put the ferment in the bowl of a stand mixer with a dough hook. Add all the other ingredients and beat until very elastic and silky and no sign of the butter – 10 to 20 minutes on medium.

    Grease the moulds well with melted butter.

    Pipe the mixture into the moulds until it comes about two-thirds the way up. Cover the tins in greased cling film and again place somewhere warm until risen a little above the moulds – this will take at least an hour.

    Preheat the oven to 190°C or 170°C if fan assisted. Take off the cling film and bake the babas in the preheated oven for 15-20 minutes for small ones and up to 40 minutes for a large one. You can tell they are cooked as a skewer will come out dry and they sound hollow when tapped underneath (just like bread). Carefully turn out onto a wire rack to cool. Then store in an airtight container for up to 2 days or freeze.

    FOR THE SYRUP
    1 lemon
    1 orange
    800g sugar
    500ml water
    200ml spiced rum

    For the syrup, thinly peal off the rind of the orange and lemon with a vegetable peeler or knife then cut into fine julienne strips. Squeeze the orange and lemon and put the juice into a pan with the sugar and water. Bring to the boil once the sugar has dissolved and boil for a few minutes until syrupy and the peel is tender. Take off the heat and add the rum. This can be stored in a container in the fridge for up to a week.

    To finish the babas place the syrup into a wide shallow dish and place in the babas. Turn them frequently and leave them to soak for a minimum of 3 hours and up to 24 hours at room temperature.

    FOR THE CHANTILLY CREAM
    150ml double cream
    50g icing sugar
    1 teaspoon vanilla extract or vanilla seeds

    Beat the cream with the sifted icing sugar until stiff peaks. Add the vanilla and give one more quick beat. Serve immediately otherwise the firmness disappears.

    To finish the babas, place a baba in a small dish, spoon over syrup and place some of the citrus peal on top. Serve with chilled Chantilly cream. Enjoy!


  10. Papua New Guinea

    October 14, 2017 by sarah


    This year our main holiday was to the other end of the world, figuratively and literally, to Papua New Guinea! It was one of the most extraordinary countries I have ever been to. My overwhelming memory of the holiday is the people; friendly and open, quiet but happy, unassuming and generous. Much like my previous favourite place in the world, Vanuatu. We saw some wonderful and unique things and had a variety of special experiences, of which these photos only touch the surface.

    It was very hard to go back through these photos to prepare them to be viewed. For a start there were nearly 6000! Secondary, I did not want to spoil the magic by looking back at photographs rather than memories but actually having a space of a few months then going back through the photos has allowed me to re-enjoy the holiday again. In the interests of brevity, I have not included many of my ‘arty’ photos, instead concentrating on ones which tell the story of Papua New Guinea and our holiday. I have captioned most of them – please ask me any questions!