RSS Feed

Posts Tagged ‘baking’

  1. Mynce Pyes

    December 12, 2021 by sarah

    The past few years I have become increasingly interested in historical cooking. So much so that my husband bought an original 18th century cook book for me for a Birthday a few years ago (and spend an obscene amount of money to purchase it). In particular mediaeval and Tudor cookery has particularly interested me. And so hence this weekend I decided that it was only right and proper that I recreated a Tudor mince pie as it is advent.

    Modern mince pies lost their meat only about 150 years ago and until that time were a combination of minced meat, dried fruit and spices contained in a pastry container. The combination of sweet and savoury may be unusual to our tastes but it really shouldn’t be – it is still common in Asian and Persian cookery. Personally, I love the combination as long as the sweet doesn’t over power and in this pie it doesn’t.

    Spices have long been associated with celebration, originally because they were so exotic and expensive. They were worth more than their weight in gold. Saffron is the typical example of this, though I left it out of this pie firstly as I didn’t have it and secondarily I don’t like the flavour, because the golden glow it gives is reminiscent of actual gold.

    The pastry case used to be called a coffin (cofynne) and until recent centuries was only a vessel to hold the fillings and not made to be eaten, though perhaps they were recycled by the house staff for their meals or given to the needy as alms. I have used a hot-water crust pastry as per this recipe on the English Heritage website – it might not be be entirely authentic but I wanted to try making it (for the first time) and have a pie at the end that we could eat for dinner, pastry and all.

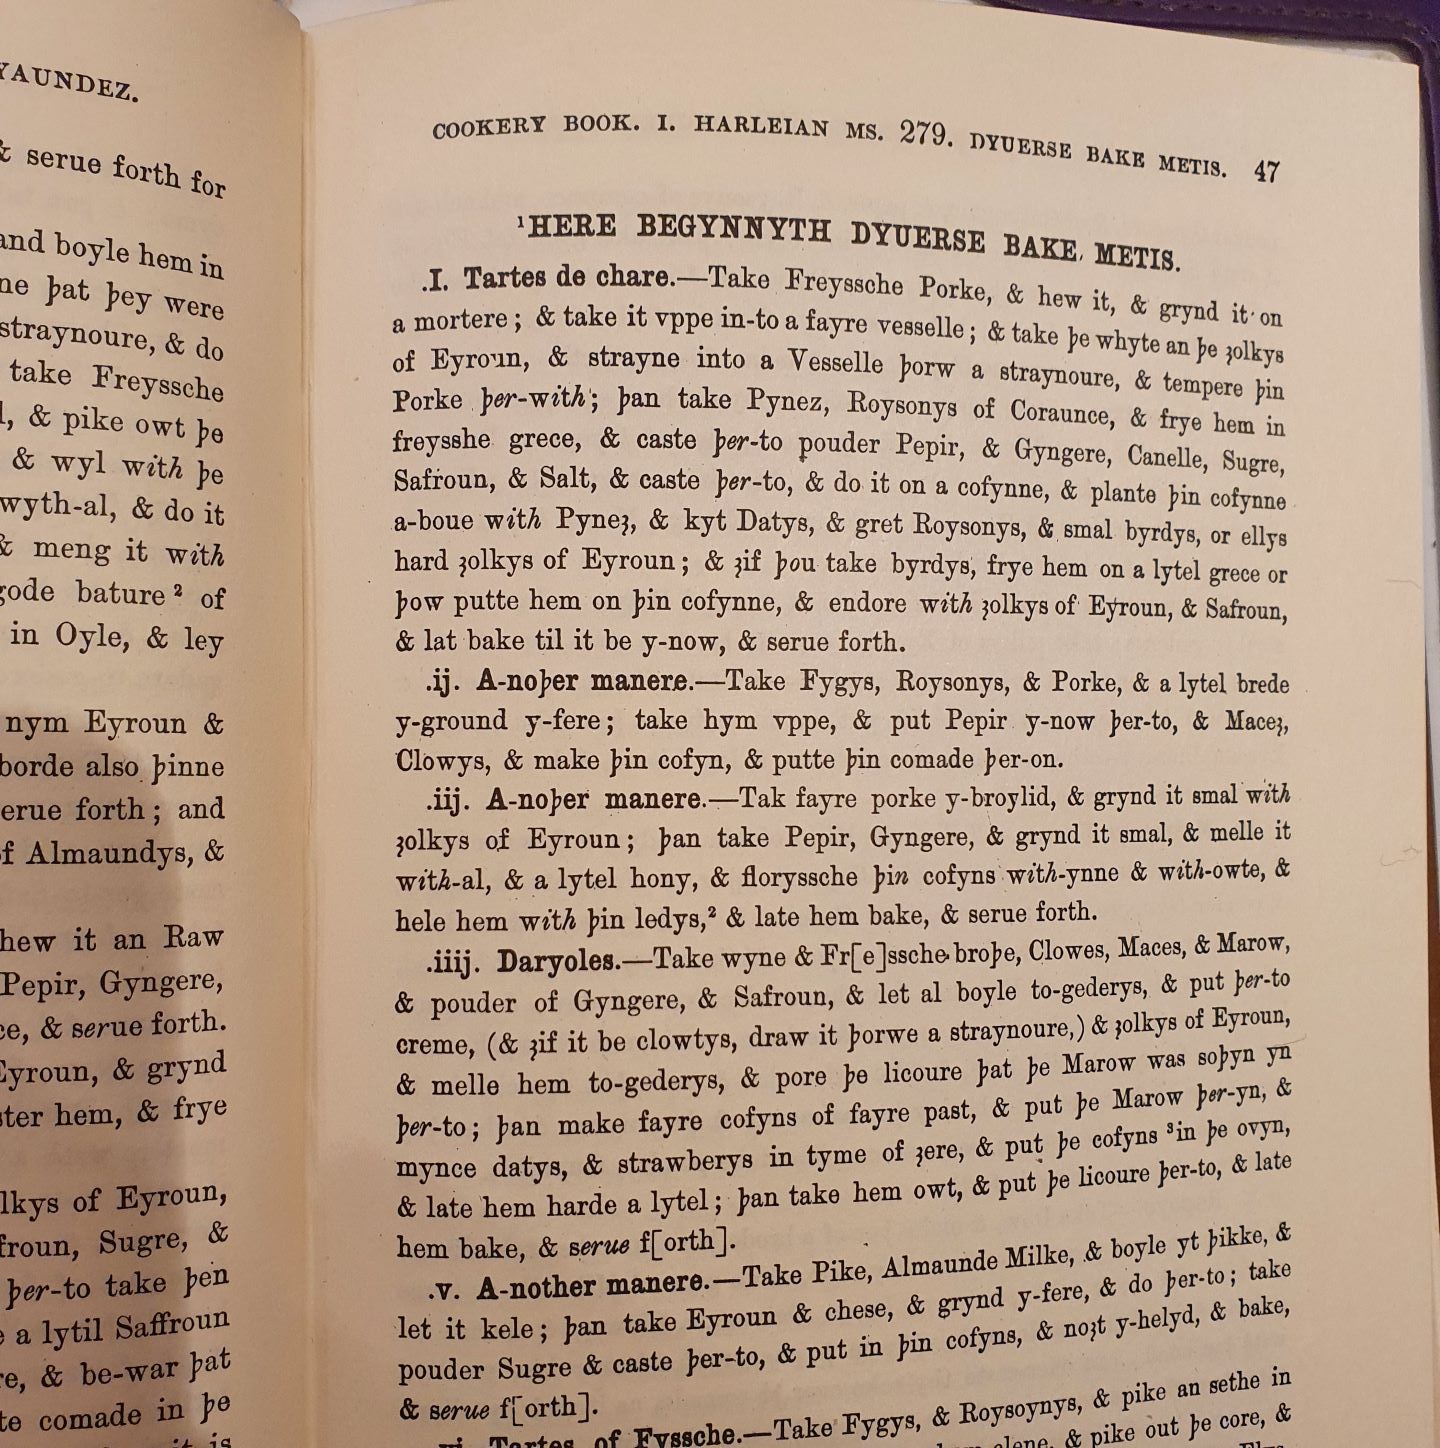
    My other source of information was a 15th century cookbook, a reprint which I picked up in the charity shop (Harleian MSS 279). Reading the text requires some deciphering as it is a mixture of old English, French and Latin but it is written phonetically so can be worked out.

    Mynce Pyes in 15th Century style

    • 750g minced beef or veal (mutton is traditional too)
    • 100g beef suet
    • 50g currants
    • 50g sultanas or raisins (roysonys of coruance – raisins or currants)
    • 100g dried figs, finely chopped (fygys) – could use dates instead
    • 50g prunes finely chopped
    • 50g pine nuts (pynez)
    • Spices – 1 tsp ground ginger, half a tsp cinnamon, half tsp ground pepper, 1 tsp brown sugar, quarter tsp ground cloves. Recipes often call for mace and saffron but I had neither. You can also add rose water or orange blossom water.
    • 1 tsp salt

    For the pastry (I made double this amount and it was more than enough to make two 15cm diameter pies, the English Heritage recipe says this amount is suitable for a 20cm diameter tin).

    • 450g plain flour
    • 1 tsp salt
    • 100g lard
    • 60ml milk
    • 150ml water

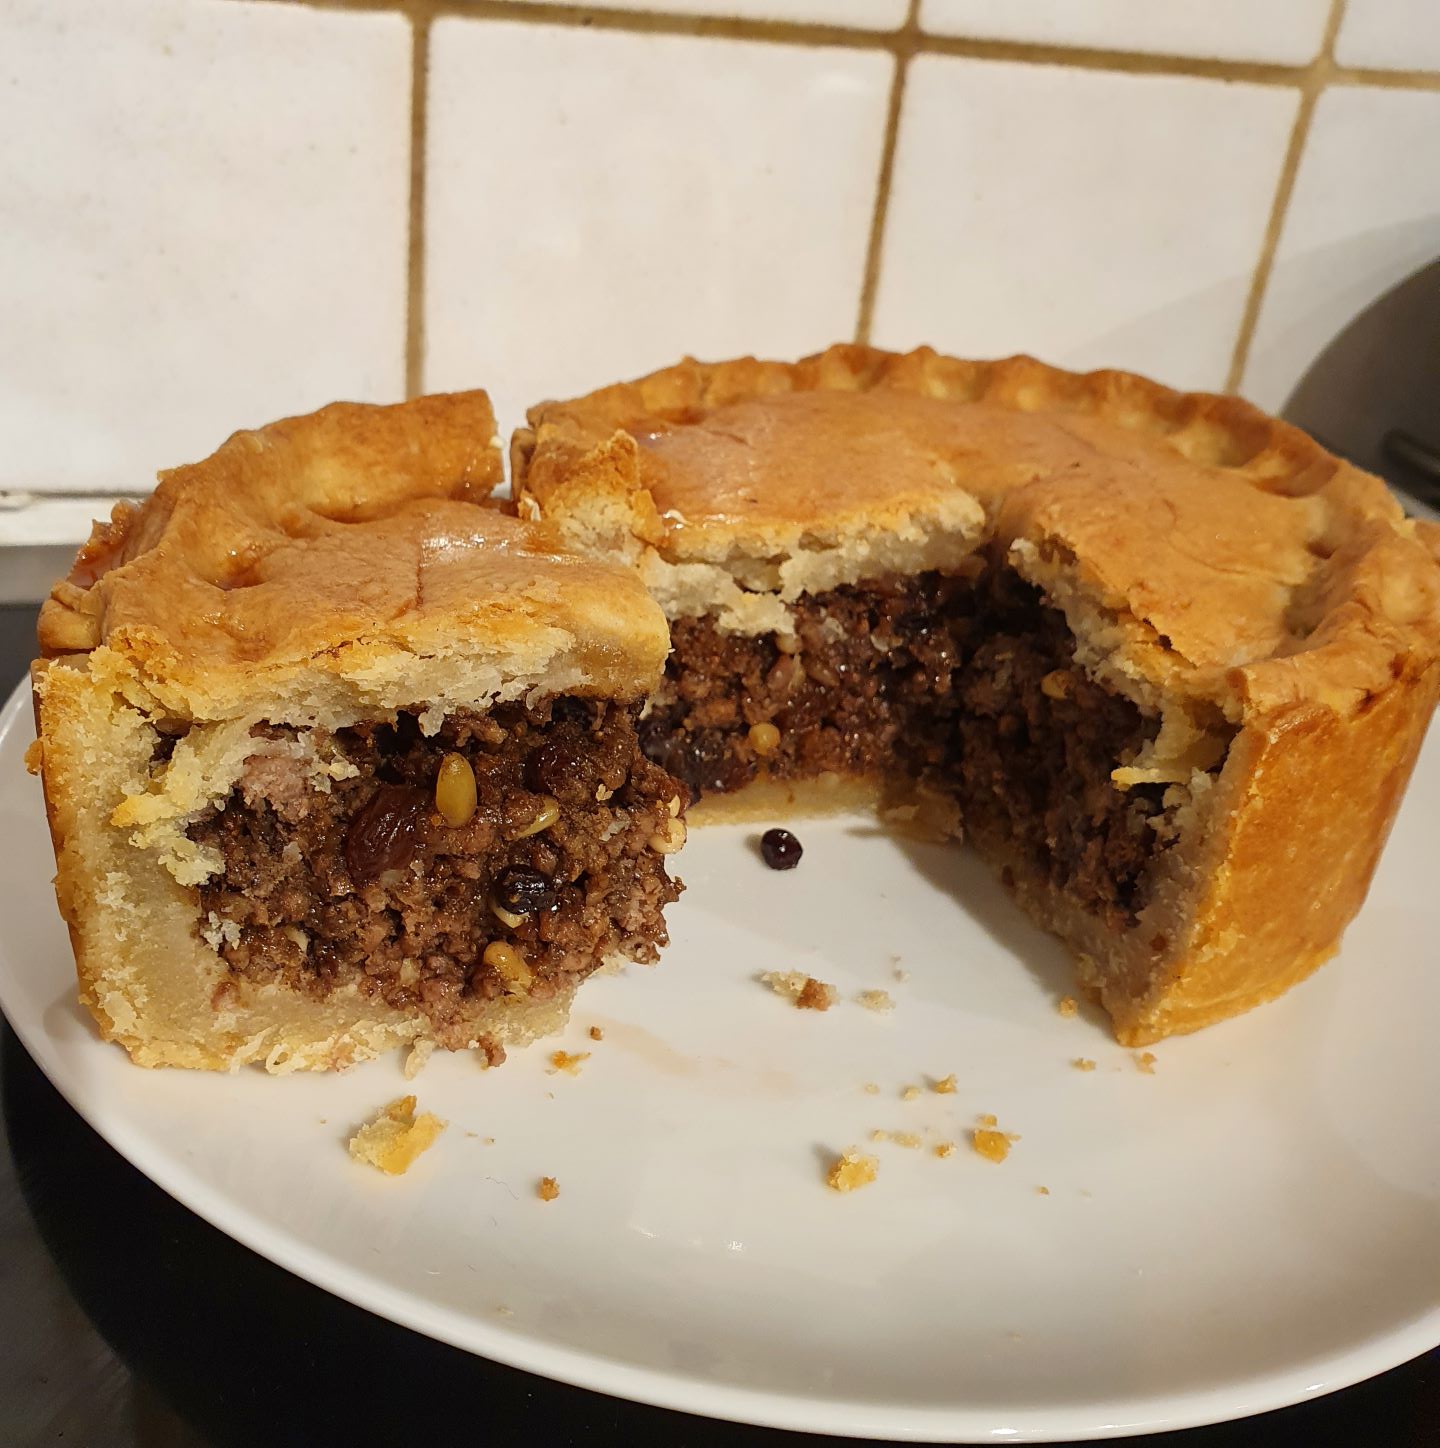
    Fry the mince and break up any lumps, put in a bowl and add the other filling ingredients and mix well. Mine looked a little dry so I added a little beer.

    To make the pastry, heat the lard, milk and water in a pan until the lard is melted and then bring to the boil. Then pour over the flour and salt and beat well with a wooden spoon before giving a knead to ensure it is smooth. Leave about one quarter of the dough to the side to form the lid. Press the dough into the tin to form base and sides.

    Sprinkle some ground almonds on the pastry case base to absorb excess liquid then pack in the filling – it needs to be packed fairly densely. Roll the remaining dough to make a lid. Moisten the top of the dough walls with water then place on the lid and squeeze closed with fingers and thumb. Cut a couple of slits in the lid to allow steam to escape.

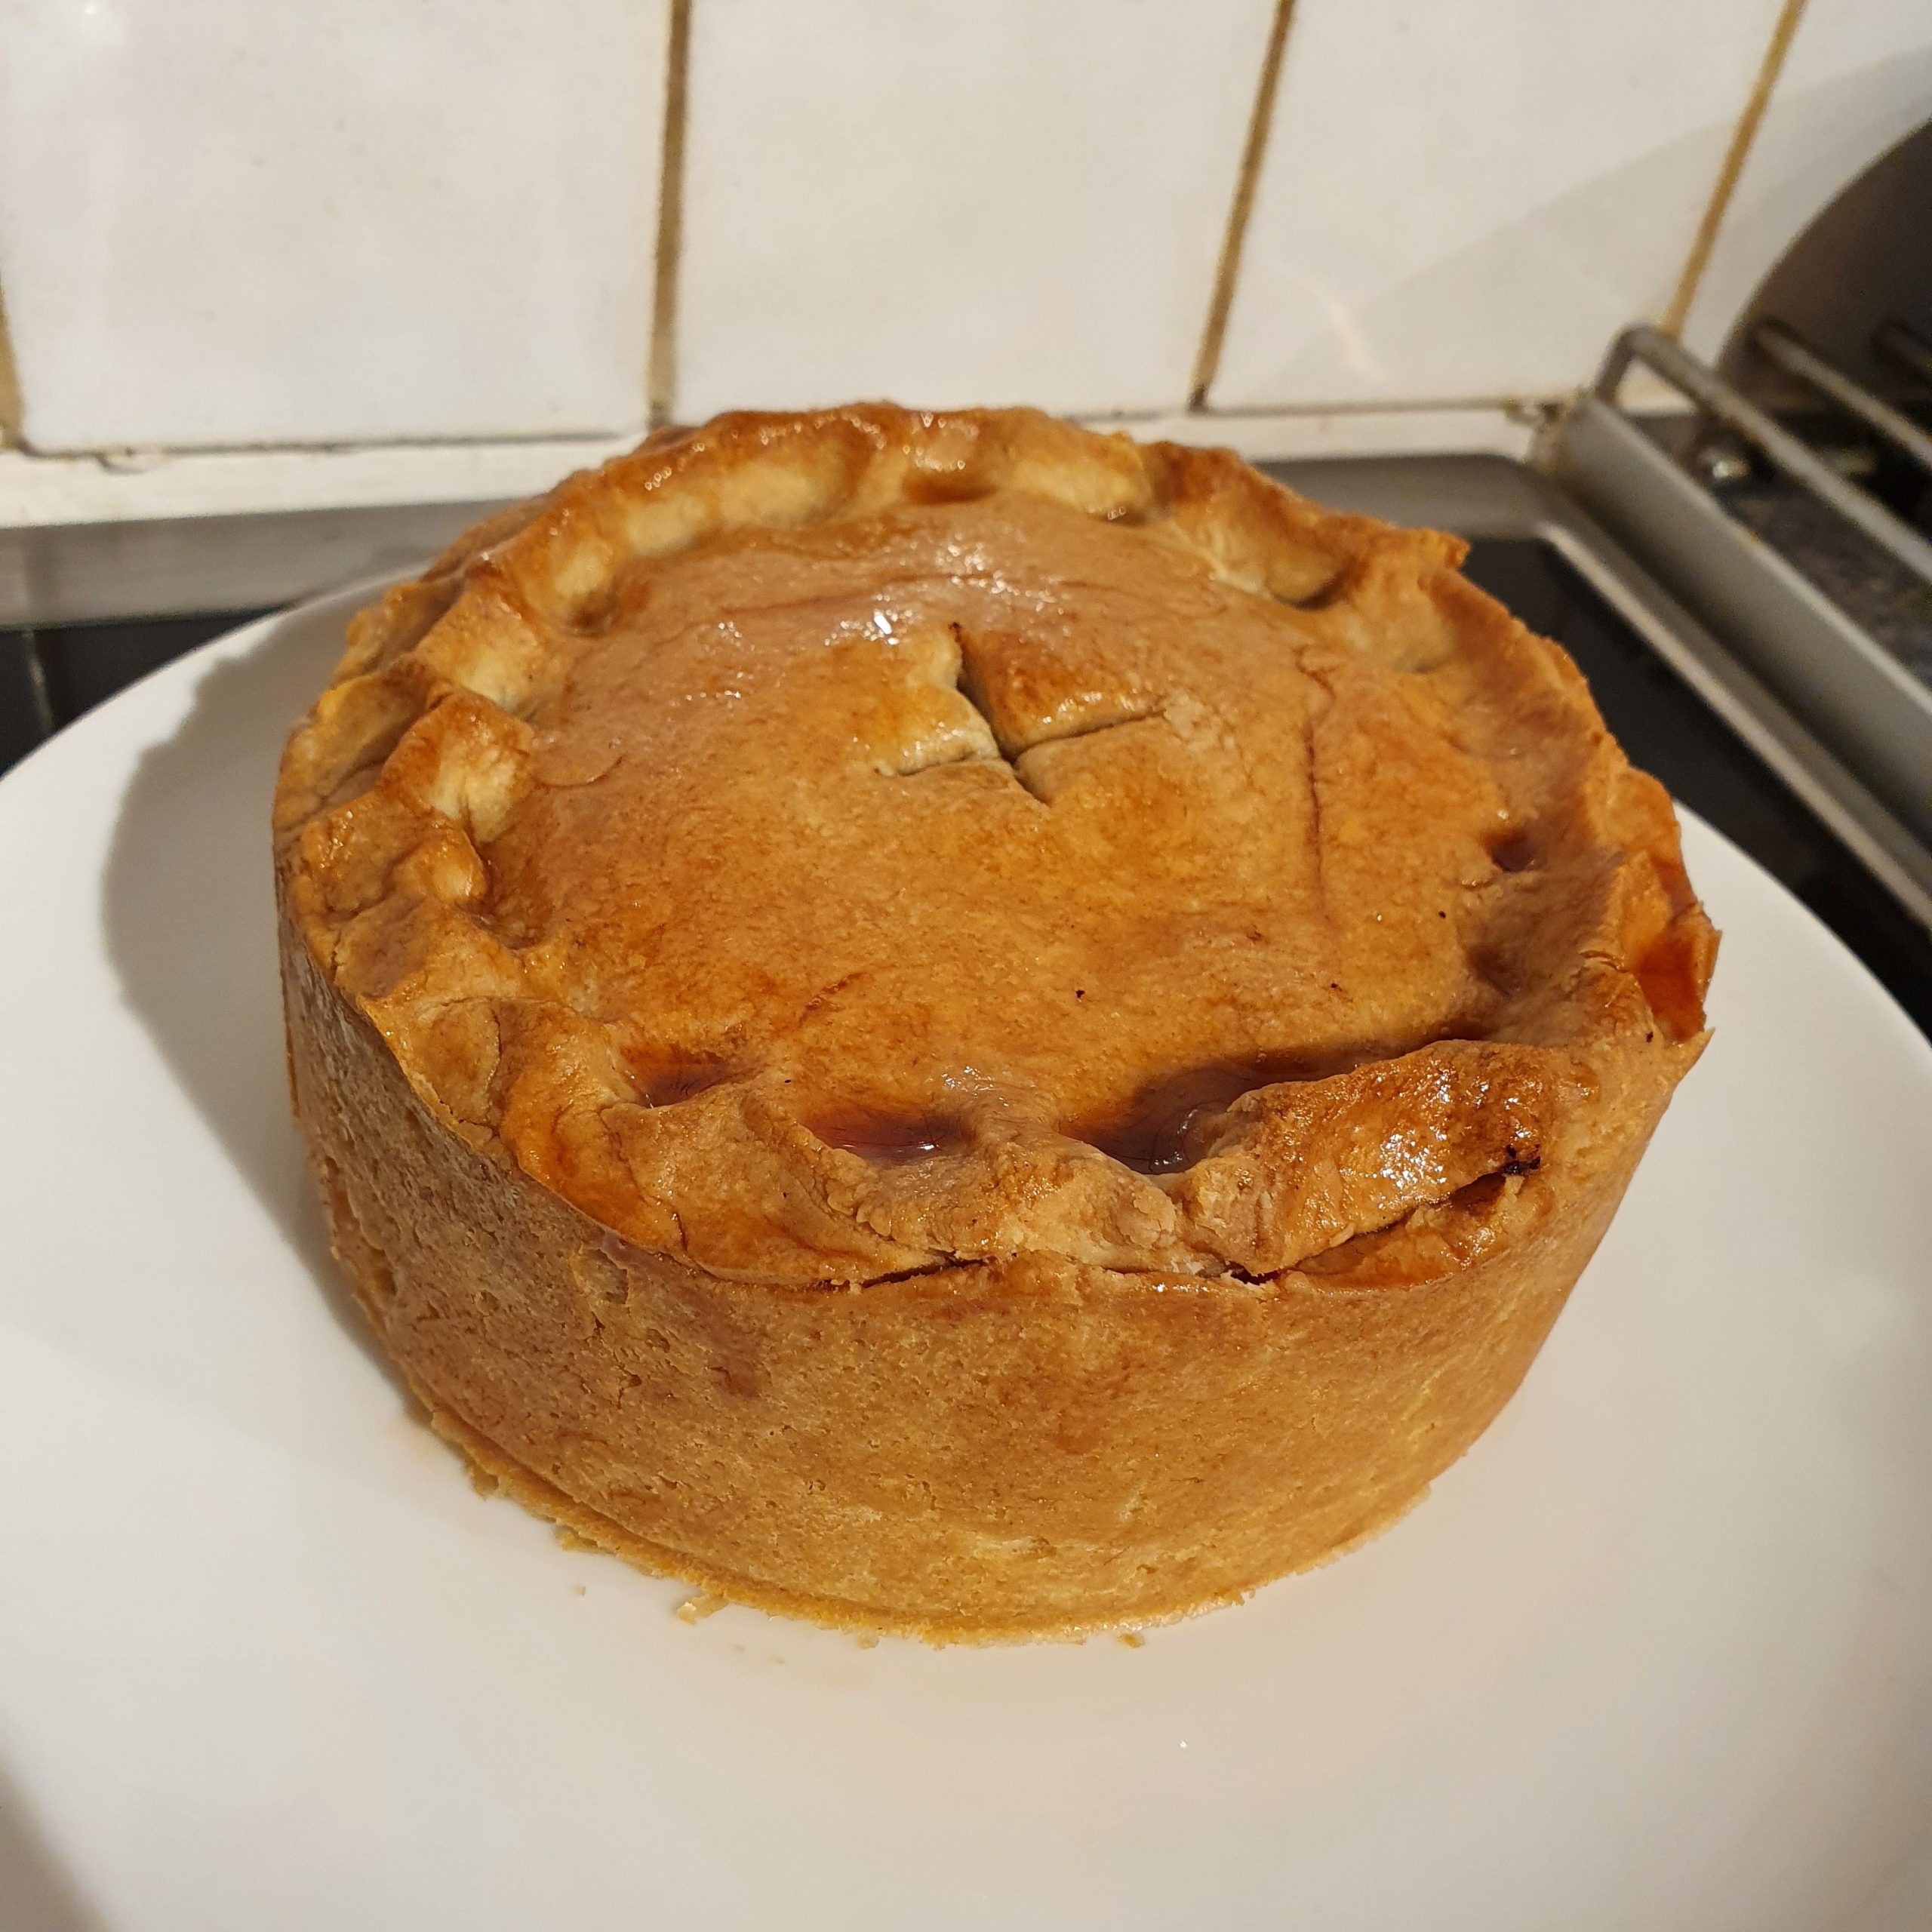
    Cook at 200C fan oven for 15 minutes then turn the oven down to 160C fan and cook for a further 1 and a half hours. Check the interior is cooked with a thermometer (needs to be over 80C). Allow to cook before unmolding. Serve hot, warm or cold. I glazed the outside of the pye with melted medlar jelly to give it a nice glossy sheen.

    @EnglishHeritage

    The cut pye in all it’s glory!

  2. Rum Babas or Savarins

    November 11, 2017 by sarah


    A French treat (baba au rhum) and so very retro – a fitting post for my blog when it has been such a long time since I last posted! From a limited check with work colleagues, most people seem to have heard of them but not be entirely sure they are. Rum babas are yeasted enriched dough cakes, soaked in a rum based sugar syrup. They are traditionally eaten in France for Sunday dinner with a good helping of chantilly cream. They seem to be making a bit of a come back so here is a post ahead of the curve! And having made them, I can say they are not something to be scared of and once you have tasted boozy sponge, you will hopefully be converted too!


    The enriched dough from which babas are made of is also known as a savarin dough. Traditional rum babas are made in small ring moulds that are known as savarin moulds, though you can also get large ring moulds and then the cake that is made is called a savarin! From internet searching, it looks like most modern chefs bake the babas in dariole moulds as these are something that most kitchens will have rather than having to buy specialist moulds. Indeed, for this recipe I made 4 traditional type babas in aluminium dariole moulds and then the rest of the dough went into a large fluted tin (it said it was a brioche tin on the label) and all turned out great. So I think the lesson for this is that it doesn’t actually matter what tins you use as a mould – how about trying individual loaf tins or tart tins (probably not loose bottom type) or even silicone moulds – you may need to adjust proving and baking times.

    Because this is an enriched dough, you need to know a few things about how it will behave. It will take a long time to rise and will rise better if kept warmer than you would do for bread dough as if it is too cold, the butter will firm up and the bubbles will struggle to get the rise. Professional chef websites recommend between 30°C and 40°C – I used my lizard heat mat under the bowl and then the molds and this worked perfectly. Also the dough needs a long and energetic beating to get the gluten to develop so really a stand mixer with a dough hook is pretty essential unless you have muscles like Arnie! Additionally it can be difficult to tell when done as the cake will colour quite fast in the oven.

    This recipe is adapted from ‘Patisserie Maison’ By Richard Bertinet. The original recipe called for fresh yeast which is a pain to find so I used the sachet instant stuff it worked out just fine. This recipes makes a lot of dough and is far too much for just half dozen babas but a mixer struggles with smaller quantities. The cooked babas freeze well or use the rest of the dough in a large tin.


    Rum Baba – Ingredients
    FOR THE FERMENT
    150g strong white bread flour
    7g sachet fast action yeast
    150ml warm milk

    FOR THE DOUGH
    4 medium eggs
    150g very soft unsalted butter
    extra butter for greasing the moulds
    50g caster sugar
    1/2 teaspoon fine salt
    125ml warm milk
    400g strong white bread flour
    grated zest of a lemon or an orange

    To make the ferment, mix the yeast into the flour and then whisk in the warm milk with a spatula or metal whisk. Cover the bowl with cling film and leave the ferment somewhere very warm for 2 hours until very bubbly – on top of a lizard heat mat is perfect.

    Put the ferment in the bowl of a stand mixer with a dough hook. Add all the other ingredients and beat until very elastic and silky and no sign of the butter – 10 to 20 minutes on medium.

    Grease the moulds well with melted butter.

    Pipe the mixture into the moulds until it comes about two-thirds the way up. Cover the tins in greased cling film and again place somewhere warm until risen a little above the moulds – this will take at least an hour.

    Preheat the oven to 190°C or 170°C if fan assisted. Take off the cling film and bake the babas in the preheated oven for 15-20 minutes for small ones and up to 40 minutes for a large one. You can tell they are cooked as a skewer will come out dry and they sound hollow when tapped underneath (just like bread). Carefully turn out onto a wire rack to cool. Then store in an airtight container for up to 2 days or freeze.

    FOR THE SYRUP
    1 lemon
    1 orange
    800g sugar
    500ml water
    200ml spiced rum

    For the syrup, thinly peal off the rind of the orange and lemon with a vegetable peeler or knife then cut into fine julienne strips. Squeeze the orange and lemon and put the juice into a pan with the sugar and water. Bring to the boil once the sugar has dissolved and boil for a few minutes until syrupy and the peel is tender. Take off the heat and add the rum. This can be stored in a container in the fridge for up to a week.

    To finish the babas place the syrup into a wide shallow dish and place in the babas. Turn them frequently and leave them to soak for a minimum of 3 hours and up to 24 hours at room temperature.

    FOR THE CHANTILLY CREAM
    150ml double cream
    50g icing sugar
    1 teaspoon vanilla extract or vanilla seeds

    Beat the cream with the sifted icing sugar until stiff peaks. Add the vanilla and give one more quick beat. Serve immediately otherwise the firmness disappears.

    To finish the babas, place a baba in a small dish, spoon over syrup and place some of the citrus peal on top. Serve with chilled Chantilly cream. Enjoy!


  3. Apple & Cinnamon Kugelhopf

    October 13, 2016 by sarah


    Now the days are really turning Autumnal; it is chilly at night and dark when I get up in the morning. But it is time to stop reminiscing of picnics and barbecues and late evening walks in the sun, and embrace the change of the seasons. The cool days, the wet days, the sitting by the fire, the fire coloured leaves that suddenly drop in a storm, the comforting puddings, vin chaud and cake. And so this has to be the perfect season for this recipe. Using the last of the British apples fresh from the tree and combining them in a spiced dense yeasted cake. This is not a fluffy and light as air sponge, this cake has some heft and needs a walk to digest it but it is not rich or cream leaden. I particularly enjoyed it re-warmed with yogurt for breakfast.

    kugelhof-3


    This recipe calls for a bundt tin but you can use a large loaf tin instead. Because of the butter and eggs in this dough, it is slow to rise. If making an enriched dough like this on a chilly day I definitely use my ‘lizard mat’, an electric warming mat sold for use under reptile houses. You can pick them up cheaply online and they just give the dough an extra boost in rising. I don’t have a proving draw like the contestants on Great British Bake Off!

    kugelhof-2

    Apple & Cinnamon Kugelhopf

    60g unsalted butter, softened, for greasing
    60g ground almonds, for dusting

    200ml full-fat milk
    85g caster sugar
    85g unsalted butter, very soft
    200g plain flour
    200g white bread flour
    3 teaspoons ground cinnamon
    1 teaspoon fine sea salt
    lemon zest, 1-2
    12g fast-action yeast (1 and 1/2 sachets)
    3 medium free-range eggs
    2 eating apples, peeled, cored and diced (about 220g)
    75g sultanas soaked in booze for 24 hours

    Thoroughly grease the bundt tin with the soft butter and dust with the 60g ground almonds; tip out the excess.

    Warm the milk with 25ml water.

    Cream together (by hand, hand mixer or stand mixer) the sugar and butter until pale and fluffy. Add the flours, cinnamon, salt, lemon zest and instant yeast. Add the warm milk/water and the eggs. Slowly beat together until comes together then beat on medium for 5-10 minutes until the dough is sticky and stretchy. Fold in the diced apples and sultanas.

    Transfer the dough to the prepared tin, cover with greased clingfilm or shower cap and leave somewhere warm (like on the lizard mat) for 1-2 hours until it is doubled and nearly reaching the top of the tin.

    Preheat the oven to 190°C/170°C fan with a rack in the middle of the oven.

    When the oven is up to temperature, bake the kugelhopf for 35-40 minutes, starting to check after 30 minutes. It is done when a skewer comes out clean and the cake starts to pull away from the sides of the tin. Cool in the tin for 5 minutes before turning out to cool fully. Decorate with sliced almonds.

    kugelhof


  4. Sticky gingerbread

    October 2, 2016 by sarah


    Autumn is definitely here: the nights are drawing in such that I squeeze in some outdoor activity after coming home from work; the evenings are becoming cool enough to think about lighting a fire or turning on the heating; the leaves are yellowing and starting to drop; the apple harvest has started with three demi-johns of cider bubbling away. It makes me glad that I live somewhere the seasons are defined and changing. Sticky gingerbread is a cake that reminds me of autumn; the dark colour contrasting with the snow white icing and the spiciness that is surprising yet moreish. Go on, welcome in the autumn and make my sticky gingerbread!

    gingerbread-2


    This recipe is an amalgamation of several recipes as I have tried countless times over the years and none where quite right, until this one.

    Sticky gingerbread

    150g unsalted butter
    150g dark muscovado sugar
    175g golden syrup
    175g black treacle
    thumb size knob of fresh ginger, finely grated
    2 teaspoons ground ginger
    1 teaspoon ground cinnamon
    1/4 teaspoon ground cloves
    250ml milk
    3 medium eggs
    2 teaspoon bicarbonate of soda
    300g plain flour

    For the icing
    200g icing sugar
    2 tablespoons of fresh lemon juice

    Line a roasting tin of about 30x20cm with baking parchment. Preheat the oven to 170°C/150°C fan.

    In a medium sized saucepan, melt the butter with the sugar, golden syrup and treacle until combined but do not boil. In a jug beat the eggs into the milk. In a large bowl sift the flour with the dry spices and in a small bowl dissolve the bicarbonate of soda in a couple of tablespoons of warm water.

    Pour the liquid ingredients (melted butter/sugar pan, milk/egg jug and dissolved bicarb) over the flour and beat until well mixed; it will make a very wet batter. I normally need to use a whisk to beat out the lumps of flour. Pour the batter into the prepared tin and place in the preheated oven; bake for 30-45 minutes until risen and a squewer comes out clean but the cake is still sticky and moist. Do NOT over bake. Allow to cool completely in the tin.

    Prepare the icing by sifting the icing sugar into a bowl and whisking in the lemon juice until a very thick icing forms. Pour this over the gingerbread and encourage it to spread out to cover the top with a palette knife.

    This cake keeps for up to a week in a sealed container.

    gingerbread


  5. Ice cream cookie sandwiches

    August 4, 2016 by sarah


    It feels like summer has finally arrived; the schools are off so my commute to work takes half the time, the weather is warm enough to consider putting on a skirt or a dress (needs to be above 20°C for cold blooded me!), the lawns are looking a little yellow/brown, I can eat a meal outside (at least some of the time), my straw hat sits by the front door for walks in the evenings. And of course, ice cream. Not that I am against eating ice cream at any other time of the year, but in the summer the luxurious iciness seems perfectly, sublimely fitting. Almost  magical, probably from reminiscences of a ‘rose-tinted’ childhood!

    sandwich


    I was inspired to make this recipe by the ‘delicious’ magazine that fell through the letter box at the weekend – this was the front cover. Though this recipe has several parts, it did not seem onerous to make. I have to admit to actually making the yogurt to go in the recipe, but only because I had excess milk in the house; please don’t bother. The ice cream recipes are supposed to be ‘non-churn’ but the raspberry ice cream was so hard that even after one hour out of the freezer, I needed to use a knife to get it out of the tub!! So I have amended the recipe so that it should not set as hard as concrete. Similarly, do not feel obliged to make ice cream at all; you can buy decent gelato at any supermarket (I admit to having a particular fondness for the cheap mint choc-chip – probably something to do with the Viennettas of the 80’s!).

    sandwich-2

    IceCream Cookie Sandwiches

    Makes 10-12 cookies; they will keep in an airtight tin for a few days. The recipes make far too much ice cream for the cookies but it will keep in the freezer for a month.

    FOR THE COOKIES
    100g unsalted butter, soft
    100g caster sugar
    100g demerara sugar, plus extra to sprinkle
    1 medium free-range egg
    1 tsp vanilla paste
    165g plain flour
    1/2 tsp bicarbonate of soda
    1/4 tsp fine salt

    1. Heat the oven to 200°C/180°C fan and grease 2 large baking sheets with flavourless oil. Mix the butter and both sugars with a stand or hand-held mixer until pale and fluffy. Slowly add the egg and vanilla, then beat in the dry ingredients.

    2. Spoon the mixture on the prepared trays; half a dessert spoon was about right. Scatter with extra demerara sugar. Bake for about 8 minutes until golden around the edges and cracking in the middle. Remove the sheets from the oven and allow the cookies to cool for 10 minutes before removing with a spatula to a cooling rack to cool completely.

    FOR THE SALTED CARAMEL ICE CREAM
    397g can Carnation caramel (I used home made salted caramel sauce as I had it left over from making chocolates)
    350ml double cream
    200ml full-fat greek yogurt
    A large pinch sea salt flakes (if not using salted caramel!)

    In a stand mixer with the paddle attachment, beat until aerated and thick. Transfer to a freezerproof container with a lid and freeze overnight until completely firm.

    FOR THE RASPBERRY ICE CREAM
    350g tub frozen raspberries, thawed then pushed through a sieve (discard the seeds)
    100g icing sugar stirred into the raspberry puree
    400ml double cream
    100ml full-fat greek yogurt
    2 tablespoons of vodka or gin or invert sugar syrup

    In a stand mixer with the paddle attachment, beat all the ingredients until aerated and thick. Ideally churn using an ice cream machine otherwise transfer to a freezerproof container with a lid and freeze overnight until completely firm.

    FOR THE MINT CHOC CHIP ICE CREAM
    350ml double cream
    397g can condensed milk
    1/4-1/2 capful of peppermint extract
    50g dark chocolate, finely chopped
    +/- green food colouring

    In a stand mixer with the paddle attachment, beat all the ingredients until aerated and thick. Add the chocolate chips. Transfer to a freezerproof container with a lid and freeze overnight until completely firm.

    To make the ice cream cookie sandwiches, take the ice cream out of the freezer at least 10 minutes before needed (sometimes they need much longer). Use a spoon to scoop out flattish scoops of ice cream; place onto the bottom side of a cookie and top with a second cookie. Eat immediately or put on a tray and freeze again for up to 24 hours.

    sandwich-3


  6. Marshmallows

    May 31, 2016 by sarah


    I have to admit now, before we go any further, I do not like marshmallows. Except the seriously caramilised (burnt) type on the end of a stick and something to do with a camp fire – those I can take in small doses. But a raw bouncy, squidgy marshmallow just does not do it for me. They tend to be insipid in taste, overwhelmingly sugary and have the texture of a gymnastics mat. I even bought some expensive hand-made ones from La Pâtisserie de Rêves the last time I was in London – they were disgusting AND expensive! Not very promising for a weekend treat, I hear you cry! Well after having made them, my way, I may be converted… just a little. And they look very pretty!

    marshmallow-2


    Feel free to use whatever freeze dried fruit you can find. Most supermarkets sell some now but I get mine online from Healthy Supplies as they have a fabulous selection at good prices. I have been disappointed with the flavour of freeze-dried fruit in chocolate ganaches – it tastes kind of ‘green’ and not at all like the fruit it is supposed to. So these marshmallows are a good use of the freeze-dried fruit as the flavour is actually intensified in them.

    marshmallow-4

    Raspberry Marshmallows

    Makes lots (about 30 portions), takes about 30 minutes.

    Handful of freeze-dried raspberries
    3 tablespoons of freeze-dried raspberry powder
    2 tablespoons icing sugar
    2 tablespoons cornflour
    8 gelatine leaves
    450g granulated sugar
    1 tablespoon glucose syrup
    3 large egg whites (about 120g)

    – Line the base a sides of a large roasting tin (about 20x30cm, but it doesn’t matter too much) with non-stick baking parchment.
    – In a small bowl, mix one tablespoon of the raspberry powder with the icing sugar and corn flour. Sieve half of this mixture into the base of the lined tin so it is evenly covered.
    – In another small bowl, sit the gelatine leaves in COLD water.
    – In a heavy based pan on a medium heat, heat the granulated sugar, glucose syrup and 150ml water, stirring until it is all dissolved. Bring this sugar syrup to the boil, do not stir any more and continue to boil until it reaches 116°C.
    – While the sugar is doing it thing, in a stand mixer, whisk the egg whites until they form soft peaks.
    – Once the sugar syrup reaches the correct temperature, take it off the heat and leave it to sit for a couple of minutes.
    – Remove the gelatine leaves from the water, squeeze out as much water as possible and pat dry with kitchen paper. Add the gelatine to the sugar and stir until melted.
    – With the mixer on slow, trickle the sugar syrup over the beaten egg whites (try to miss the whisk otherwise it gets messy). Once it is all added, turn the mixer up to high and beat until the marshmallow is thick, light and cool to touch.
    – Add the rest of the raspberry power and whole raspberries.
    – Pour this into the prepared tin, tapping it flat, and leave to set overnight.
    – Cover a chopping board with non-stick parchment and sieve over the remaining powdered raspberry/icing sugar/cornflour mix. Turn the tray of marshmallow out on to this and cut into desired sizes, rolling in the dust as you go along.

    marshmallow-5 marshmallow-3 marshmallow


  7. Madeleines – a better recipe!

    May 10, 2016 by sarah


    Almost exactly a year ago, I made madeleines for the first time, inspired by our trip to Paris. After the initial enthusiasm of a new pretty cake, I realised they were actually quite dry and boring! My excitement of a new cake tin and a recipe that is supposedly hard and picky turning out right the first time clouded my judgement of what a madeleine should really be like; a moist morsel.

    madeleines


    My interest was stimulated again at Christmas time when reading about the uses of invert sugar, initially in chocolate making and that lead on to reading about its use in baking and how this may be secret to moist madeleines. Before you start worrying about artificial additives in my cooking, invert sugar is chemically similar to honey (you could substitute honey in many recipes) and is simply made by boiling regular sugar in the presence of acid, for which I used cream of tartar. Invert sugar has many uses in recipes; to control crystallisation, improves keeping properties and keeps products moist. It even intensifies flavour and aroma! If you want to read more about it and make some for yourself then visit Chef Eddy’s website, a mine of information on pastry and confectionery making.

    madeleines-2


    The test of a good madeleine is a good dome and a crispy shell with a soft buttery inside. This recipe cracked that and was much easier than my previous attempt where I was freezing molds and juggling batter between fridge and tin! See what you think and let me know!

    madeleines-3

    Orange and White Chocolate Madeleines

    Makes about 48, keep a couple of days.

    50g caster sugar
    zest of 2 oranges
    1/2 teaspoon orange extract
    40g invert sugar
    3 medium whole eggs (150g)
    60g cream 35% (whipping cream)
    200g plain flour
    1 teaspoon (6g) baking powder
    100g butter
    60g neutral vegetable oil
    85g white chocolate

    1. Combine the sugars and orange zest with extract; whisk in the eggs and cream.

    2. Combine the butter, oil and chocolate and heat over a very gentle heat until melted and combined. Add to the sugar mix and then sift over the flour and baking powder and fold in.

    3. Leave the batter to rest, ideally overnight. Scrape into a piping bag.

    4. Preat the oven to 200ºC/ 180ºC fan. Grease the madeleine tray with butter then pipe in a teaspoon sized amount of batter. Bake for 7-8 minutes and allow to cool in a cooling rack.

    5. Store in an airtight container; they will keep well for 3-4 days.


  8. Caramel Layer Cake

    April 16, 2016 by sarah


    Salted caramel seems to be everywhere at the moment; in cakes, ice-creams and chocolates. But it is not new; it is a rediscovered classic. And for good reason; it tastes fabulous! Salt is underused in sweet cooking but it actually enhances a lot of recipes, not just savoury ones. Just try making some melted chocolate discs topped with sea salt to see what I mean. Salt really makes the favours sing and brings out more sweetness without having to over-do the sugar. There are many types of salt which also affect how it combines with the recipe and many also have subtle flavours of their own due to trace minerals. My favourite salt is sea salt; I grind a little into dishes as I cook them and often add a burst of coarse flakes at the end. What is your favourite type of salt?

    caramel cake caramel cake-3

    Caramel Layer Cake

    250g unsalted butter, room temperature
    550g golden caster sugar
    6 large eggs, room temperature
    300g plain flour
    85g corn flour
    2 teaspoons baking powder
    1 1/2 teaspoon salt
    2 tablespoons vanilla extract or paste
    360ml mix of 50:50 cream and milk
    6 large eggs, room temperature

    To Decorate
    Swiss meringue buttercream
    caramel, homemade or tin of Carnation caramel sauce
    large pinch of salt, ideally fine sea salt
    fudge pieces

    1. Preheat the oven to 180°C/160°C fan. Grease and line three 8″/20cm round sandwich tins.

    2. Cream together the butter and sugar until light. Beat in the eggs one at a time, adding some flour if it looks like it is curdling. In a jug mix the cream/milk and vanilla and in a large bowl mix together the remaining dry ingredients. While mixing the creamed butter and sugar, alternate adding the wet ingredients and dry ingredients. Give everything one final mix by hand and then divide between the three tins.

    3. Bake the cakes on the same shelf in the oven until a toothpick comes out clean; about 30 minutes. All to cool completely in the tins.

    4. Make a batch of Swiss meringue buttercream (recipe here)(about a half batch is plenty for layering and icing this cake) and flavour with about half a tin (200g) of caramel. Pipe or spread over the cake, drizzle over some more caramel and scatter with fudge pieces.

    caramel cake-2


  9. Chocolate Brownies

    March 14, 2016 by sarah


    Passable brownie recipes are everywhere but it has taken some serious searching, testing and tasting to find a truly good brownie recipe.  These brownies embody everything I love in a brownie; they’re bittersweet and chewy, where so many brownies are excessively sweet and fudgy (or worse, the dreaded cakey and chocolaty in colour only). Do not skimp on the ingredients here; use the finest dark chocolate you can find as this give the brownies their characteristic chocolaty taste. The chopped nuts and cocoa nibs are absolutely optional so if you like your brownies without bits then just leave them out. The only obligatory part of this recipe is the stipulation that you should not add a topping to these brownies. I believe that toppings or frostings are only there to hide a second rate brownie; get that Mr Costa! But do not kid your self that without frosting these brownies would be healthy; good for your soul, yes, but not healthy. A once in a while treat.

    brownies


    Sorry for the poor photography of these brownies. I took the photos last summer when I was in the midst of madness and although I made the brownies there was no way I was going to have time to photograph them properly. But the over-exposed washed out look seems to be all the rage in food-blog-land (yes, there really is such a place). Since the madness of last year has passed I now have time to clean the house, even weekly sometimes; cook food, most nights too; indulge in some crafts, more of which I will post in this coming week; read books that have sat on the shelf for year. If asked, would I do next year again? Then, no I would not but having done it and achieved it and moved on at least I can learn not to do it again!

    brownies-2

    Chocolate brownies

    Makes 16 indulgent squares.

    115g unsalted butter, chopped
    60g dark chocolate, chopped
    200g caster sugar (golden if you have it)
    3 medium eggs at room temperature
    1/2 teaspoon vanilla extract
    50g plain flour
    1/4 teaspoon salt
    75g nuts, chopped
    25g cocoa nibs

    1. Preheat the oven to 160°C/ fan 140°C. Line an 8″/20cm square pan with foil or baking parchment, leaving overhang around the edges. Grease with butter or spray with non-stick.

    2. In a medium saucepan over a low heat, melt the butter and chocolate , stirring frequently until both are melted and smooth. Take off the heat and stir in the sugar then the eggs and vanilla extract.

    3. Sieve over the flour and salt and mix in then mix in the nuts and cocoa nibs. Scrape into the prepared pan and level off. Bake for 30 minutes until they are just set (do not test with a skewer, it will still be wet in the centre). Leave to cool completely in the tinbrownie-002 then remove by pulling the overhanging foil or parchment and cut into squares.


  10. Chocolate Guinness Cake

    February 15, 2016 by sarah


    I made this cake nearly a year ago and had forgot how good it was until I came across the photos. Then my mouth was salivating at the thought of the damp, slightly tart chocolateliness and I had to share the recipe with you. To be honest, you can’t taste the Guinness in the cake but it lends a slightly sour note to the cake which cuts through the sweetness; although I enjoy the occasional sugar rush, a balanced cake is much better to savour and enjoy in the long-term. Although the cake is only flavoured with cocoa powder (make sure it is decent stuff), it is more than enough chocolately. The slightly sweet, silky icing completements the cake perfectly and of course gives us the appearance of a frothy glass of Guinness.

    guinness


    For the cake in the photos, I made the recipe twice and to make each layer thinner, made a 23cm cake plus half a dozen cupcakes. I stuck the two halves of cake together with some plum jam and double the icing was enough for the main cake and the dozen cupcakes. Make sure to line the sides and bottom of the springform tin well to make a water-tight seal and place the pan on a baking tray when placing in the oven as the batter is very liquid and will seep out otherwise. Recipe from Nigella Lawson’s Feast.

    guinness-2

    Chocolate Guinness Cake


    For The Cake
    250ml Guinness
    250g unsalted butter
    75g cocoa powder
    400g caster sugar
    140ml sour cream
    2 large eggs (or 3 medium)
    1 tablespoon vanilla extract
    1/2 teaspoon salt
    275g plain flour
    2 and 1/2 teaspoon bicarbonate of soda

    For The Topping
    300g full-fat cream cheese
    150g icing sugar
    100ml double cream

    Preheat oven to 180°C/160°C fan. Butter and line the bottom and sides of a 23cm springform tin.

    Pour the Guinness into a large saucepan and add the butter; heat gently until the butter is melted and then whisk in the cocoa and sugar. In a jug, beat the eggs, sour cream and vanilla and then pour into the beery mixture. Whisk in the flour, bicarb and salt.

    Pour the batter into the prepared tin and bake for 45 minutes to an hour until a skewer comes out clean. Allow to cool fully in the tin.

    For the icing, beat the cream cheese until smooth then sieve over the icing sugar and beat until smooth. Add the cream while beating and continue to beat until soft and silky. Spread on the cake once COMPLETELY cold.

    guinness-3