RSS Feed

‘Home’ Category

  1. More jewellery making!

    June 5, 2016 by sarah

    I spent another enjoyable day making jewellery, this time using something called ‘silver clay’. It is silver held within a binding compound which allows you to mold, sculpt and generally mess around with it as it handles like a clay. But when fired (which can be done with a blow torch for small pieces), you are left with something which is 99% pure silver! Isn’t that brilliant!  It is much easier to pick up than traditional silver smithing techniques and I can see many applications of this to play with but I don’t think it would replace traditional techniques: it is complementary. And probably a dangerous habit considering the cost!

    feather


    I have a small amount of clay left so I am thinking of making some small charms, perhaps even a honey bee!


  2. Marshmallows

    May 31, 2016 by sarah

    I have to admit now, before we go any further, I do not like marshmallows. Except the seriously caramilised (burnt) type on the end of a stick and something to do with a camp fire – those I can take in small doses. But a raw bouncy, squidgy marshmallow just does not do it for me. They tend to be insipid in taste, overwhelmingly sugary and have the texture of a gymnastics mat. I even bought some expensive hand-made ones from La Pâtisserie de Rêves the last time I was in London – they were disgusting AND expensive! Not very promising for a weekend treat, I hear you cry! Well after having made them, my way, I may be converted… just a little. And they look very pretty!

    marshmallow-2


    Feel free to use whatever freeze dried fruit you can find. Most supermarkets sell some now but I get mine online from Healthy Supplies as they have a fabulous selection at good prices. I have been disappointed with the flavour of freeze-dried fruit in chocolate ganaches – it tastes kind of ‘green’ and not at all like the fruit it is supposed to. So these marshmallows are a good use of the freeze-dried fruit as the flavour is actually intensified in them.

    marshmallow-4

    Raspberry Marshmallows

    Makes lots (about 30 portions), takes about 30 minutes.

    Handful of freeze-dried raspberries
    3 tablespoons of freeze-dried raspberry powder
    2 tablespoons icing sugar
    2 tablespoons cornflour
    8 gelatine leaves
    450g granulated sugar
    1 tablespoon glucose syrup
    3 large egg whites (about 120g)

    – Line the base a sides of a large roasting tin (about 20x30cm, but it doesn’t matter too much) with non-stick baking parchment.
    – In a small bowl, mix one tablespoon of the raspberry powder with the icing sugar and corn flour. Sieve half of this mixture into the base of the lined tin so it is evenly covered.
    – In another small bowl, sit the gelatine leaves in COLD water.
    – In a heavy based pan on a medium heat, heat the granulated sugar, glucose syrup and 150ml water, stirring until it is all dissolved. Bring this sugar syrup to the boil, do not stir any more and continue to boil until it reaches 116°C.
    – While the sugar is doing it thing, in a stand mixer, whisk the egg whites until they form soft peaks.
    – Once the sugar syrup reaches the correct temperature, take it off the heat and leave it to sit for a couple of minutes.
    – Remove the gelatine leaves from the water, squeeze out as much water as possible and pat dry with kitchen paper. Add the gelatine to the sugar and stir until melted.
    – With the mixer on slow, trickle the sugar syrup over the beaten egg whites (try to miss the whisk otherwise it gets messy). Once it is all added, turn the mixer up to high and beat until the marshmallow is thick, light and cool to touch.
    – Add the rest of the raspberry power and whole raspberries.
    – Pour this into the prepared tin, tapping it flat, and leave to set overnight.
    – Cover a chopping board with non-stick parchment and sieve over the remaining powdered raspberry/icing sugar/cornflour mix. Turn the tray of marshmallow out on to this and cut into desired sizes, rolling in the dust as you go along.

    marshmallow-5 marshmallow-3 marshmallow


  3. A jewellery making weekend

    May 17, 2016 by sarah

    I was wondering at the weekend, while on a silver jewellery course, do I need another craft or hobby? The answer should probably be no but I can’t stop making things! I find it fascinating finding out about new crafts to do and make, especially if they have an ancient basis. I have long wanted to do some jewellery making; I dabbled in beading to make my jewellery for my wedding. But I wanted to learn how to do it properly. So I spent this past weekend on a silver jewellery making course with Stephen O’Keeffe at Missenden Abbey. I can highly recommend this course and the sketching with water colours I did last year; in fact, probably any of their courses would be great fun to do and I circled at least half a dozen in the brochure. The sad thing is I have just received an email saying that they are closing down and this is the last year they are running courses. Very sad, but then they are not advertising properly or to the right people.

    jewellery


    This is the silver bracelet that I spent most of the weekend making. Can you believe it is made only from silver wire? To make this the wire had to be soldered into rings, linking them together as I went along, and then they were shaped on molds (different sized bolts) – this was the most delicate bit and I snapped a couple of the hearts when trying to get a nice sharp shape. Finally I made the toggle catch – it looks like a ships anchor! Actually the mini heart earrings I made to go with it are even harder to make and fiddly – I nearly melted them while joining on the backs!

    jewellery-2


    Our first project was a ring which is actually surprisingly easy to make but with my thin fingers, the ring had not been hammered to proper thickness and pattern all the way round before it was already too big. So the kink was put in which actually means it sits better on my finger. I don’t think I could be a hand model though!

    jewellery-6 jewellery-7


  4. Madeleines – a better recipe!

    May 10, 2016 by sarah

    Almost exactly a year ago, I made madeleines for the first time, inspired by our trip to Paris. After the initial enthusiasm of a new pretty cake, I realised they were actually quite dry and boring! My excitement of a new cake tin and a recipe that is supposedly hard and picky turning out right the first time clouded my judgement of what a madeleine should really be like; a moist morsel.

    madeleines


    My interest was stimulated again at Christmas time when reading about the uses of invert sugar, initially in chocolate making and that lead on to reading about its use in baking and how this may be secret to moist madeleines. Before you start worrying about artificial additives in my cooking, invert sugar is chemically similar to honey (you could substitute honey in many recipes) and is simply made by boiling regular sugar in the presence of acid, for which I used cream of tartar. Invert sugar has many uses in recipes; to control crystallisation, improves keeping properties and keeps products moist. It even intensifies flavour and aroma! If you want to read more about it and make some for yourself then visit Chef Eddy’s website, a mine of information on pastry and confectionery making.

    madeleines-2


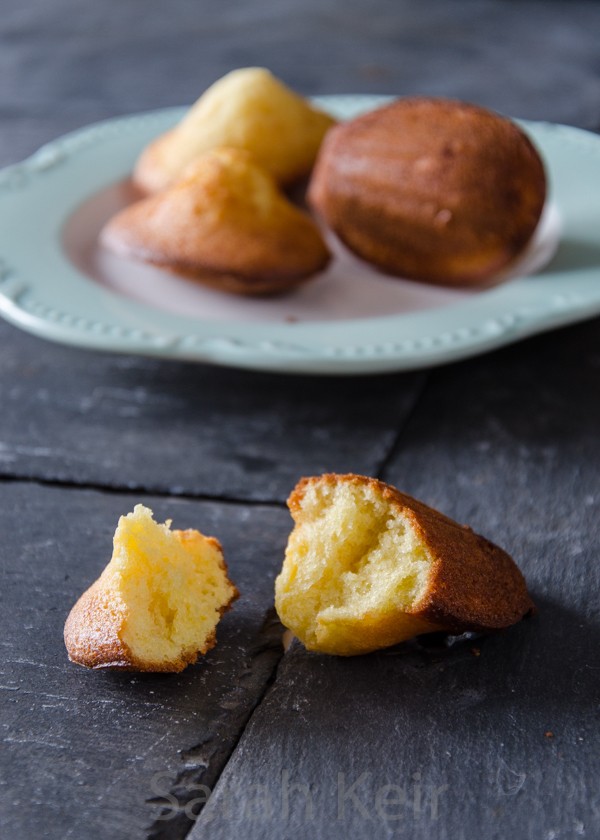
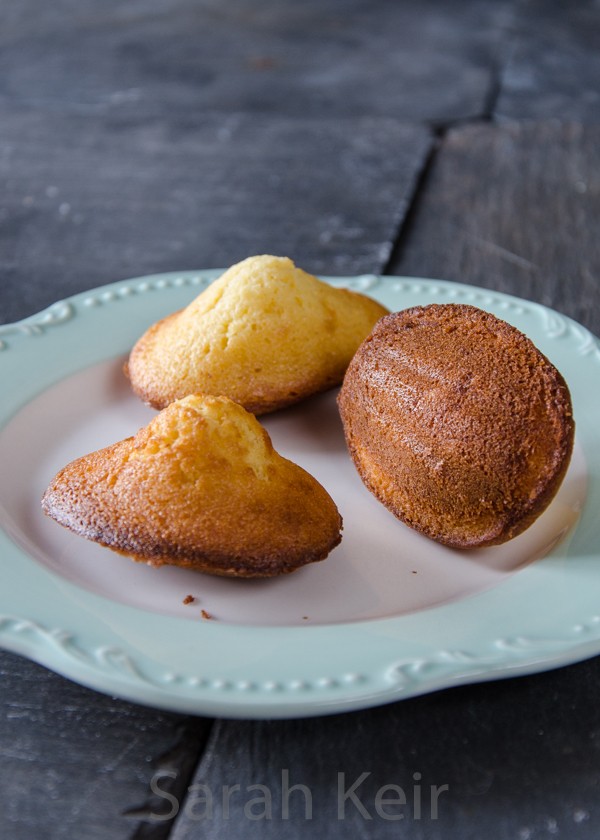
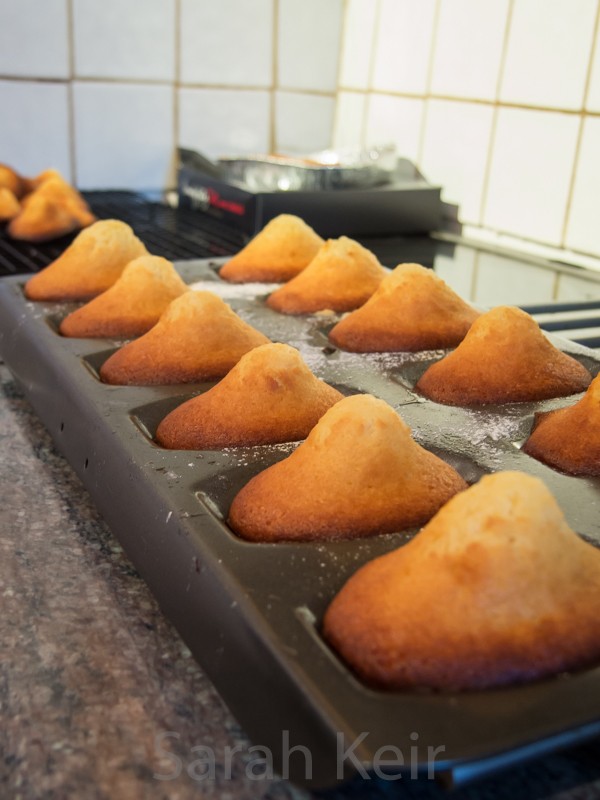
    The test of a good madeleine is a good dome and a crispy shell with a soft buttery inside. This recipe cracked that and was much easier than my previous attempt where I was freezing molds and juggling batter between fridge and tin! See what you think and let me know!

    madeleines-3

    Orange and White Chocolate Madeleines

    Makes about 48, keep a couple of days.

    50g caster sugar
    zest of 2 oranges
    1/2 teaspoon orange extract
    40g invert sugar
    3 medium whole eggs (150g)
    60g cream 35% (whipping cream)
    200g plain flour
    1 teaspoon (6g) baking powder
    100g butter
    60g neutral vegetable oil
    85g white chocolate

    1. Combine the sugars and orange zest with extract; whisk in the eggs and cream.

    2. Combine the butter, oil and chocolate and heat over a very gentle heat until melted and combined. Add to the sugar mix and then sift over the flour and baking powder and fold in.

    3. Leave the batter to rest, ideally overnight. Scrape into a piping bag.

    4. Preat the oven to 200ºC/ 180ºC fan. Grease the madeleine tray with butter then pipe in a teaspoon sized amount of batter. Bake for 7-8 minutes and allow to cool in a cooling rack.

    5. Store in an airtight container; they will keep well for 3-4 days.


  5. Recipe book

    May 7, 2016 by sarah

    A couple of months ago, I received a voucher for a free photo-book and having just completed a couple of photo-books of our previous holidays, I decided to use it for something different and made a recipe book of my favourite recipes. I think it is a mixed success – it feels good to have some of my photos in print but the layout is a bit clumsy, probably from using the photo-book software in a way that it was never meant for. I’ll never be able to sell these because though it is just 26 pages and a thin cardboard cover, the company wants £18 to print more! Oh well, will just have to wait for the publishing contract to come my way…

    recipe book recipe book-2 recipe book-3 recipe book-4 recipe book-5


  6. Caramel Layer Cake

    April 16, 2016 by sarah

    Salted caramel seems to be everywhere at the moment; in cakes, ice-creams and chocolates. But it is not new; it is a rediscovered classic. And for good reason; it tastes fabulous! Salt is underused in sweet cooking but it actually enhances a lot of recipes, not just savoury ones. Just try making some melted chocolate discs topped with sea salt to see what I mean. Salt really makes the favours sing and brings out more sweetness without having to over-do the sugar. There are many types of salt which also affect how it combines with the recipe and many also have subtle flavours of their own due to trace minerals. My favourite salt is sea salt; I grind a little into dishes as I cook them and often add a burst of coarse flakes at the end. What is your favourite type of salt?

    caramel cake caramel cake-3

    Caramel Layer Cake

    250g unsalted butter, room temperature
    550g golden caster sugar
    6 large eggs, room temperature
    300g plain flour
    85g corn flour
    2 teaspoons baking powder
    1 1/2 teaspoon salt
    2 tablespoons vanilla extract or paste
    360ml mix of 50:50 cream and milk
    6 large eggs, room temperature

    To Decorate
    Swiss meringue buttercream
    caramel, homemade or tin of Carnation caramel sauce
    large pinch of salt, ideally fine sea salt
    fudge pieces

    1. Preheat the oven to 180°C/160°C fan. Grease and line three 8″/20cm round sandwich tins.

    2. Cream together the butter and sugar until light. Beat in the eggs one at a time, adding some flour if it looks like it is curdling. In a jug mix the cream/milk and vanilla and in a large bowl mix together the remaining dry ingredients. While mixing the creamed butter and sugar, alternate adding the wet ingredients and dry ingredients. Give everything one final mix by hand and then divide between the three tins.

    3. Bake the cakes on the same shelf in the oven until a toothpick comes out clean; about 30 minutes. All to cool completely in the tins.

    4. Make a batch of Swiss meringue buttercream (recipe here)(about a half batch is plenty for layering and icing this cake) and flavour with about half a tin (200g) of caramel. Pipe or spread over the cake, drizzle over some more caramel and scatter with fudge pieces.

    caramel cake-2


  7. Chocolate Brownies

    March 14, 2016 by sarah

    Passable brownie recipes are everywhere but it has taken some serious searching, testing and tasting to find a truly good brownie recipe.  These brownies embody everything I love in a brownie; they’re bittersweet and chewy, where so many brownies are excessively sweet and fudgy (or worse, the dreaded cakey and chocolaty in colour only). Do not skimp on the ingredients here; use the finest dark chocolate you can find as this give the brownies their characteristic chocolaty taste. The chopped nuts and cocoa nibs are absolutely optional so if you like your brownies without bits then just leave them out. The only obligatory part of this recipe is the stipulation that you should not add a topping to these brownies. I believe that toppings or frostings are only there to hide a second rate brownie; get that Mr Costa! But do not kid your self that without frosting these brownies would be healthy; good for your soul, yes, but not healthy. A once in a while treat.

    brownies


    Sorry for the poor photography of these brownies. I took the photos last summer when I was in the midst of madness and although I made the brownies there was no way I was going to have time to photograph them properly. But the over-exposed washed out look seems to be all the rage in food-blog-land (yes, there really is such a place). Since the madness of last year has passed I now have time to clean the house, even weekly sometimes; cook food, most nights too; indulge in some crafts, more of which I will post in this coming week; read books that have sat on the shelf for year. If asked, would I do next year again? Then, no I would not but having done it and achieved it and moved on at least I can learn not to do it again!

    brownies-2

    Chocolate brownies

    Makes 16 indulgent squares.

    115g unsalted butter, chopped
    60g dark chocolate, chopped
    200g caster sugar (golden if you have it)
    3 medium eggs at room temperature
    1/2 teaspoon vanilla extract
    50g plain flour
    1/4 teaspoon salt
    75g nuts, chopped
    25g cocoa nibs

    1. Preheat the oven to 160°C/ fan 140°C. Line an 8″/20cm square pan with foil or baking parchment, leaving overhang around the edges. Grease with butter or spray with non-stick.

    2. In a medium saucepan over a low heat, melt the butter and chocolate , stirring frequently until both are melted and smooth. Take off the heat and stir in the sugar then the eggs and vanilla extract.

    3. Sieve over the flour and salt and mix in then mix in the nuts and cocoa nibs. Scrape into the prepared pan and level off. Bake for 30 minutes until they are just set (do not test with a skewer, it will still be wet in the centre). Leave to cool completely in the tinbrownie-002 then remove by pulling the overhanging foil or parchment and cut into squares.


  8. Chocolate Guinness Cake

    February 15, 2016 by sarah

    I made this cake nearly a year ago and had forgot how good it was until I came across the photos. Then my mouth was salivating at the thought of the damp, slightly tart chocolateliness and I had to share the recipe with you. To be honest, you can’t taste the Guinness in the cake but it lends a slightly sour note to the cake which cuts through the sweetness; although I enjoy the occasional sugar rush, a balanced cake is much better to savour and enjoy in the long-term. Although the cake is only flavoured with cocoa powder (make sure it is decent stuff), it is more than enough chocolately. The slightly sweet, silky icing completements the cake perfectly and of course gives us the appearance of a frothy glass of Guinness.

    guinness


    For the cake in the photos, I made the recipe twice and to make each layer thinner, made a 23cm cake plus half a dozen cupcakes. I stuck the two halves of cake together with some plum jam and double the icing was enough for the main cake and the dozen cupcakes. Make sure to line the sides and bottom of the springform tin well to make a water-tight seal and place the pan on a baking tray when placing in the oven as the batter is very liquid and will seep out otherwise. Recipe from Nigella Lawson’s Feast.

    guinness-2

    Chocolate Guinness Cake


    For The Cake
    250ml Guinness
    250g unsalted butter
    75g cocoa powder
    400g caster sugar
    140ml sour cream
    2 large eggs (or 3 medium)
    1 tablespoon vanilla extract
    1/2 teaspoon salt
    275g plain flour
    2 and 1/2 teaspoon bicarbonate of soda

    For The Topping
    300g full-fat cream cheese
    150g icing sugar
    100ml double cream

    Preheat oven to 180°C/160°C fan. Butter and line the bottom and sides of a 23cm springform tin.

    Pour the Guinness into a large saucepan and add the butter; heat gently until the butter is melted and then whisk in the cocoa and sugar. In a jug, beat the eggs, sour cream and vanilla and then pour into the beery mixture. Whisk in the flour, bicarb and salt.

    Pour the batter into the prepared tin and bake for 45 minutes to an hour until a skewer comes out clean. Allow to cool fully in the tin.

    For the icing, beat the cream cheese until smooth then sieve over the icing sugar and beat until smooth. Add the cream while beating and continue to beat until soft and silky. Spread on the cake once COMPLETELY cold.

    guinness-3


  9. Christmas Pudding Slice

    February 7, 2016 by sarah

    At the beginning of the year I like to go through my cupboards and have a clear out. Clothes I haven’t worn all year go to the charity shop and the food cupboards are sorted too. And so I found a lonely Christmas pudding, a few months out of date; it wouldn’t last to next Christmas but neither did I feel like eating it as a pudding. This recipe is a great way of using up Christmas pudding, mincemeat or even cranberry sauce; mix up the filling how you like it! You could have pastry top and bottom or have a crumble topping like I made. Make them yours and use up your lonely cupboard ingredients!

    christmas pudding slice-2

    Christmas Pudding Slice

    For the pastry base
    175g cold butter, cubed
    250g plain flour
    1/2 teaspoon salt
    25g caster sugar
    1 egg, beaten

    For the filling
    400-500g Christmas pudding or a jar of mincemeat
    2 cooking apples, peeled and grated
    1 lemon, juice and zest

    For the crumble topping
    185g plain flour
    125g butter, cubed
    1 teaspoon baking powder
    150g caster sugar
    50g rolled oats

    Preheat the oven to 190°C/ 170°C fan.

    To make the pastry base, rub the butter into the flour and salt, stir in the caster sugar and then stir in the egg using a knife. You may need a touch of ice cold water to bring it together. Tip this crumbly mixture in the base of a tin about 20x30cm and press down to make a smooth layer.

    Bake the pastry for 10-15 minutes until just colouring.

    Mix the filling ingredients together then spread evenly over the pastry base.

    For the crumble topping, rub the butter into the flour then stir in the other ingredients. Sprinkle evenly over the filling.

    Bake for 40-45 minutes. Leave to cool in the tin and then cut into squares. Enjoy!

    christmas pudding slice


  10. Quick soda bread

    January 17, 2016 by sarah

    I love bread, but it needs to be fresh and crusty and tasty. If I had time I would make sourdough every day, but most of it would go to waste as we don’t eat that much bread. And it takes time, a serious commitment. I sadly had to consign my sourdough starter to the bin this week as it had been forgotten at the back of the fridge for too long and gone bad. When I crave bread, I either go to Waitrose and get some of the expensive French stuff or I make this bread. This goes perfectly with homemade soup so is great for these cold, snowy (at last) winter days and if knocked together in the time that the soup is cooking as there is no kneading or anything. Perfect! It is best eaten on the day it is made but you can freeze it successfully.

    soda bread-003


    Soda Bread (Paul Hollywood recipe)

    500g strong flour – I used stone ground wholemeal from Isle of Wight watermill
    1 teaspoon bicarbonate of soda
    1 teaspoon salt
    400ml buttermilk

    Heat the oven to 200°C and line a baking tray with baking parchment.

    Put all the dry ingredients into a large bowl and use a balloon whisk to mix. Stir in the buttermilk to form a sticky dough. Tip the dough out on to a lightly floured surface and shape into a rough ball.

    Place the ball of dough on to the baking tray. Using a sharp knife, mark the dough into quarters, cutting all the way to the tray. Dust with a little flour.

    Bake for 30 minutes (check sounds hollow underneath). Leave to cool on a baking rack.

    soda bread-002 soda bread-001